Cat Collector Adding a Custom Date Picker
Learning objective: By the end of this lesson, learners will be able to integrate a custom date picker into a Django form using MCDatepicker.
Integrating MCDatepicker for a custom date picker
We’re enhancing the user experience on the cat details page by incorporating the MCDatepicker, a feature-rich date picker. This tool will allow users to easily select dates through a visually appealing interface. Start by including its necessary files through their CDN links in the HTML head of the detail page. Place these links before your existing CSS to ensure styles load correctly.
In detail.html:
{% block head %}
<!-- New MCDatepicker CSS -->
<link
  href="https://cdn.jsdelivr.net/npm/mc-datepicker/dist/mc-calendar.min.css"
  rel="stylesheet"
/>
<link rel="stylesheet" href="{% static 'css/mcdp.css' %}">
<!-- MCDatepicker JS -->
<script
  src="https://cdn.jsdelivr.net/npm/mc-datepicker/dist/mc-calendar.min.js"
>
</script>
<!-- Existing CSS -->
<link rel="stylesheet" href="{% static 'css/cats/cat-detail.css' %}" />
{% endblock %}
Next, create a new CSS file specifically for styling the MCDatepicker elements:
touch main_app/static/css/mcdp.css
In this new CSS file, adjust the sizing and spacing of the MCDatepicker’s display elements to better fit the theme of your application:
.mc-display__day,
.mc-display__date,
.mc-display__month,
.mc-display__year,
.mc-select__data,
.mc-btn--danger,
.mc-btn--success,
.mc-date,
.mc-table__weekday,
.mc-picker__footer {
  font-size: 1.6rem;
  padding: .5rem;
}

.mc-display__date {
  font-size: clamp(8rem, 40vw, 11.2rem);
}

.mc-select__data--month,
.mc-select__data--month span,
.mc-select__data--year,
.mc-select__data--year span {
  width: auto;
  min-width: 8rem;
  max-width: 10rem;
}
Setting up javaScript for MCDatepicker
For JavaScript functionality, create a new directory for scripts and add a new script file:
mkdir main_app/static/js
touch main_app/static/js/cat-detail.js
Inside this new script file, initialize the MCDatepicker on the feeding date input field. Make sure the script loads after the DOM is ready by using the defer attribute:
<script defer src="{% static 'js/cat-detail.js' %}"></script>
Implement the MCDatepicker setup in the cat-detail.js:
const dateInput = document.getElementById('id_date'); // Select the date input by ID

// Create a date picker instance
const picker = MCDatepicker.create({
  el: '#id_date',
  dateFormat: 'yyyy-mm-dd', // Set the desired date format
  closeOnBlur: true, // Close picker when clicking outside
  selectedDate: new Date() // Default to today's date
});

// Open the date picker when the input is clicked
dateInput.addEventListener("click", () => {
  picker.open();
});
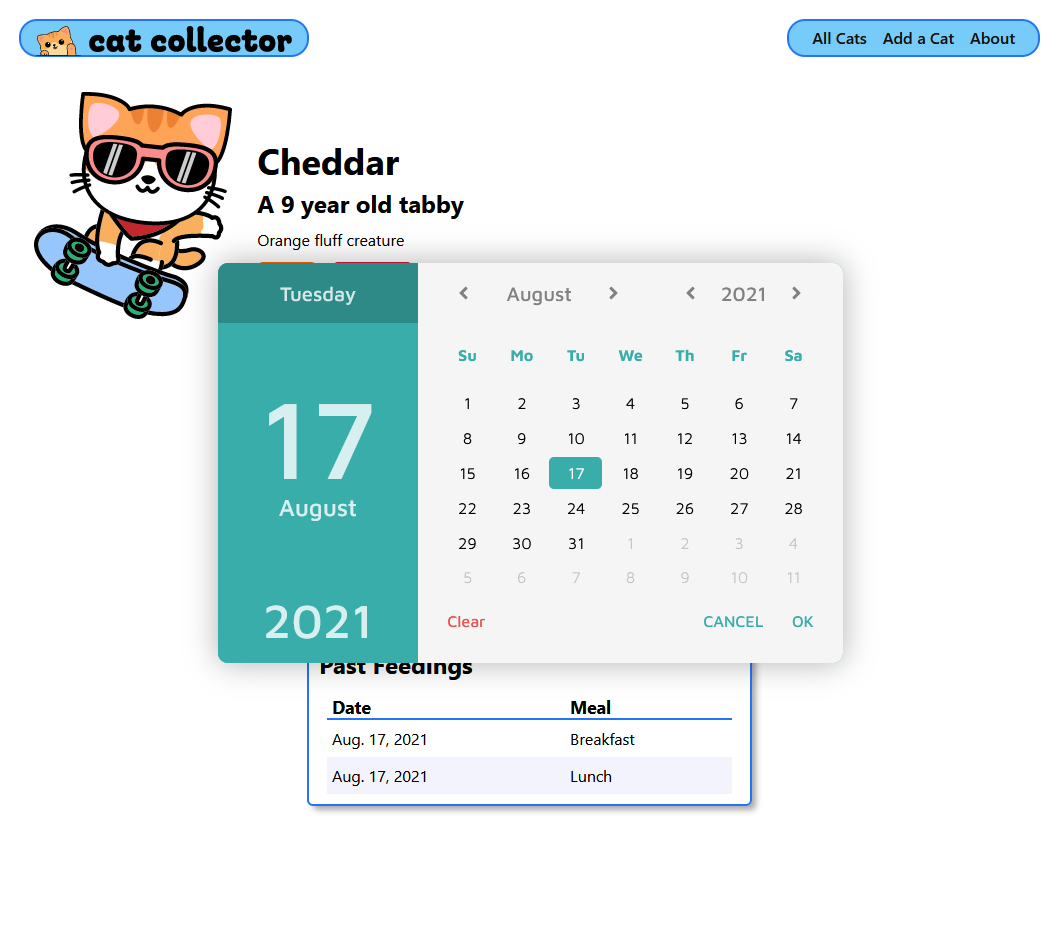
With these steps, you’ve not only improved the functionality of your application but also made the date selection process more intuitive and visually pleasing. Test the new date picker by interacting with the Feeding Date input on the cat detail page. You should see a modern, easy-to-use calendar pop up, making date selection smoother and more integrated with your site’s design.
Refresh and test it out by clicking inside of Feeding date input - you should see an awesome date-picker pop up like this: