Cat Collector Django Authentication
Learning objective: By the end of this lesson, students will be able enable authentication and authorization in a Django app.
Authentication in Django
By default, Django creates projects with authentication and authorization capabilities pre-installed!
Django’s built-in authentication functionality is provided by the 'django.contrib.auth' app included within the INSTALLED_APPS list in settings.py:
INSTALLED_APPS = [
    'main_app',
    'django.contrib.admin',
    'django.contrib.auth',         # Thank You Django!
    'django.contrib.contenttypes',
    'django.contrib.sessions',
    'django.contrib.messages',
    'django.contrib.staticfiles',
]
Django provides the common user authentication where the user signs up and logs in with a username and password.
Django relies on server-side sessions, implemented by the 'django.contrib.sessions' app, to track when a user is logged in or out.
The User Model
At the core of Django’s authentication, is the provided User Model which by default has the following attributes:
usernamepasswordemailfirst_namelast_name
Although these attributes are fine for the Cat Collector, some projects may need additional attributes such as birth_date, favorite_color, etc.
Creating the User -< Cat relationship
Currently, our application treats all cats as if they don’t belong to any specific user— free-roaming cats! By the end of this lesson, we will have implemented user authentication, ensuring that each cat is linked to a specific user who “owns” them, the cat collector.
Ideally, authentication should be set up early in the development process to simplify code management. However, for educational purposes, we’re integrating it at the end of our project to highlight the changes it requires.
Update the Cat model
Adding the relationship of A User has many Cats; and a Cat belongs to a User is much the same as with creating any other one-to-many relationship.
The User Model lives in the django.contrib.auth app, so the first thing we need to do is import it into models.py:
from django.db import models
from django.urls import reverse
from datetime import date
# Import the User
from django.contrib.auth.models import User
One of the Models needs a Foreign Key - User or Cat… Which one makes sense?
Since the Cat Model belongs to another entity, it’s the one to hold the Foreign Key.
Now let’s add the field linking a Cat to a User:
class Cat(models.Model):
    # Other Cat class items above
    toys = models.ManyToManyField(Toy)
    # Add the foreign key linking to a user instance
    user = models.ForeignKey(User, on_delete=models.CASCADE)
Migrate the change
Now that we’ve made a change to a Model that impacts the database, we need to migrate that change.
However, there will now be a FK constraint on cats, which means that every cat record must hold the PK of a user record and because there are existing cats, Django will prompt us with two options.
In your terminal enter the following:
python3 manage.py makemigrations
Which then presents us with this message:
You are trying to add a non-nullable field 'user' to cat without a default;
we can't do that (the database needs something to populate existing rows).
Please select a fix:
 1) Provide a one-off default now (will be set on all existing rows with a null value for this column)
 2) Quit, and let me add a default in models.py
Select an option:
Option 1) is our best option because it will allow us to enter the id of a user, which we created in an earlier lesson (the superuser).
Press 1 and [enter], which will then prompt us to enter that value:
Please enter the default value now, as valid Python
The datetime and django.utils.timezone modules are available,
so you can do e.g. timezone.now
Type 'exit' to exit this prompt
>>>
Our superuser’s id should be 1, so type 1 and press [enter].
The migration file will then be created. Let’s migrate the changes. In your terminal enter the following:
python3 manage.py migrate
Congrats, the one-to-many relationship between User and Cat has been established and all existing cats have been collected by the superuser!
Adding URLs for authentication
Excluding login, we’re going to use Django’s built-in authentication features and default settings.
Django provides several class-based views that we can use for handling logging in and logging out.
However, before we can use those views, we’ll need URLs to map to them.
Lucky for us, the django.contrib.auth module contains predefined URLS that we can simply include like this in catcollector/urls.py.
Let’s do so now:
    # Other paths above
    path('admin/', admin.site.urls),
    path('', include('main_app.urls')),
    # include the built-in auth urls for the built-in views
    path('accounts/', include('django.contrib.auth.urls')),
We don’t need to import django.contrib.auth.urls because it’s just a string.
Including the built-in URLs has added the following URL patterns to the app:
accounts/login/ [name='login']
accounts/logout/ [name='logout']
accounts/password_change/ [name='password_change']
accounts/password_change/done/ [name='password_change_done']
accounts/password_reset/ [name='password_reset']
accounts/password_reset/done/ [name='password_reset_done']
accounts/reset/<uidb64>/<token>/ [name='password_reset_confirm']
accounts/reset/done/ [name='password_reset_complete']
Thankfully, not all of these are required. We are able to choose which ones to implement.
Logging in
Modifying the home.html template
We’re going to convert the existing home view function to a CBV that inherits from the LoginView class.
First import this class into main_app/views.py:
from django.contrib.auth.views import LoginView
And use it in a class based view that replaces the current home view function.
class Home(LoginView):
    template_name = 'home.html'
Don’t forget to update main_app/urls.py to use the new CBV.
path('', views.Home.as_view(), name='home'),
When LoginView renders the home.html template, it passes in the context a default form object we can display in home.html.
Add it after the existing section:
<section>
  <form action="{% url 'home' %}" method="post" class="login">
    <h1>Login</h1>
    {% csrf_token %} {{ form.as_p }}
    <input type="hidden" name="next" value="{{ next }}" />
    <button type="submit" class="btn submit">Login</button>
  </form>
</section>

{% endblock %}
One interesting feature in the above code is the following input:
<input type="hidden" name="next" value="{{ next }}" />
This is a feature of Django’s authentication that will automatically redirect a user that tries to access a protected route back to that route after they log in!
Here’s our new home page!
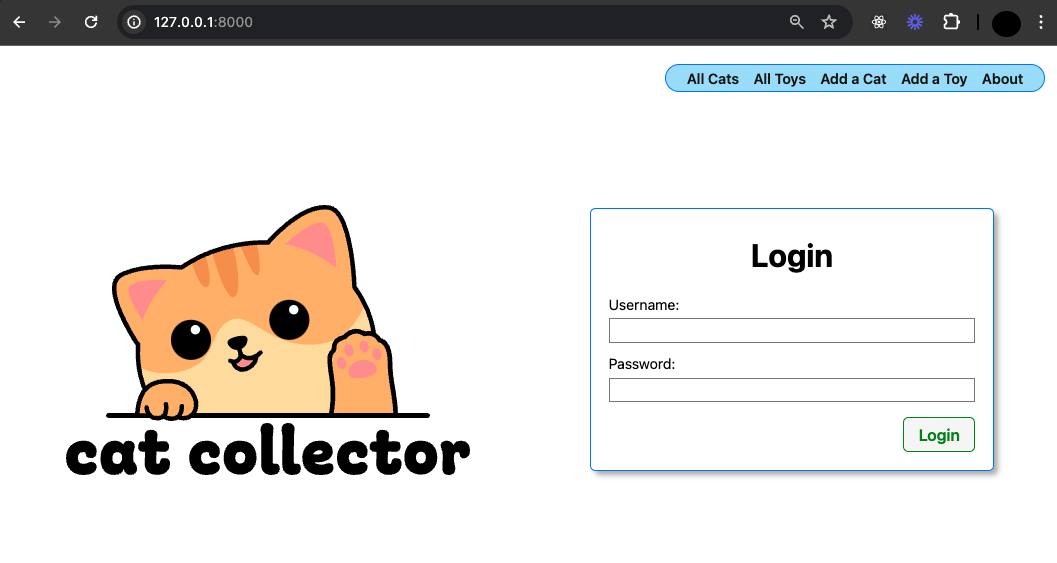
You can log in now, but you’ll get an error because by default, the login view redirects to /accounts/profile, but we can change this…
Specifying the default redirect after logging in
In Cat Collector, when a user logs in, we want them to see their cat index page.
The most straight forward way to make this happen is to add a new variable at the bottom of settings.py:
STATIC_URL = 'static/'

# Add this variable to specify where successful logins should redirect to
LOGIN_REDIRECT_URL = 'cat-index'
The django.contrib.auth app uses that value of the LOGIN_REDIRECT_URL variable, if it exists, to redirect to after the user logs in.
Test it out!
Updating the nav bar dynamically
In most applications, many of the links displayed in a nav bar usually depend upon whether there is a logged in user or not.
In Cat Collector, if there’s no user logged in, all we want is to show the following links:
- About
- Sign Up
- Log In
Then, when there is a logged in user, we want to see:
- About
- Add a Toy
- View All Toys
- Add a Cat
- View All My Cats
- Log Out
Thanks again to the built-in auth, we automatically have a user variable available in every template!
To check if the user is logged in, we simply use user.is_authenticated, which returns True when logged in and False otherwise.
With this knowledge, let’s make the nav bar dynamic in base.html:
<nav>
  <ul>
    {% if user.is_authenticated %}
      <li><a href="{% url 'cat-index' %}">All Cats</a></li>
      <li><a href="{% url 'toy-index' %}">All Toys</a></li>
      <li><a href="{% url 'cat-create' %}">Add a Cat</a></li>
      <li><a href="{% url 'toy-create' %}">Add a Toy</a></li>
      <li><a href="{% url 'about' %}">About</a></li>
    {% else %}
      <li><a href="{% url 'about' %}">About</a></li>
      <li><a href="{% url 'home' %}">Login</a></li>
    {% endif %}
  </ul>
</nav>
Note how the Log In link uses the url template tag along with the built-in named URL patterns (listed above).
However, we’re skipping the Sign Up and Log Out links for now, because Django requires a bit of extra configuration for these actions.
Now we should see the following nav if not logged in:

When you log in, you’ll see this nav:

Nice!
We also want to prevent the login form from being shown when there is a user logged in. A simple if template tag in home.html will accomplish this:
{% if not user.is_authenticated %}
  <section>
    <form action="{% url 'home' %}" method="post" class="login">
      <h1>Login</h1>
      {% csrf_token %} {{ form.as_p }}
      <input type="hidden" name="next" value="{{ next }}" />
      <button type="submit" class="btn submit">Login</button>
    </form>
  </section>
{% endif %}
Logging out
Django’s authentication framework provides built-in support for logging out, but recent security practices require that logout actions be submitted via a POST request instead of a GET request. This means we can’t use a simple link to log out; instead, we need a form.
First, we need to integrate a logout form into your existing navbar. Here’s how to place the form in the navbar using an <li> element:
  <li><a href="{% url 'cat-index' %}">All Cats</a></li>
  <li><a href="{% url 'toy-index' %}">All Toys</a></li>
  <li><a href="{% url 'cat-create' %}">Add a Cat</a></li>
  <li><a href="{% url 'toy-create' %}">Add a Toy</a></li>
  <li><a href="{% url 'about' %}">About</a></li>
  <li>
    <form id="logout-form" method="post" action="{% url 'logout' %}">
      {% csrf_token %}
      <button type="submit">Log out</button>
    </form>
  </li>
{% else %}
  <li><a href="{% url 'about' %}">About</a></li>
  <li><a href="{% url 'home' %}">Login</a></li>
Check it out:

Style the form button
The new form button kinda ruins the aesthetic, but with a bit of styling, we can make these links appear uniform!
Add the following at the bottom of base.css:
#logout-form button {
  text-decoration: none;
  color: var(--text-color);
  font-weight: 600;
  font-size: 16px;
  background: none;
  border: none;
  cursor: pointer;
  padding: 0;
  font-family: inherit;
}

#logout-form button:hover {
  color: var(--link-hover-color);
}
These styles remove default button styling and make the logout button look like a part of the navigation links. Much better!

Redirect after logging out
Finally, specify a redirection path for after users log out. By default, Django redirects to http://127.0.0.1:8000/admin/logout/ for the admin, but you can customize this for all users in settings.py:
STATIC_URL = 'static/'

LOGIN_REDIRECT_URL = 'cat-index'

# Add this variable to specify where logging out redirects to
LOGOUT_REDIRECT_URL = 'home'
Logout is complete!
Update the CatCreate view to assign a new cat to the logged in user
Since cats belong to a user, before a new cat can be added to the database, its “owner” is going to have to be assigned to the user attribute we added to the model earlier.
To do this, we’re going to have to add some additional code to the CatCreate view as follows:
class CatCreate(CreateView):
    model = Cat
    fields = ['name', 'breed', 'description', 'age']

    # This inherited method is called when a
    # valid cat form is being submitted
    def form_valid(self, form):
        # Assign the logged in user (self.request.user)
        form.instance.user = self.request.user  # form.instance is the cat
        # Let the CreateView do its job as usual
        return super().form_valid(form)
We’re overriding the CreateView’s form_valid method to assign the logged in user, self.request.user. Yes, the built-in auth automatically assigns the user to the request object similarly our middleware in Express.
In Python, methods inherited by the superclass can be invoked by prefacing the method name with super(). Accordingly, after updating the form to include the user, we’re calling super().form_valid(form) to let the CreateView do its usual job of creating the model in the database and redirecting.
Okay, let’s test the refactor by:
- Navigating to the
/adminroute in a separate tab in your browser - Click on Cats
- Select a cat and verify the user is assigned to it
- Leave the admin app open, and add a new cat from the “Add a Cat” page
- Back in the admin app, view all cats, select the cat you just added, and verify that the user’s been assigned
Nice work!
Signing up new users
Unfortunately, Django’s built-in auth does not provide a URL or view for signing up new users. We will add this custom functionality ourselves.
Add a URL
First we’ll add the last URL pattern to this application, which will implement the sign up functionality in main_app/urls.py:
path('accounts/signup/', views.signup, name='signup'),
To stay consistent with Django’s auth-related URLs, we’ll preface the pattern with accounts/.
There’s no generic view available for this function, so we’re going to write a new view function named signup.
Add the signup view function
The signup view function will be the first view we’ve coded that performs two different behaviors based upon whether it was called via a GET or POST request:
- If it’s a GET request: The view function should render a template with a form for the user to enter their info.
- If it’s a POST request: The user has submitted their info and the function should create the user and redirect.
Although Django does not include a default URL or view, it does include a UserCreationForm that we can use in a template to generate all of the form inputs for a User model.
In addition, we’re also going to use the login function to automatically log in a user when they sign up - users hate signing up and then having to turn around and log in!
Let’s import these methods near the top of views.py:
# Other imports above
from django.views.generic import ListView, DetailView
# Add the two imports below
from django.contrib.auth import login
from django.contrib.auth.forms import UserCreationForm
# Other code below
Now let’s create the signup view function:
def signup(request):
    error_message = ''
    if request.method == 'POST':
        # This is how to create a 'user' form object
        # that includes the data from the browser
        form = UserCreationForm(request.POST)
        if form.is_valid():
            # This will add the user to the database
            user = form.save()
            # This is how we log a user in
            login(request, user)
            return redirect('cat-index')
        else:
            error_message = 'Invalid sign up - try again'
    # A bad POST or a GET request, so render signup.html with an empty form
    form = UserCreationForm()
    context = {'form': form, 'error_message': error_message}
    return render(request, 'signup.html', context)
    # Same as:
    # return render(
    #     request,
    #     'signup.html',
    #     {'form': form, 'error_message': error_message}
    # )
When building future projects in Django you can always refer back to this function or Django’s documentation on how to implement this functionality.
Add the Sign Up link to the nav
Now that we know the URL, we can add a Sign Up link to the nav in base.html:
{% else %}
  <li><a href="{% url 'about' %}">About</a></li>
  <li><a href="{% url 'home' %}">Login</a></li>
  <li><a href="{% url 'signup' %}">Sign Up</a></li>
{% endif %}
Create the signup.html template
Run the following in the terminal:
touch main_app/templates/signup.html
Add the following to signup.html:
{% extends 'base.html' %}
{% load static %}
{% block head %}
<link rel="stylesheet" href="{% static 'css/form.css' %}" />
{% endblock %}
{% block content %}
<div class="page-header">
  <h1>Sign Up</h1>
  <img src="{% static 'images/nerd-cat.svg' %}" alt="A cat using a computer" />
</div>
{% if error_message %}
  <p class="red-text">{{ error_message }}</p>
{% endif %}
<form action="" method="post" class="form-container" autocomplete="off">
  {% csrf_token %}
  <table>
    {{ form.as_table }}
  </table>
  <button type="submit" class="btn submit">Submit!</button>
</form>

{% endblock %}
With the above template, clicking the Sign Up in the nav should render the following UI:
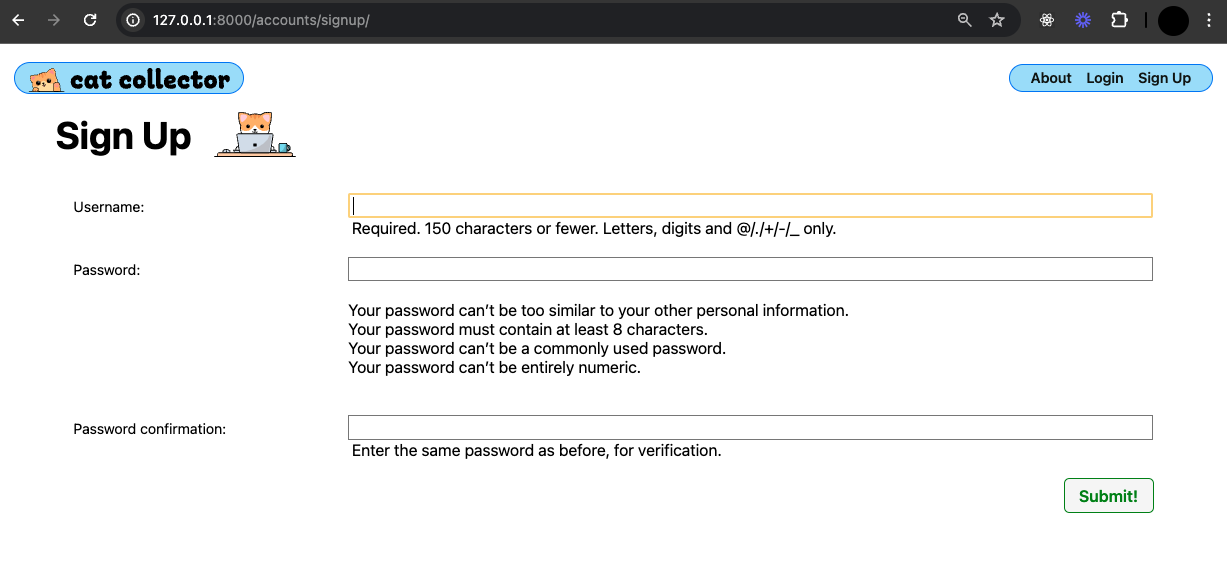
By using the the UserCreationForm, you get helpful messages with all of the validations.
However, notice that the form does not include inputs for the user’s:
emailfirst_namelast_name
To include these, you’ll have to create your own ModelForm based upon the User Model.
If you want to remove some of the password validations, you can comment them out or remove them from the AUTH_PASSWORD_VALIDATORS list in settings.py.
You should now be able to sign up!
Displaying only the user’s cats
If you sign up or log in with a different user, you’ll notice that all of the cats in the database are still showing up on the index page.
If we take a look at the cat_index view, we’ll see why:
def cat_index(request):
    # This reads ALL cats, not just the logged in user's cats
    cats = Cat.objects.all()
    return render(request, 'cats/index.html', { 'cats': cats })
To display just the logged in user’s cats, we just need to change the query to this:
def cat_index(request):
    cats = Cat.objects.filter(user=request.user)
    # You could also retrieve the logged in user's cats like this
    # cats = request.user.cat_set.all()
    return render(request, 'cats/index.html', { 'cats': cats })
Last step, coming up!
Implement Authorization
Now that authentication has been implemented, the last step is to protect the routes that are dependent upon a user being logged in.
Yes, the dynamic nav bar helps prevent access, but users can still type something like http://127.0.0.1:8000/cats in the address bar when nobody is logged in, which will raise an error.
Django provides an easy way to protect both function and class-based views.
Implement Authorization on view functions
To protect view functions, we will use the login_required decorator.
First we need to import it near the top of views.py:
# Other imports above
from django.contrib.auth.forms import UserCreationForm
# Import the login_required decorator
from django.contrib.auth.decorators import login_required
Now we can simply “decorate” any view function that requires a user to be logged in like this:
@login_required
def cat_index(request):
    # cat_index function code here
Trying to browse to http://127.0.0.1:8000/cats while logged out - it throws an error!
To complete this, we need to tell Django where we want these decorators and mixins to redirect to. We just need to add a LOGIN_URL to our settings.py file and have it redirect to the 'home' URL:
STATIC_URL = '/static/'

# Add this variable to specify where decorators and mixins should redirect to
LOGIN_URL = 'home'

LOGIN_REDIRECT_URL = 'cat-index'

LOGOUT_REDIRECT_URL = 'home'
You’ll now be navigated to the login page if you try to navigate to a protected URL without signing in.
Be sure to add the @login_required to these remaining view functions:
cat_detailadd_feedingassociate_toyremove_toy
Implement Authorization on class-based views
Protecting class-based views is slightly different, it uses what’s called a mixin, which is another class to inherit from - in OOP, we call this multiple inheritance.
As usual, we’ll need to import it:
# Other imports above
from django.contrib.auth.decorators import login_required
# Import the mixin for class-based views
from django.contrib.auth.mixins import LoginRequiredMixin
Finally, we can protect class-based views like this:
class CatCreate(LoginRequiredMixin, CreateView):
    # CatCreate class code here
Not all OOP languages support the concept of multiple inheritance, but Python does.
Be sure to add LoginRequiredMixin to these remaining classes:
CatUpdateCatDeleteToyCreateToyListToyDetailToyUpdateToyDelete
Summary
Authentication is a crucial component of most applications, as it determines user access to various features.
Understanding who is using your app is essential for delivering personalized and secure experiences. That’s why it’s best practice to implement authentication early in the development process. Typically, this should follow the initial user story for anonymous visitors:
As a Visitor, when I browse to the application, I want [insert feature here].
Congrats! You have completed Cat Collector!