Cat Collector Django Many-to-Many Relationships
Learning objective: By the end of this lesson, students will be able to create and manage a many-to-many relationship between Cats and Toys using Django’s built-in features.
Many-to-Many Relationships in Relational Databases
In relational databases like those used by Django, creating many-to-many relationships between two entities requires an intermediary or join table. This join table, unlike in document-based databases like MongoDB, is essential for managing M:M relationships in SQL databases.
The role of a join table
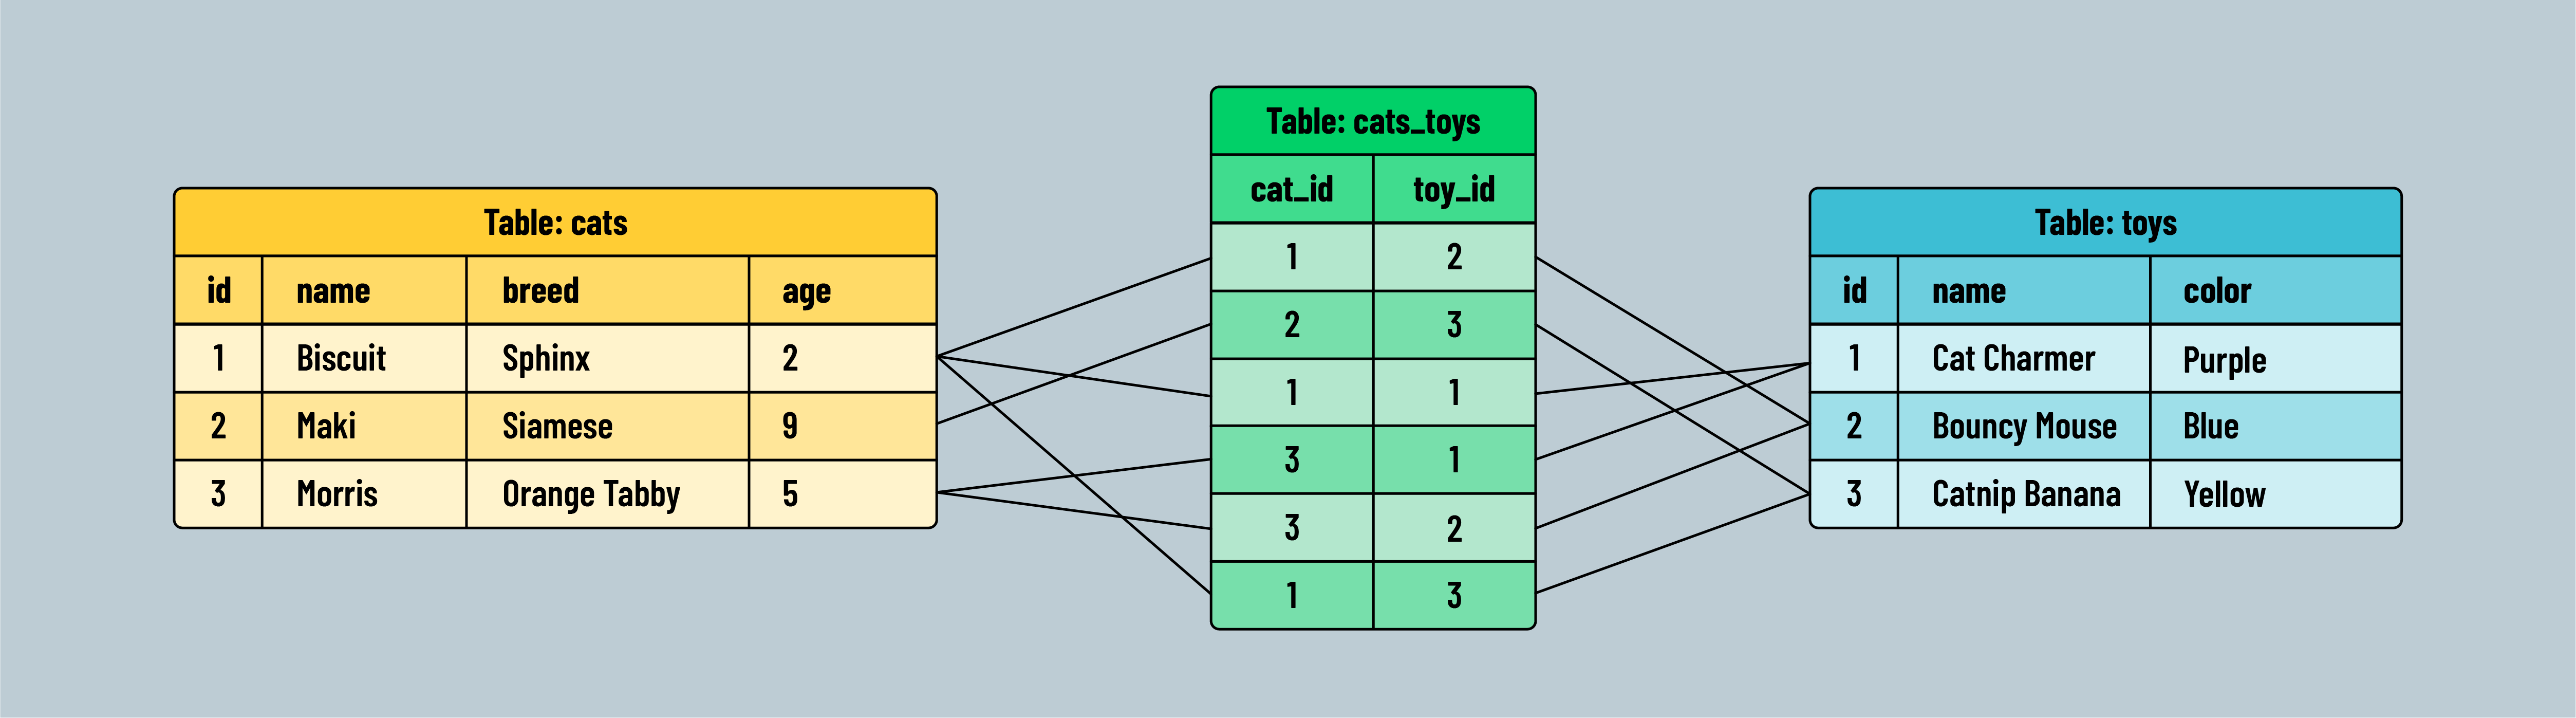
A join table acts as a bridge connecting two other tables by storing foreign keys that reference the primary keys of these tables. Each row in a join table represents a link between one entry in each of the connected tables.
For instance, if a Cat can play with many Toys, and each Toy can be used by many Cats, the join table will store pairs of foreign keys pointing to the respective entries in the Cats and Toys tables.
Associating Cats with Toys
Now that we have set up full CRUD capabilities for the Toy model, our next step is to define a many-to-many relationship between Cats and Toys. This allows multiple cats to interact with multiple toys interchangeably.
When you associate a Cat with a Toy, you add a row to the join table containing the foreign keys of the cat and toy involved. In reverse, dissociating a Cat from a Toy simply involves removing the corresponding row from the join table, without deleting any records from the Cat or Toy tables themselves.
Many-to-Many Relationship in Django
As usual, the Django framework handles a lot of the heavy lifting when it comes to working with many-to-many relationships between Models.
Forms and templates aside, all we need to do to implement a many-to-many relationship using Django is:
- Add a
ManyToManyFieldon one of the Models - Create the migration and migrate it to update the database
Django will ensure that a “hidden” join table is created that links the rows of the other two tables together.
Let’s get started!
Add a ManyToManyField on one side of the relationship
To create a M:M relationship between two models, we need to add a ManyToManyField on one of them.
When you add a ManyToManyField to one of your models, you also choose a name for the relationship. This name is used as the attribute through which you access related objects from that model.
Given that our application’s focus is on Cats, we are more likely interested in a cat’s toys, than a toy’s cats, so we’ll add the new attribute to the Cat model and name it “toys”:
class Cat(models.Model):
    name = models.CharField(max_length=100)
    breed = models.CharField(max_length=100)
    description = models.TextField(max_length=250)
    age = models.IntegerField()
    # Add the M:M relationship
    toys = models.ManyToManyField(Toy)
Tip: If you don’t have your
Toymodel above yourCatmodel inmodels.py, you’ll need to move it there now. This will correct anytoy not definedserver errors.
Make and run the migration
Because we’ve made a change to a Model that impacts the database’s schema, we need to make a migration and migrate it to update the database:
First, make the migration:
python3 manage.py makemigrations
Then migrate the created migration to update the schema:
python3 manage.py migrate
Thats it, the relationship has been made! Now when we navigate to our new cat page we automatically see an option to add a toy in the new cat form. This means the connection was successful, however it’s not the best user experience. What if we don’t want to add a toy when creating a cat?
We need to make a small change to ensure this field isn’t shown when a user is creating a cat.
Navigate to the CatCreate class in main_app/views:
Change the property:
fields = '__all__'
to the following:
fields = ['name', 'breed', 'description', 'age']
This ensures that only the listed fields are shown in the new cat form. We’ll create a separate form for adding toys to cats in a later section.
Displaying a list of all available toys
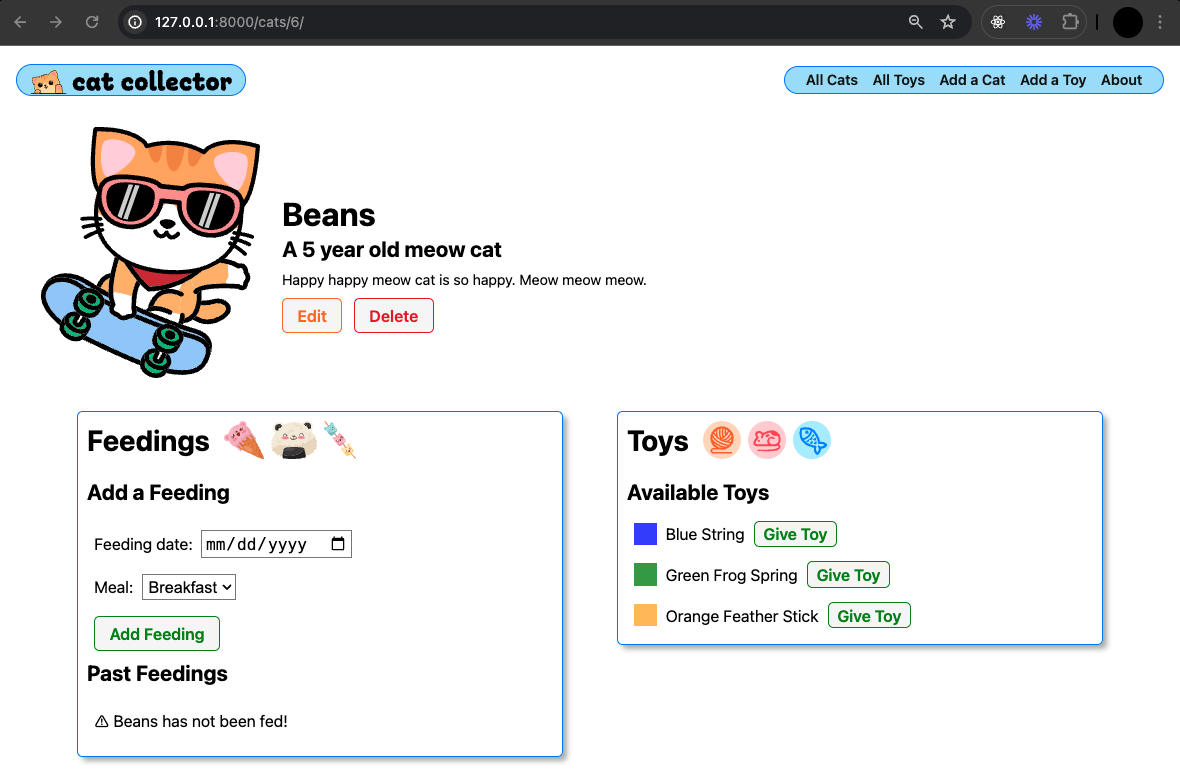
In this part of the lesson, we will display a list of all toys and provide an option to associate each toy with a cat. This will be achieved by adding an “Add” button next to each toy, which, when clicked, will link the toy to the cat.
Update the view to include toys
First, update the cat_detail view in your views.py to fetch all toys from the database and pass them to the template:
def cat_detail(request, cat_id):
    cat = Cat.objects.get(id=cat_id)
    toys = Toy.objects.all()  # Fetch all toys
    feeding_form = FeedingForm()
    return render(request, 'cats/detail.html', {
        'cat': cat,
        'feeding_form': feeding_form,
        'toys': toys  # Pass toys to the template
    })
This code ensures that all toys are available in the cats detail page template, enabling us to display them next to the cat’s details.
Modify the template to display toys
Now, let’s update the cats/detail.html template to display each toy with an “Give Toy” button that will eventually link the toy to the cat.
Add the following <section> with the class “toys”, below the existing <section> with the class “feedings”:
<section class="feedings">
  <!-- This is a long section -->
</section>

<section class="toys">
  <div class="subsection-title">
    <h2>Toys</h2>
    <img src="{% static 'images/string.svg' %}" alt="A ball of string" />
    <img src="{% static 'images/mouse.svg' %}" alt="A mouse" />
    <img src="{% static 'images/fish.svg' %}" alt="A fishy toy" />
  </div>
  <h3>Available Toys</h3>
  <div class="subsection-content">
    {% for toy in toys %}
      <div class="toy-container">
        <div class="color-block" style="background-color: {{ toy.color }}"></div>
        <p>{{ toy.color }} {{ toy.name }}</p>
        <form action="" method="post">
          {% csrf_token %}
          <button type="submit" class="btn submit">Give Toy</button>
        </form>
      </div>
    {% endfor %}
  </div>
</section>
In the code above:
-
Each toy is being programmatically rendered with its
colorandnameproperties listed. -
Each toy is also being rendered with a simple form with a “Give Toy” button, which allows users to associate or “give” a toy to a cat.
-
The form action will be linked to a URL that handles the association.
-
The
actionattribute is currently empty, as we will implement this feature next once we create thepathused to associate cats and toys.
After making these changes, your user interface will display a list of toys on the cat’s detail page, each with an option to give the toy to the cat.
Take a moment to add toys if you don’t see any listed!
Associating cats and toys
Next, we will implement the functionality to link toys to cats using the many-to-many relationship we created earlier. This involves setting up a new view function that handles the association process when a user clicks the “Give Toy” button next to a toy in the cat’s detail page.
Define the URL pattern
First, we’ll add a new URL pattern in the urls.py file. This URL will handle the association between a cat and a toy by capturing their respective ids.
To do this, the server needs to know the id of both the cat and the toy being associated:
# New URL to associate a toy with a cat
path('cats/<int:cat_id>/associate-toy/<int:toy_id>/', views.associate_toy, name='associate-toy'),
This URL pattern includes two dynamic segments cat_id and toy_id which will capture the ids from the URL and pass them to the view function.
This will cause an error with our server temporarily, because we have not created the view for this new path.
Update the form action in the template
Next, modify the form in your cat-detail.html template to use this new URL. Ensure that the form’s action attribute is set to the correct URL which will trigger the association when submitted:
<form action="{% url 'associate-toy' cat.id toy.id %}" method="post">
  {% csrf_token %}
  <button type="submit" class="btn submit">Give Toy</button>
</form>
In this form, the {% url 'assoc-toy' cat.id toy.id %} template tag dynamically generates the correct URL based on the ids of the cat and the toy. This setup ensures that each “Give Toy” button properly associates its corresponding toy with the current cat.
Note how we need to provide both
ids as space-separated parameters in the order that they were defined in the path (first the cat’s id, then the toy’s).
Create the association view function
Finally, create the view function in views.py that will execute the association between the cat and the toy using the ids passed from the form:
You can add this function anywhere in your views file:
def associate_toy(request, cat_id, toy_id):
    # Note that you can pass a toy's id instead of the whole object
    Cat.objects.get(id=cat_id).toys.add(toy_id)
    return redirect('cat-detail', cat_id=cat_id)
Now that we have our view function in place, we can test making associations from the UI by verifying the association in the admin portal. Give a cat a couple toys and head to the admin portal!
Toys associated with each cat will appear highlighted in the admin portal.
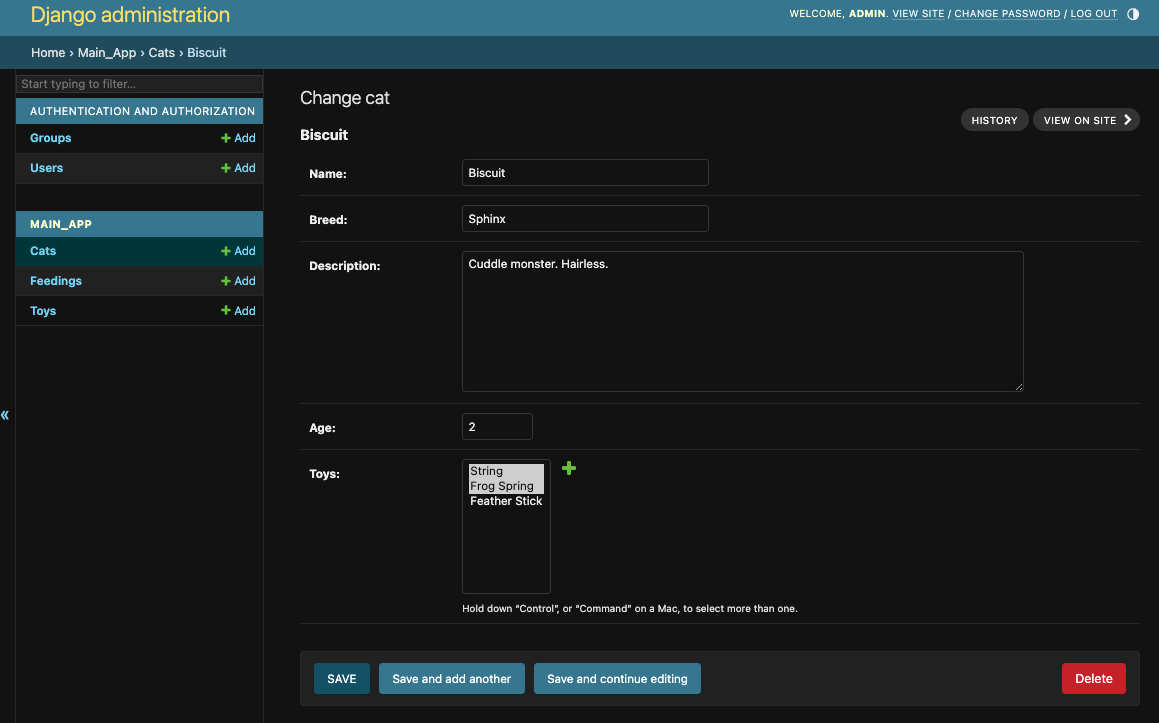
Biscuit has been given the two toys highlighted in the toy list.
Displaying a list of associated Toys
Now that we have verified we are able to make associations between cats and toys, we should display them back to the user.
Consider the following user story:
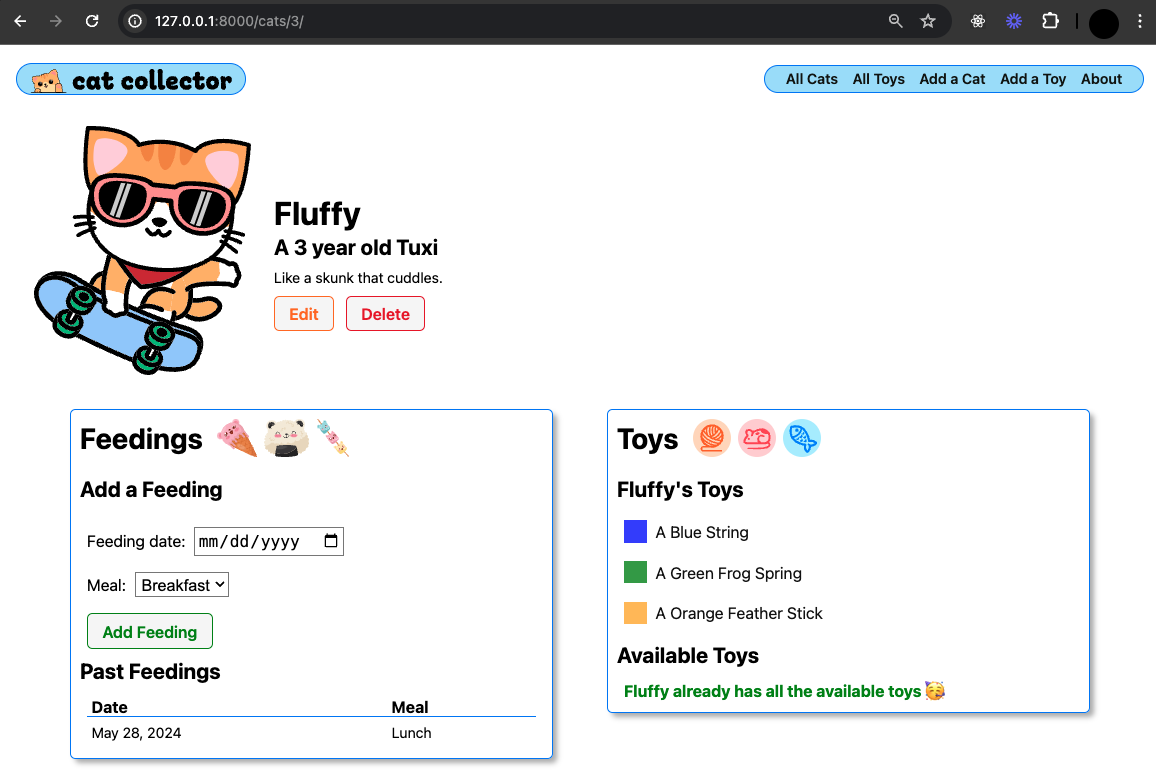
As a User, when viewing the detail page of a cat, I want to see a list of toys the cat has and be able to give more toys the cat doesn’t already have
Displaying a cat’s toys is just a matter of updating /cats/detail.html to show cat.toys.all:
<section class="toys">
  <div class="subsection-title">
    <h2>Toys</h2>
    <img src="{% static 'images/string.svg' %}" alt="A ball of string" />
    <img src="{% static 'images/mouse.svg' %}" alt="A mouse" />
    <img src="{% static 'images/fish.svg' %}" alt="A fishy toy" />
  </div>

  <!-- displaying a cat's toys -->
  <h3>{{ cat.name }}'s Toys</h3>
  <div class="subsection-content">
    {% if cat.toys.count %}
      {% for toy in cat.toys.all %}
        <div class="toy-container">
          <div class="color-block" style="background-color: {{ toy.color }}"></div>
          <a href="{% url 'toy-detail' toy.id %}">
            <p>A {{ toy.color }} {{ toy.name }}</p>
          </a>
        </div>
      {% endfor %}
    {% else %}
      <p class="no-toys">{{cat.name}} doesn't have any toys!</p>
    {% endif %}
  </div>

  <h3>Available Toys</h3>
  <div class="subsection-content">
    <!-- Available toys here -->
  </div>
</section>
In this section, the template checks whether the cat has any associated toys. If the cat has no toys, a message stating "{{cat.name}} doesn't have any toys!" is displayed. If the cat does have toys, we use a loop to list each toy that belongs to the cat.
Removing toys from the available list
As an improvement to the user experience, you might consider removing toys from the available list once they have been given to a cat. To do this we will make a slight change to the way toys are being filtered in the cat_detail view before rendering the data in the detail template.
In the cat_detail view function we will replace the code to get all toys:
toys = Toy.objects.all()
And update this function to the following:
def cat_detail(request, cat_id):
    cat = Cat.objects.get(id=cat_id)

    # Only get the toys the cat does not have
    toys_cat_doesnt_have = Toy.objects.exclude(id__in = cat.toys.all().values_list('id'))

    feeding_form = FeedingForm()
    return render(request, 'cats/detail.html', {
        'cat': cat,
        'feeding_form': feeding_form,
        'toys': toys_cat_doesnt_have  # send those toys
    })
This line of code is designed to fetch all toys that are not currently associated with that specific cat. It’s useful for displaying only those toys that the cat could still “acquire” or be associated with.
It’s a bit complex looking, so let’s break down each part:
-
The first half of this expression
Toy.objects.exclude(id__in =retrieves all Toy objects that do not have anidthat is in the list of associated toyids. Theexclude()method is the opposite offilter(), which means it will get all toys except those whoseidsare listed in the previous query. Theid__inis a field lookup that checks if theidfield of theToymodel is within the provided list. -
The second half of this expression
cat.toys.all().values_list('id')retrieves a list ofidsfor all the toys associated with a specific cat. This is done by first accessing all toy instances linked to the cat through the many-to-many relationship(cat.toys.all()), and then narrowing the data down to just theidsof these toys usingvalues_list('id').
Now we can update the “Available Toys” section in the UI to only show available toys, and a conditional message once a cat has collected all the available toys:
<h3>Available Toys</h3>
<div class="subsection-content">
  {% if toys.count %}
    {% for toy in toys.all %}
      <div class="toy-container">
        <div class="color-block" style="background-color: {{ toy.color }}"></div>
        <a href="{% url 'toy-detail' toy.id %}">
          <p>A {{ toy.color }} {{ toy.name }}</p>
        </a>
        <form action="{% url 'associate-toy' cat.id toy.id %}" method="post">
          {% csrf_token %}
          <button type="submit" class="btn submit">Give toy</button>
        </form>
      </div>
    {% endfor %}
  {% else %}
    <p class="all-toys">{{cat.name}} already has all the available toys 🥳</p>
  {% endif %}
</div>
Looking great!
🎓 You Do: Remove a Toy from a Cat
Implement the following user story:
As a User, when viewing the detail page for a cat, I want to be able to remove a toy from that cat
This process will be nearly identical to what we did when adding an association, but with the opposite action.
-
Define the URL.
path('cats/<int:cat_id>/remove-toy/<int:toy_id>/', views.remove_toy, name='remove-toy'), -
Create the view function. Hint: Check out Django’s .remove() method.
def remove_toy(request, cat_id, toy_id): # Look up the cat # Look up the toy # Remove the toy from the cat return redirect('cat-detail', cat_id=cat.id) -
Update the template. Where should this form be added?
<form action="{% url 'remove-toy' cat.id toy.id %}" method="post">
  {% csrf_token %}
  <button type="submit" class="btn btn-danger">Remove Toy</button>
</form>