Cat Collector Django Models
Learning objective: By the end of this lesson, learners will be able to understand the role of the Model layer in the Django architecture, define Models to represent database entities, and perform basic CRUD operations using these Models.
The Model Layer in the Django Architecture
This lesson focuses on the Model layer which provides Views with access to the database
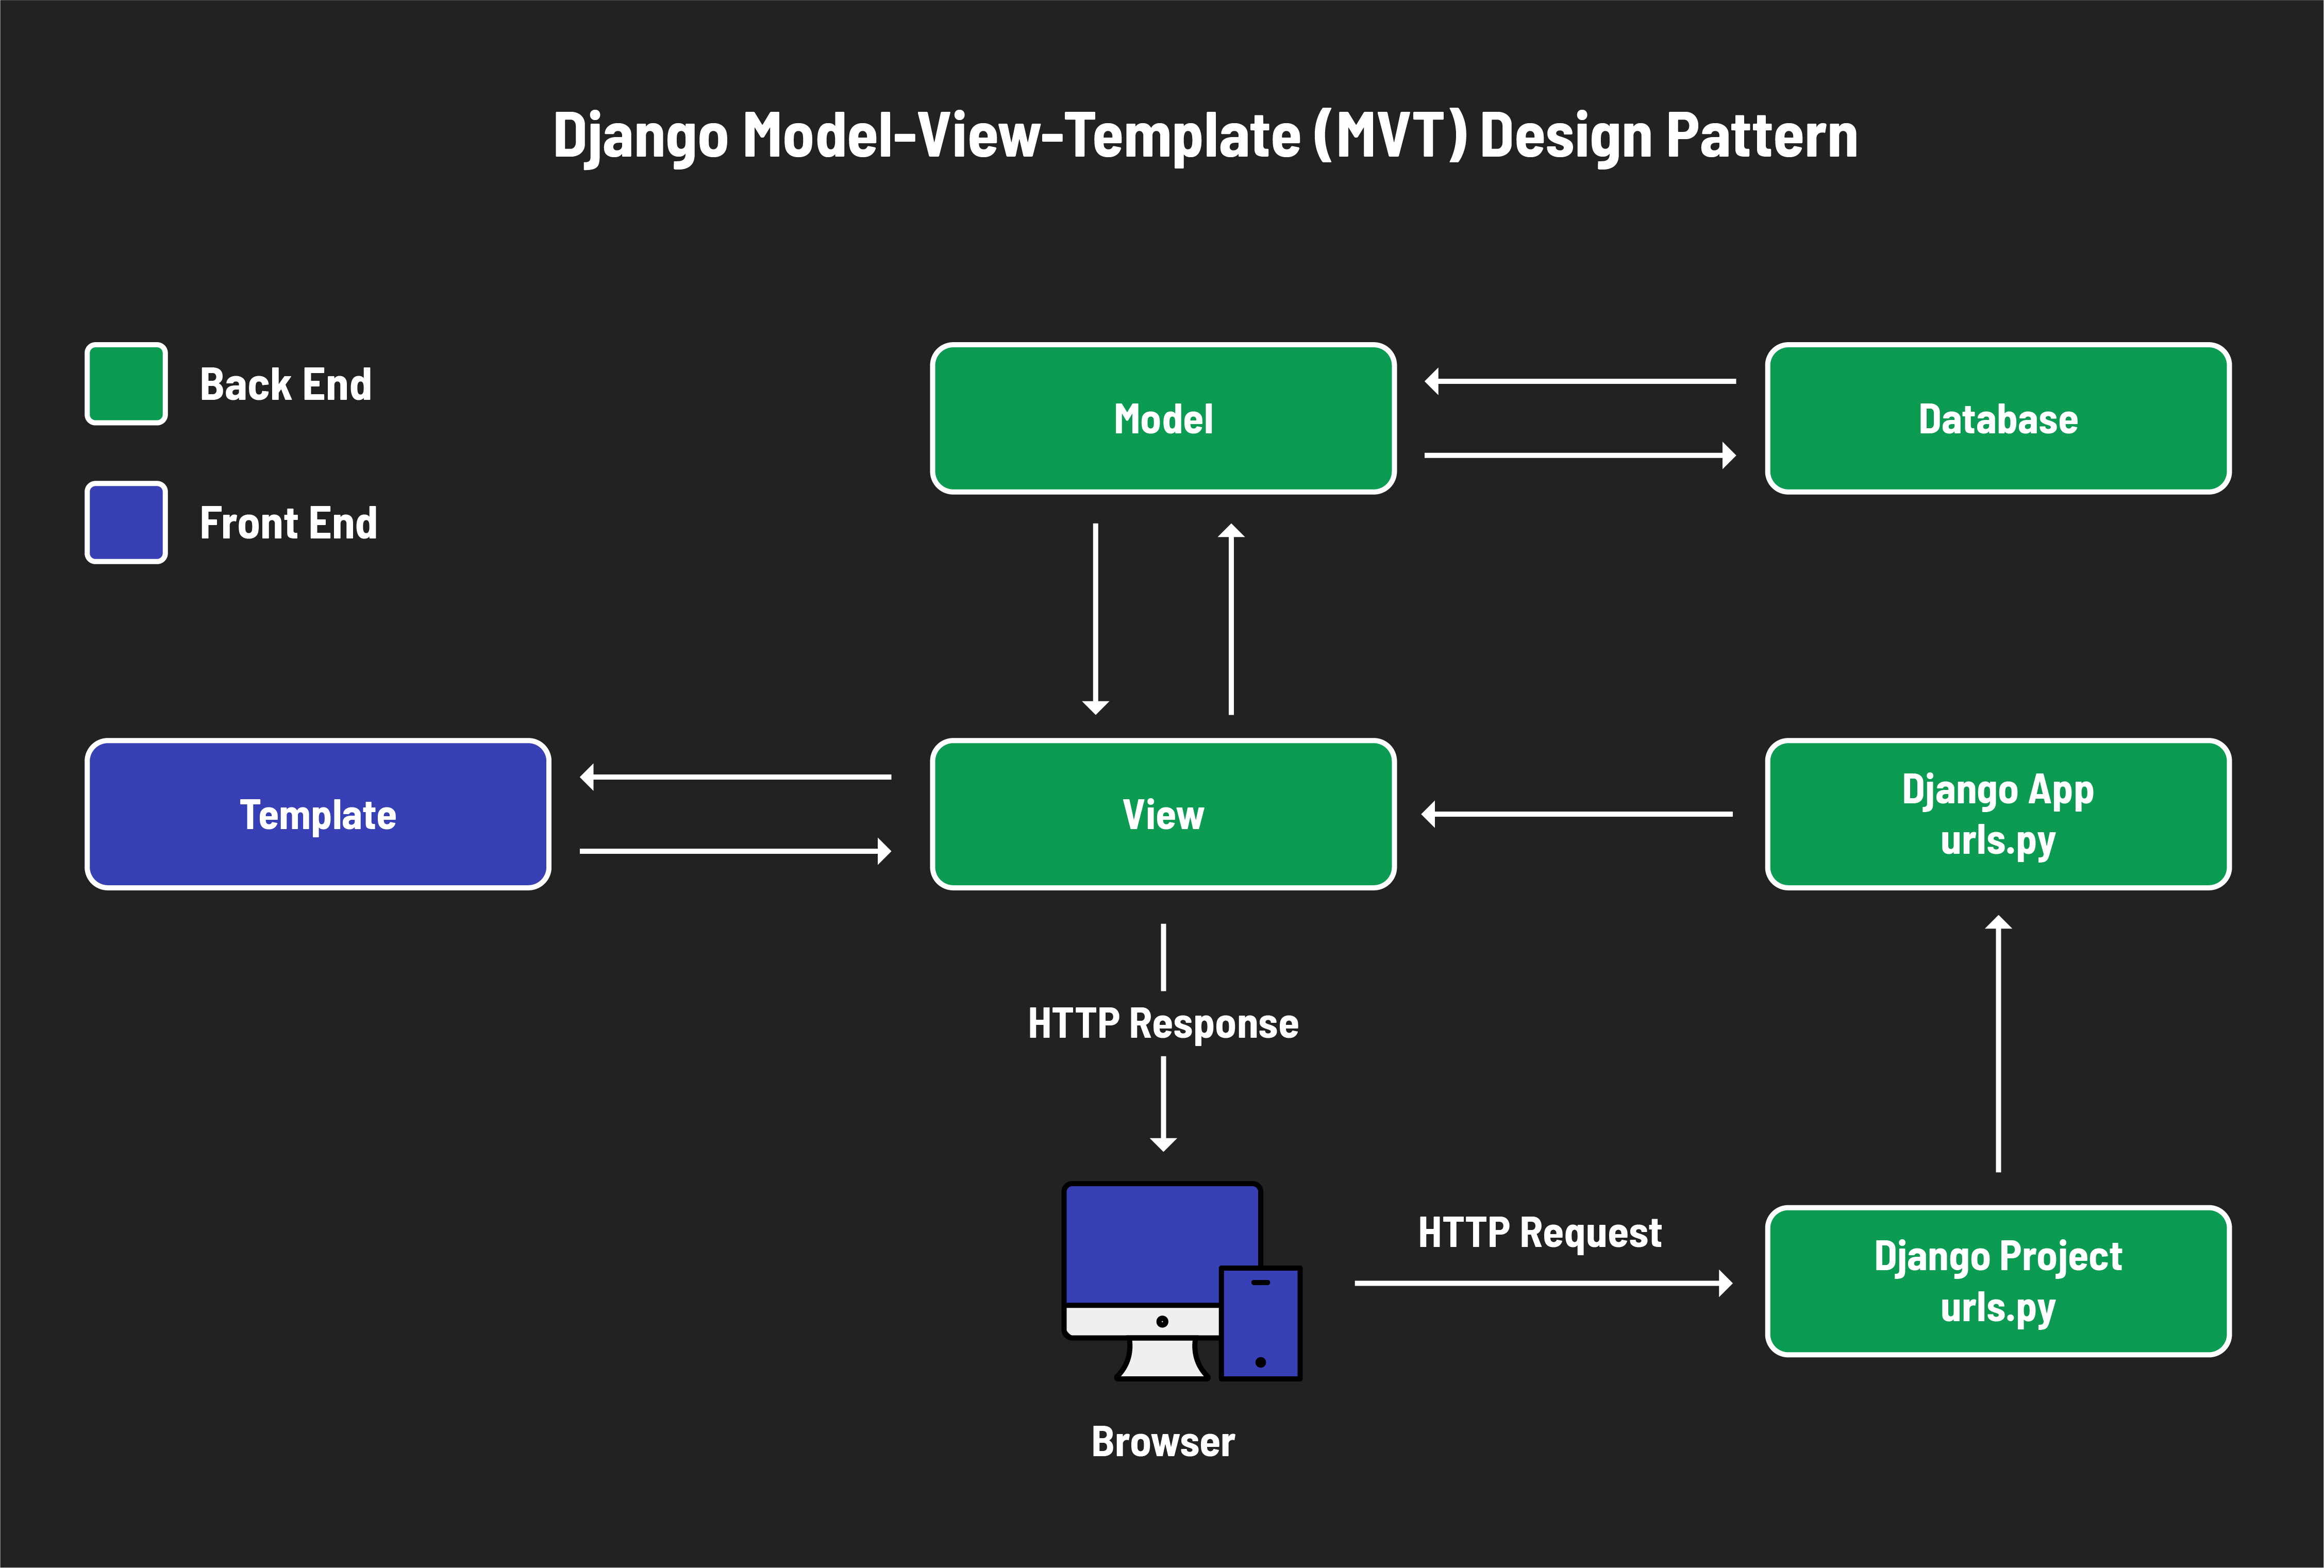
What’s a Model?
Models are used to perform CRUD data operations on a database.
Remember entities in the Entity-Relationship-Diagrams?
A Django Model represents a single entity from the ERD.
Thus, a Model has a one-to-one mapping with a table in the database and is what allows us to perform create, read, update and delete data operations on that table.
When we retrieve data from the database (using a Model), we will have model objects, each of which represents a row in a database table. Model objects are also called instances of the Model. We can work with these instances of the Model just like how we worked with Mongoose documents.
Note: Since a “model” can technically refer to the Model class or an instance of that class, we will try to use “Model” (capitalized) to refer to a Model class we use to perform CRUD with and “model” (lowercased) to refer to a model instance.
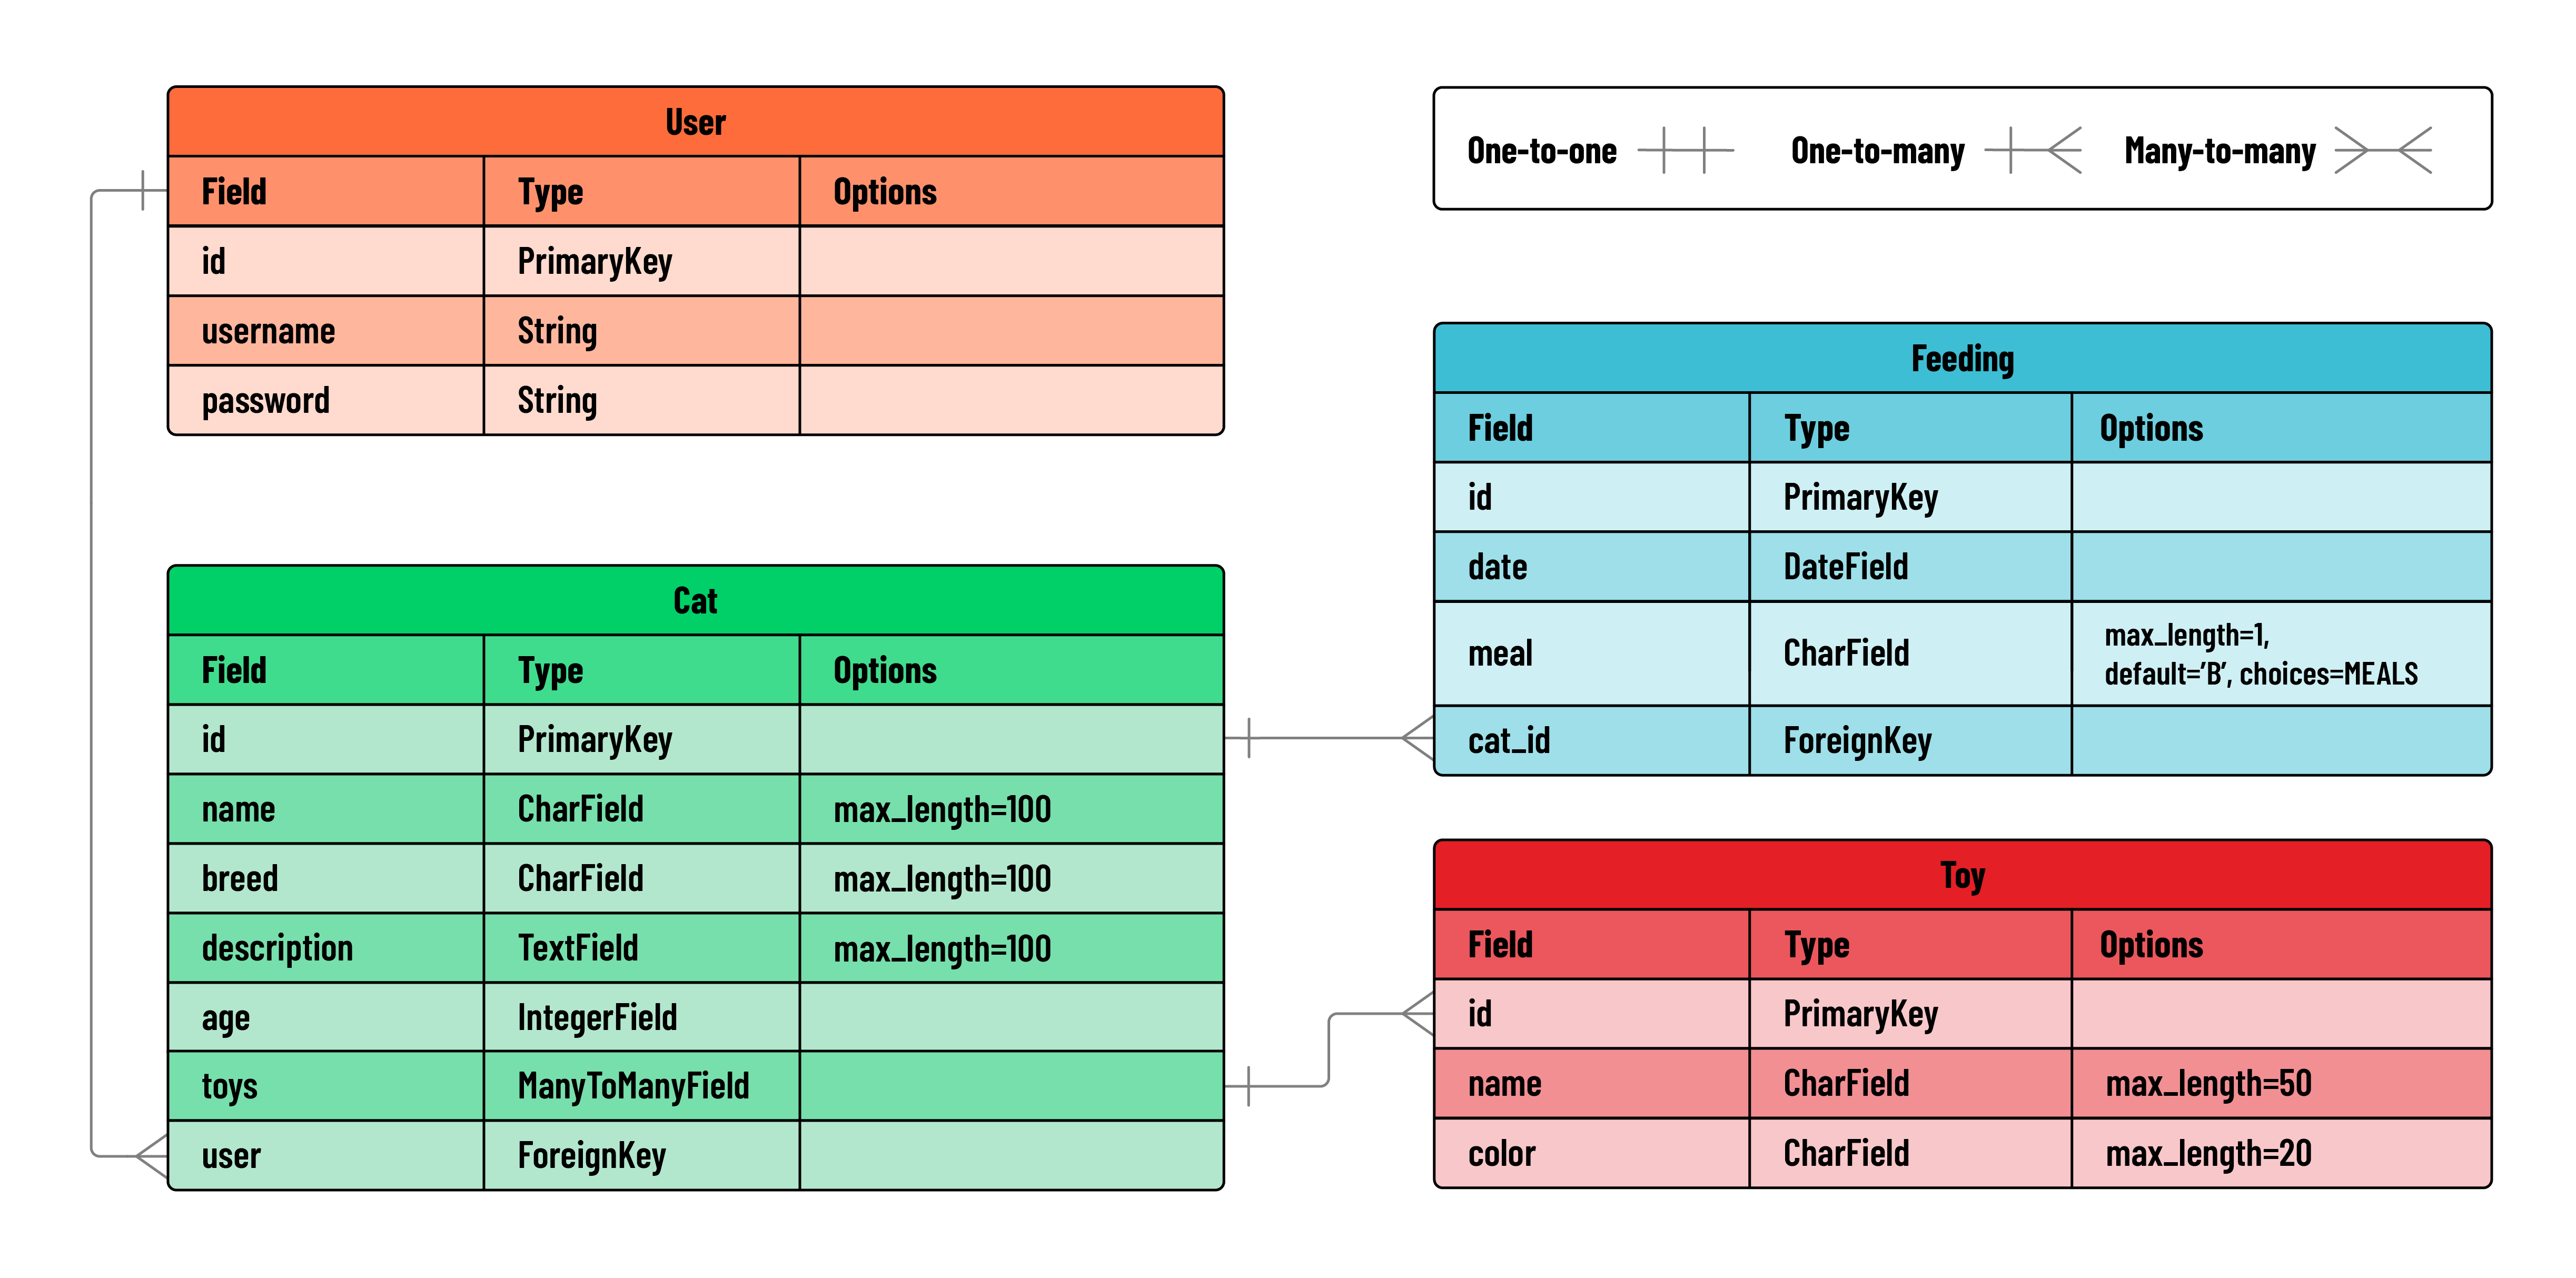
Here’s an ERD for the future state of Cat Collector:
Models in Django
Each Model is defined as a Python class that inherits from django.db.models.Model.
Here’s the Cat entity from the ERD and the code to define the equivalent Model:

Creating a Model
All of the Models for a Django app are defined in the app’s models.py file.
Let’s create a Cat model in main_app/models.py:
from django.db import models

class Cat(models.Model):
    name = models.CharField(max_length=100)
    breed = models.CharField(max_length=100)
    description = models.TextField(max_length=250)
    age = models.IntegerField()
When defining fields in a Django model, each field is represented by a specific Field class, such as
CharFieldfor character strings. You can explore all the available field types in the Django documentation on model field types, which provides a variety of options to suit different data needs.
These field types are important for several reasons:
-
Validation: Django uses the field types to apply automatic data validation in forms, ensuring that data conforms to the expected format before it’s processed or stored.
-
Form Rendering: The field type also determines the default HTML widget used in forms.
For example:
- A
CharFieldwill typically render as an<input type="text">HTML element. - A
TextFieldwill render as a<textarea>, suitable for longer text inputs.
Adding a __str__ method in Models
It’s a best practice to override the __str__ method in Models so that they will print in a more helpful way.
For the Cat model, we’ll code __str__ to return the cat’s name attribute:
class Cat(models.Model):
    name = models.CharField(max_length=100)
    breed = models.CharField(max_length=100)
    description = models.TextField(max_length=250)
    age = models.IntegerField()

    # new code below
    def __str__(self):
        return self.name
Watch your indentation here! This is a class method so it belongs in the Cat class.
Connecting to the Database
Installing the PostgreSQL Adapter
Before we can connect to a PostgreSQL database, we need to install the necessary adapter in our Django project’s virtual environment. Run the following command in your terminal to install the psycopg2-binary package, which allows Django to communicate with PostgreSQL databases:
pipenv install psycopg2-binary
After installation, you can verify that the package has been added by checking your Pipfile.
Creating the catcollector Database
In a separate terminal window run the following command:
createdb catcollector
Verify its creation by entering the psql shell:
psql
and checking your list of Databases:
\l
Hit enter to exit this view, and run:
\q
to exit the shell.
Configuring Django to Use PostgreSQL
By default, Django uses SQLite3, which is a minimalist DB suitable for development, but might not be robust enough for production environments.
To switch to PostgreSQL:
-
Navigate to the
settings.pyfile located in your project directorycatcollector/settings.py. -
Find the
DATABASESconfiguration: This setting defines the details of the database connection. Initially, it’s set to use SQLite3, as shown below:DATABASES = { 'default': { 'ENGINE': 'django.db.backends.sqlite3', 'NAME': os.path.join(BASE_DIR, 'db.sqlite3'), } } -
Modify the configuration for PostgreSQL: Replace the SQLite settings with PostgreSQL settings. You will specify the
ENGINEasdjango.db.backends.postgresql, and you’ll also need to define the databaseNAMEwhich is the name of your PostgreSQL database.After the changes, your setting should look like this:
DATABASES = {
    'default': {
        'ENGINE': 'django.db.backends.postgresql',
        'NAME': 'catcollector',
    }
}
This configuration tells Django to use a PostgreSQL database named catcollector for storing all data. Make sure that you have created this database in your PostgreSQL server before running your Django application.
Making and Running Migrations
What are Migrations?
Migrations are a way to keep the database schema in sync with your Django models. They track changes to your models and apply these changes to your database schema over time, which is essential as the needs of your application evolve.
While migrations are powerful for evolving your database schema, they can be potentially destructive—especially in a production environment—because they can lead to data loss. It’s important to handle them with care.
To create migrations, Django provides commands that you can run in your terminal. These commands generate Python files that describe the changes to be made to the database.
Making Migration Files
Once you’ve defined a model, like our Cat model, the next step is to update the database so it can store data for this model. Before the database knows about our Cat model, we need to create migration files.
Run the command below in your terminal to generate migrations for any models that have been added or changed since your last update:
python3 manage.py makemigrations
This command prepares migration files, which Django uses to align the database structure with your current model definitions.
The output in the terminal informs us that the following migration file was created: main_app/migrations/0001_initial.py
A migrations directory is created for an app the first time you run makemigrations.
Examining Migration Files
After creating migration files, you typically don’t need to modify them. However, since this is our first migration, it’s useful to understand what’s inside. Go ahead and open the newly created migration file to see how Django plans to update your database schema.
🤯 Note: While it’s possible to manually edit migration files, it’s generally not recommended, especially while you are still learning. Manual edits can lead to unexpected database behaviors and complications.
Running Migrations
Simply creating migration files does not update the database’s schema.
To synchronize the database with the code in the migration files, we “migrate” using this command in the terminal:
python3 manage.py migrate
Lots of OK messages is what you are looking for!
💡 Rule of Thumb for Migrations: Whenever you modify a model, always remember to create and apply migrations. This ensures that your database schema is up-to-date with your model definitions.
🚨 Team Collaboration: In a team setting, designate only one person to create migrations to avoid conflicts. However, every team member should apply these migrations to their local development environment.
What exactly was created in the database?
To check out the database to see this table being added, we can use our psql command in the terminal:
psql catcollector
Then, we can list the tables in the database:
\dt
You should see a table named main_app_cat listed!
catcollector=# \dt
                     List of relations
 Schema |            Name            | Type  |    Owner
--------+----------------------------+-------+-------------
 public | auth_group                 | table | user
 public | auth_group_permissions     | table | user
 public | auth_permission            | table | user
 public | auth_user                  | table | user
 public | auth_user_groups           | table | user
 public | auth_user_user_permissions | table | user
 public | django_admin_log           | table | user
 public | django_content_type        | table | user
 public | django_migrations          | table | user
 public | django_session             | table | user
 public | main_app_cat               | table | user    <- Our new table!
(11 rows)

catcollector=#
You’ll find quite a few tables with names like django_*. These tables are used by the framework to track migrations, server-side sessions, etc.
You’ll also find several tables with names like auth_*. These were created by the django.contrib.auth app that’s listed in the INSTALLED_APPS variable within settings.py.
You can now quit the shell using:
\q