Cat Collector Django One-to-Many Relationships
Learning objective: By the end of this lesson, learners will be able to implement and manage one-to-many relationships in Django by adding a Feeding model related to the Cat model.
A cat’s got to eat!
In this lesson, we’ll explore how to add another model in Django to demonstrate working with one-to-many relationships.
We’ll use an Entity-Relationship Diagram (ERD) to illustrate this relationship:
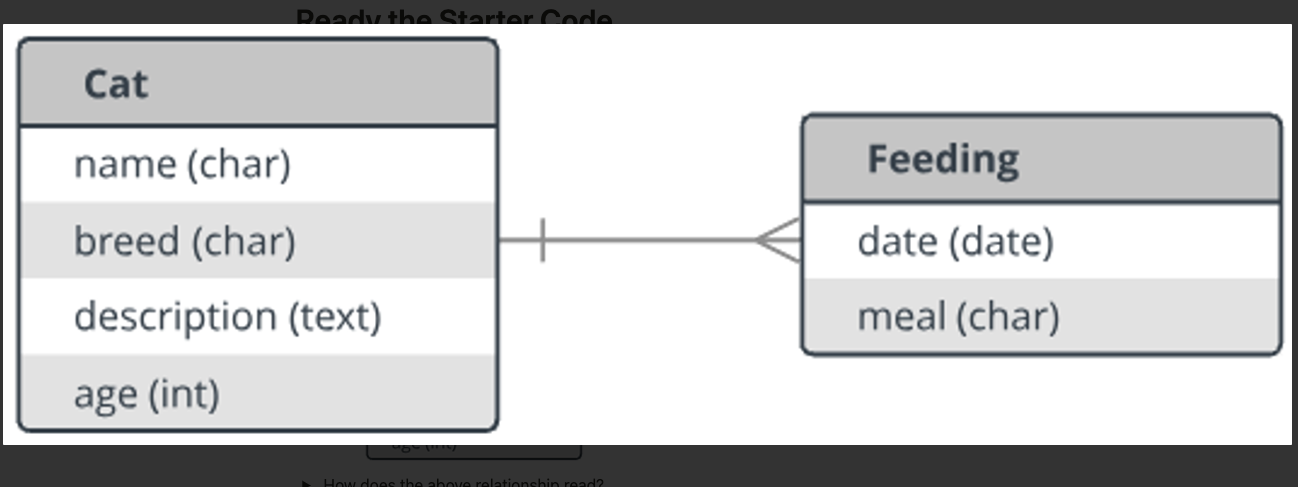
In this relationship, each cat will have many feedings, and each feeding will belong to a specific cat.
Adding a new Feeding Model
Using the ERD above as a guide, let’s add a new Feeding Model (below the current Cat Model) in our models.py:
# Add new Feeding model below Cat model

class Feeding(models.Model):
    date = models.DateField()
    meal = models.CharField(max_length=1)
Note that we’re going to use just a single-character to represent what meal the feeding is for: Breakfast, Lunch or Dinner.
Field.choices
Django has a feature, Field.choices, that will make the single-characters more user-friendly by automatically generating a select dropdown in the form using descriptions that we define.
The first step is to define a tuple of 2-tuples. Because we might need to access this tuple within the Cat class also, let’s define it above both of the Model classes:
# A tuple of 2-tuples added above our models
MEALS = (
    ('B', 'Breakfast'),
    ('L', 'Lunch'),
    ('D', 'Dinner')
)


class Cat(models.Model):
As you can see, the first item in each 2-tuple represents the value that will be stored in the database, e.g. B.
The second item represents the human-friendly “display” value, e.g., Breakfast.
Now let’s enhance the meal field as follows:
class Feeding(models.Model):
    date = models.DateField()
    meal = models.CharField(
        max_length=1,
        # add the 'choices' field option
        choices=MEALS,
        # set the default value for meal to be 'B'
        default=MEALS[0][0]
    )
Override the __str__ Method
As is common in python classes, we can override the __str__ method in Models so that they provide more meaningful output when they are printed:
class Feeding(models.Model):
    # Other Feeding class fields here

    def __str__(self):
        # Nice method for obtaining the friendly value of a Field.choice
        return f"{self.get_meal_display()} on {self.date}"
Check out the convenient get_meal_display() method Django automagically creates to access the human-friendly value of a Field.choice like we have on meal.
Add the Foreign Key
Since a Feeding belongs to a Cat, it must hold the id of the cat object it belongs to - it needs a foreign key!
Here’s how it’s done - Django style:
class Feeding(models.Model):
    date = models.DateField()
    meal = models.CharField(
        max_length=1,
        choices=MEALS,
        default=MEALS[0][0]
    )
    # Create a cat_id column for each feeding in the database
    cat = models.ForeignKey(Cat, on_delete=models.CASCADE)

    def __str__(self):
        return f"{self.get_meal_display()} on {self.date}"
As you can see, the ForeignKey field-type is used to create a one-to-many relationship.
- The first argument provides the parent Model,
Cat. - In a one-to-many relationship, the
on_delete=models.CASCADEis required. It ensures that if aCatrecord is deleted, all of the childFeedingswill be deleted automatically as well - thus avoiding orphan records for feedings that are no longer tied to an existing Cat.
🧠 In the database, the column in the feedings table for the FK will actually be called
cat_idbecause Django by default appends_idto the name of the attribute used in the Model.
Make and Run the Migration
We changed our models.py file, so it’s that time again! Open your terminal and run:
python3 manage.py makemigrations
Then run:
python3 manage.py migrate
Use the Admin Portal to create some new feedings
Before we start building the user interface (UI) for our new feedings model, let’s practice adding a few feedings using the Django admin portal. This will give us some data to display and allow us to create our feedings’ index UI first.
Registering the Model
To use the built-in Django admin portal for CRUD operations, we must first register the model. Update main_app/admin.py to include the Feeding model:
from django.contrib import admin
# Add Feeding to the import
from .models import Cat, Feeding

admin.site.register(Cat)
# Register the new Feeding model
admin.site.register(Feeding)
Now, navigate to http://127.0.0.1:8000/admin and click on the Feeding +Add link.
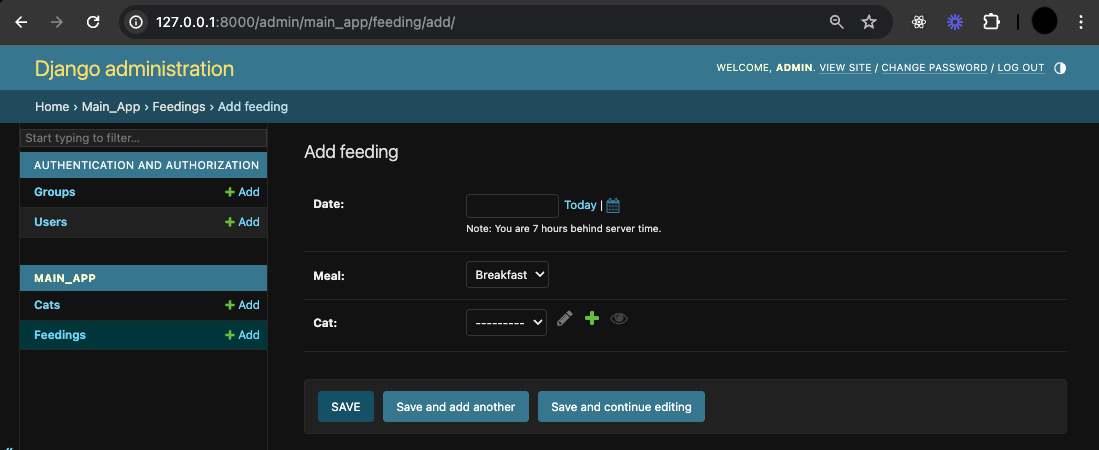
Notice the select drop-downs for assigning both the Meal and the Cat!
Custom field labels
Let’s say though, that you would like a less vague label than Date.
If you want to use a more descriptive label than Date, you can customize field labels directly in the model. Since Django models are the single source of truth about your data, this is where you should add customizations.
In main_app/models.py, update the Feeding model to include a user-friendly label for the date field:
class Feeding(models.Model):
    # The first optional positional argument overrides the label
    date = models.DateField('Feeding date')
    # Other fields below
After making this change, refresh the admin portal page to see the updated label.
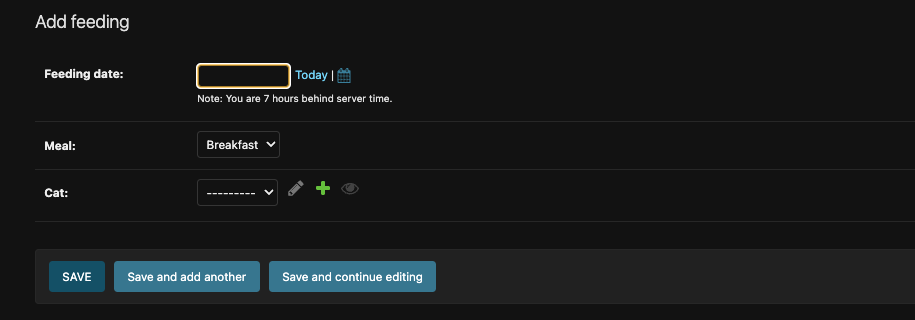
These custom labels will also be used in all of Django’s ModelForms.
Add a few feedings
Now, go ahead and add a few feedings for each of your cats using the admin portal. This will populate your database with initial data, which will be useful for building and testing your UI.
Displaying a Cat’s Feedings
The cat’s detail page is the perfect place to display a cat’s feedings because it provides a comprehensive view of all the important information about that specific cat in one place. This is similar to how you would see a list of all tasks on a project detail page. By showing feedings on the cat’s detail page, users can easily see the feeding history along with other details about the cat, making the information more accessible and organized.
No additional views or templates are necessary. We only need to update the detail.html template.
Update the detail.html template
Here’s the new content for detail.html. Copy and paste this markup, and then we’ll review it:
<!-- Existing cat-container above -->
<div class="feedings-toy-container">
  <section class="feedings">
    <div class="subsection-title">
      <h2>Feedings</h2>
      <img
        src="{% static 'images/cat-cone.svg' %}"
        alt="An ice cream cone cat"
      />
      <img src="{% static 'images/cat-onigiri.svg' %}" alt="A cat as onigiri" />
      <img
        src="{% static 'images/kitty-kabob.svg' %}"
        alt="A kabob of kittens"
      />
    </div>
    <table>
      <thead>
        <tr>
          <th>Date</th>
          <th>Meal</th>
        </tr>
      </thead>
      <tbody>
        {% for feeding in cat.feeding_set.all %}
          <tr>
            <td>{{feeding.date}}</td>
            <td>{{feeding.get_meal_display}}</td>
          </tr>
        {% endfor %}
      </tbody>
    </table>
  </section>
</div>

{% endblock %}
- In this code we have added an html table to present the feeding data in an more structured way.
- The table body (
<tbody>) dynamically lists each feeding associated with the cat. This is done through a loop ({% for feeding in cat.feeding_set.all %}) that iterates over each feeding related to the cat. - For each feeding, the date is displayed, and the meal type is shown using Django’s
get_meal_displaymethod, which translates a database value into a more user-friendly format (such as converting a single character like ‘B’ into “Breakfast”).
Refresh your browser and select a cat to see their feedings!
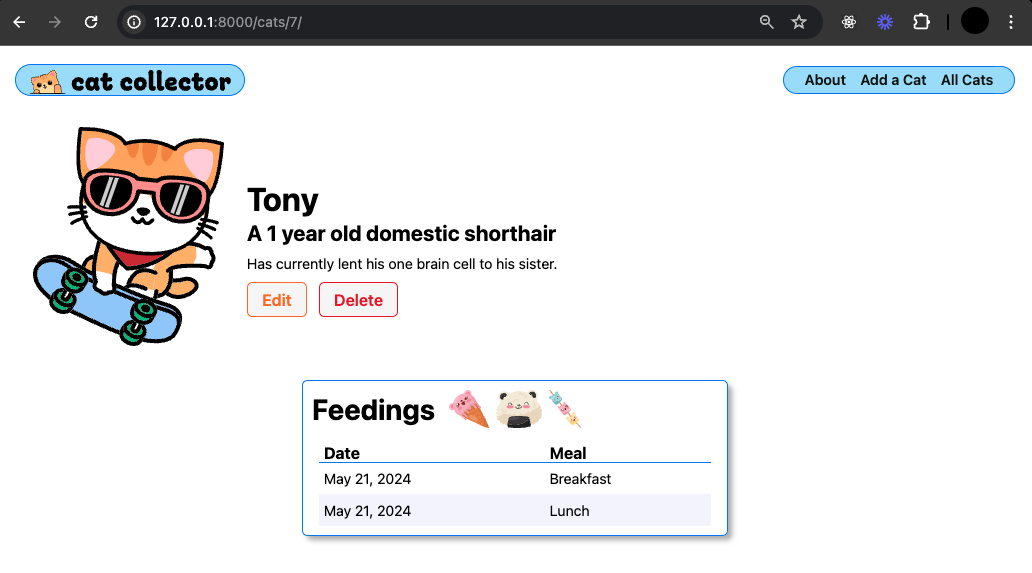
Adding new feedings from the Detail page
As developers, we can add feedings easily from the admin portal, but this helpful dashboard is not available to users of our application.
Next, we will add functionality for users to add feedings directly from a cat’s detail page. This requires integrating a form on the page that can handle the creation of new feedings linked to that specific cat.
In previous sections, we’ve utilized Django’s class-based views to manage create and update operations. These CBVs automatically handle form generation and data submission by using a ModelForm tied to a specific model behind the scenes.
For adding feedings through the cat’s detail page, we’ll need to add a custom ModelForm. This form will allow us to embed feeding-related inputs within a custom <form> tag, manage form validation, and save new feeding entries to the database.
Create the ModelForm for the Feeding Model
We could define the ModelForm inside of the models.py module, but we’re going to follow a best practice of defining it inside of a forms.py module instead. Run the following in the terminal:
touch main_app/forms.py
Let’s open it and add this code:
from django import forms
from .models import Feeding

class FeedingForm(forms.ModelForm):
    class Meta:
        model = Feeding
        fields = ['date', 'meal']
Note that our custom form inherits from ModelForm.
Many of the attributes in the
Metaclass are in common with CBVs because the CBV was using them behind the scenes to create a ModelForm as previously mentioned.
For more options, check out the Django ModelForms documentation.
Passing an instance of FeedingForm
FeedingForm is a class that needs to be instantiated in the cat_detail view function so that it can be rendered inside of detail.html.
Here’s the updated cat_detail view function in main_app/views.py:
from .models import Cat
# Import the FeedingForm
from .forms import FeedingForm

# Other view functions above

# update this view function
def cat_detail(request, cat_id):
    cat = Cat.objects.get(id=cat_id)
    # instantiate FeedingForm to be rendered in the template
    feeding_form = FeedingForm()
    return render(request, 'cats/detail.html', {
        # include the cat and feeding_form in the context
        'cat': cat, 'feeding_form': feeding_form
    })
feeding_form is set to an instance of FeedingForm and then it’s passed to detail.html just like cat.
Displaying FeedingForm inside of detail.html
Okay, so we’re going to need a form used to submit a new feeding.
We’re going to display a <form> at the top of the feedings column in detail.html.
This is how we can “render” the ModelForm’s inputs within <form> tags. Add this section in templates/cats/detail.html just above the <table> for displaying feedings:
<h3>Add a Feeding</h3>
<!-- Add just above the feedings table -->
<form method="post" class="subsection-content" autocomplete="off">
  {% csrf_token %}
  {{ feeding_form.as_p }}
  <button type="submit" class="btn submit">Add Feeding</button>
</form>
As before, we need to include the {% csrf_token %} for security purposes.
A form’s action attribute determines the URL that a form is submitted to. For now, we’ll leave it out and come back to it in a bit.
The {{ feeding_form.as_p }} will generate the <input> tags wrapped in <p> tags for each field we specified in FeedingForm.
Let’s see what it looks like - not perfect but it’s a start:
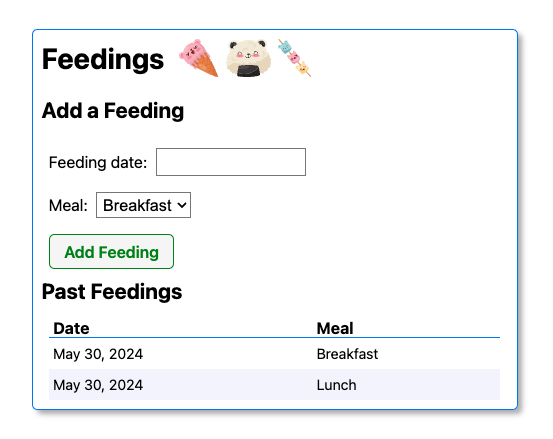
Unfortunately, you may have noticed that the Feeding Date field is just a basic text input. This is what Django uses by default for DateFields. Let’s make it a date picker instead.
Use Django’s DateInput
To improve user experience and maintain consistent date formatting, we’ll be adding a “date picker”—a user interface component that lets users easily select dates. This feature is supported by HTML5 and is common in web forms. Django supports this with a built in DateInput widget, which is built on top of the standard HTML date picker to integrate smoothly with Django’s DateField.
For our Feeding model’s form, we specify Django’s built-in date picker as a widget for the date field. This creates a visually pleasing date selection process on the frontend and ensures that date data remains consistent on the backend.
In Django forms, the
widgetsattribute is used to customize how form fields are rendered in the HTML and to add specific HTML attributes to those fields.
Update the FeedingForm in forms.py to include a new property called widgets:
class FeedingForm(forms.ModelForm):
    class Meta:
        model = Feeding
        fields = ['date', 'meal']
        widgets = {
            'date': forms.DateInput(
                format=('%Y-%m-%d'),
                attrs={
                    'placeholder': 'Select a date',
                    'type': 'date'
                }
            ),
        }
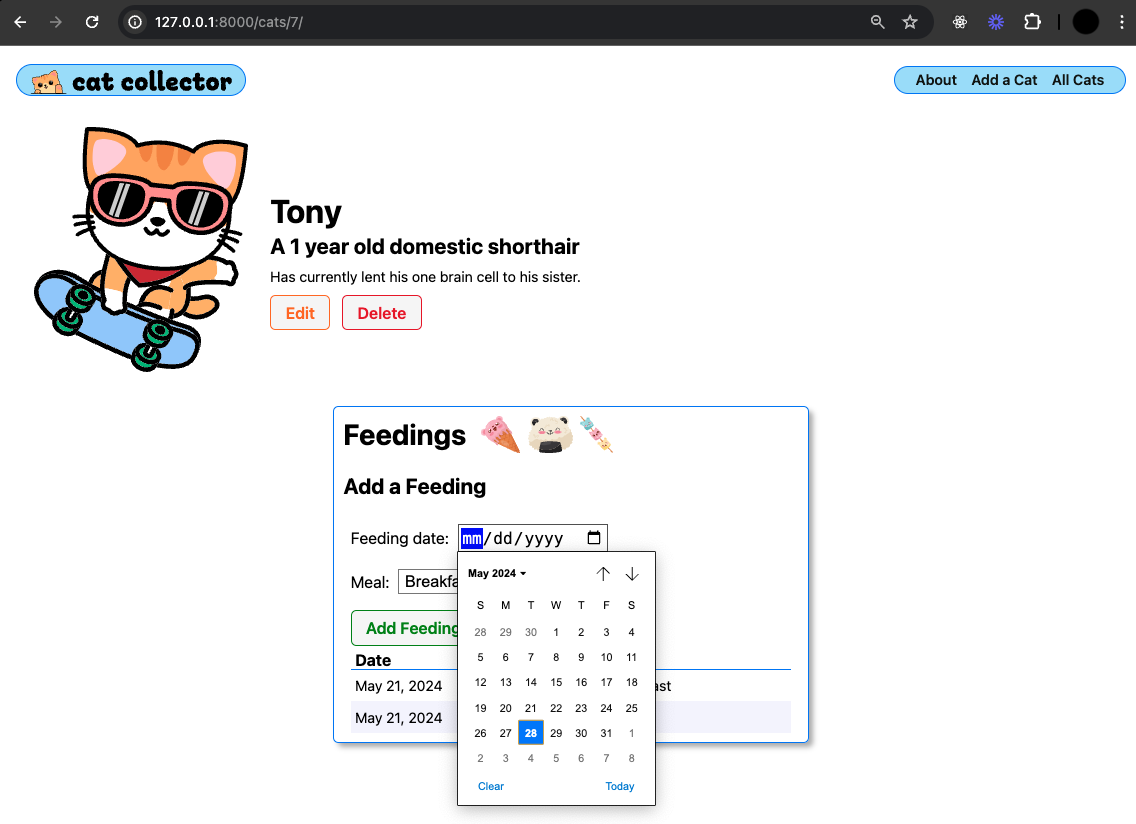
By specifying these attributes and using a DateInput widget, the date field in the form will render as an HTML date input. This allows users to select a date using a mini calendar-style date picker, which is much more user-friendly.
Refresh the page to see your DateInput widget in action:
Create new path for feedings
Its time to complete our form functionality by enabling the route we’ll use as the form action for new Feedings.
Every Feeding object needs a cat_id that holds the primary key of the cat object that it belongs to. Therefore, we need to ensure that the route path includes a URL parameter for capturing the cat’s id like we’ve done in other routes.
Add a route to the urlpatterns list in urls.py like this:
urlpatterns = [
    # Existing URL patterns above
    path(
        'cats/<int:cat_id>/add-feeding/',
        views.add_feeding,
        name='add-feeding'
    ),
]
The above route specifies that the <form>’s action attribute will need to look something like /cats/2/add-feeding. Let’s update the form now.
Add the action Attribute to the <form>
Now that we have a named URL, let’s add the action attribute to the <form> in detail.html:
<h3>Add a Feeding</h3>
<form
  action="{% url 'add-feeding' cat.id %}"
  method="post"
  class="subsection-content"
  autocomplete="off"
>
  {% csrf_token %}
  {{ feeding_form.as_p }}
  <button type="submit" class="btn submit">Add Feeding</button>
</form>
Note that arguments provided to template tags are always separated using a space, not a comma.
Once again, we’re using best practice of using the url template tag {% url 'add-feeding' cat.id %} to write out the correct the URL for a route.
Our form is now complete, but before we can test, we need to add the views.add_feeding function.
Add the View function
This view is designed to handle the submission of a feeding form associated with a specific cat.
This form will capture the feeding data entered by the user, but will be missing one key piece of information that we will need to add manually before sending the data to the database- cat_id.
Let’s create an add_feeding view function in main_app/views.py :
def add_feeding(request, cat_id):
    # create a ModelForm instance using the data in request.POST
    form = FeedingForm(request.POST)
    # validate the form
    if form.is_valid():
        # don't save the form to the db until it
        # has the cat_id assigned
        new_feeding = form.save(commit=False)
        new_feeding.cat_id = cat_id
        new_feeding.save()
    return redirect('cat-detail', cat_id=cat_id)
- First we capture data from the user via the
FeedingForm(request.POST)and prepare it for the database. - The method
form.is_valid()checks if the submitted form data is valid according to the form’s specifications, such as required fields being filled and data types matching the model’s requirements. - After ensuring that the form contains valid data, we save the form with the
commit=Falseoption, which returns an in-memory model object so that we can assign thecat_idbefore actually saving to the database. - Finally we will
redirectinstead ofrendersince data has been changed in the database.
Lastly, remember to import redirect at the top of views.py:
from django.shortcuts import render, redirect
With our view complete we can test our form.
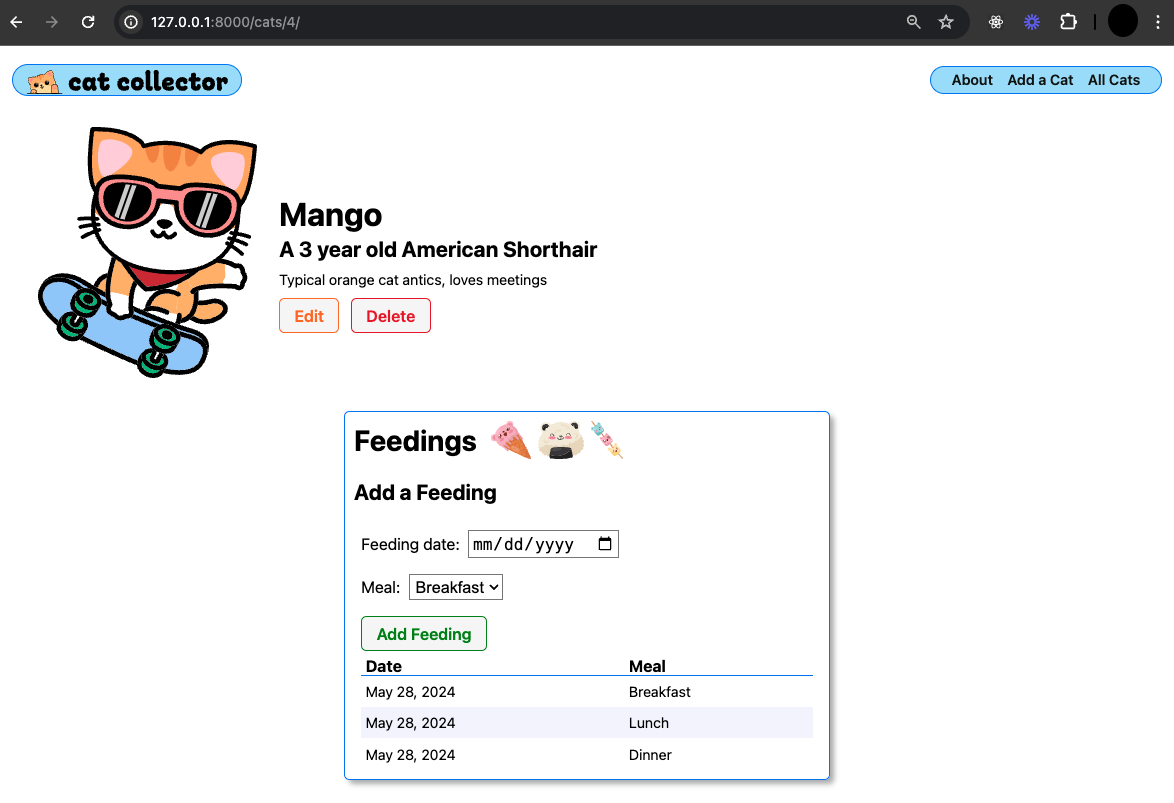
Nice Job!
Adjust the order of feedings
Now we have the ability to add feedings, great! But as our list of feedings grows we’ll need to scroll to the bottom to see the latest information. This is not a great user experience. How can we fix this?
We can use a feature in Django that sorts the feedings automatically. This is done by setting an ordering option inside the Feeding model’s class Meta.
Let’s add this to our Feeding model:
class Feeding(models.Model):
    # Other Feeding model items above

    def __str__(self):
        # Nice method for obtaining the friendly value of a Field.choice
        return f"{self.get_meal_display()} on {self.date}"

    # Define the default order of feedings
    class Meta:
        ordering = ['-date']  # This line makes the newest feedings appear first
This ordering option in Django allows us to specify how lists of entries, like our feedings, should be sorted by default. The prefix ‘-‘ before ‘date’ means it sorts the dates in descending order, so the newest feedings appear first.
What if there are no feedings yet?
We can also add some conditional logic in our markup that tells the user whether or not a cat has been fed.
Replace the existing feedings table with the following:
<h3>Past Feedings</h3>
{% if cat.feeding_set.all.count %}
  <table>
    <thead>
      <tr>
        <th>Date</th>
        <th>Meal</th>
      </tr>
    </thead>
    <tbody>
      {% for feeding in cat.feeding_set.all %}
      <tr>
        <td>{{feeding.date}}</td>
        <td>{{feeding.get_meal_display}}</td>
      </tr>
      {% endfor %}
    </tbody>
  </table>
{% else %}
  <div class="subsection-content">
    <p>⚠️ {{cat.name}} has not been fed!</p>
  </div>
{% endif %}
Now if a cat has a feeding count of 0 in the database, you’ll see a warning message.
Feed your cats!