Pets Back-End Create Route
Learning objective: By the end of this lesson, students will be able to create a new pet by POSTing to the database and sending a JSON response to the client.
CREATE - Create route
In this section, we will make a new route to create a new pet. This route will be a POST request to /pets, and will return a JSON response with the created pet.
We will be following these specs when building the route:
- CRUD Action: CREATE
- Method:
POST - Path:
/pets - Response: JSON
- Success Status Code:
201Created - Success Response Body: A new Pet object
- Error Status Code:
500Internal Server Error - Error Response Body: A JSON object with an
errkey and a message describing the error
Creating a POST route
This route will handle data sent when users submit a form. Before we can start writing the route and controller function, we need to make a few additions to our existing code.
We need to import the express package in the pets controller and create a router to attach our routes to.
// controllers/pets.js

// Add these at the top of the file:
const Pet = require('../models/pet.js');
const express = require('express');
const router = express.Router();
Export the router at the bottom of the file:
// controllers/pets.js

const Pet = require('../models/pet.js');
const express = require('express');
const router = express.Router();

// Write your routes/controller functions here

// Export the router at the bottom of the file
module.exports = router;
Then, in server.js, import the pets router file and add it to our /pets route.
// server.js

const dotenv = require('dotenv');
dotenv.config();
const express = require('express');
const app = express();
const mongoose = require('mongoose');

// Import the controller file
const petRouter = require('./controllers/pets.js');

mongoose.connect(process.env.MONGODB_URI);

mongoose.connection.on('connected', () => {
  console.log(`Connected to MongoDB ${mongoose.connection.name}.`);
});

app.use(express.json());

// Add the petRouter to the `/pets` route
app.use('/pets', petRouter);

app.listen(3000, () => {
  console.log('The express app is ready!');
});
Great, now all of our routes can be handled in controllers/pets.js!
Define the route
Now we’re finally ready to define a route. Use the .post() method on the router object to create the route and pass in the path and a callback function.
// controllers/pets.js

// CREATE - POST - /pets
router.post('/', async (req, res) => {});
We are using async at the start of the callback function to allow us to use await inside of the function. This will enable us to asynchronously query the database for all pets.
🧠 Notice how we have declared this path. We have just used
/as the path. This is because we are already in the /pets route. This is a shorthand way of declaring the path. Check outserver.jsto see how we have declared the/petsroute.
Test the Route
Let’s test the route to ensure that it works - we can do this by sending a response with a message to the client.
// controllers/pets.js

// CREATE - POST - /pets
router.post('/', async (req, res) => {
  // Add a message to test the route
  res.json({ message: 'Create Route' });
});
Open Postman and send a POST request to http://localhost:3000/pets. You should receive a JSON response with the message Create Route. If you do not receive this message, debug before moving on.
📚 If you are having trouble, check the terminal for error messages. Check that the server is running too!
Making a post request
The route works, but now we want to actually make use of it being a POST route! We’ll want to wrap our code in a try...catch block to handle any errors that may occur.
Try - Create a new pet
Inside our controller function, we’ll call create() on our Pet model, and pass in req.body. Once the createdPet is created, we’ll send a JSON response with the new createdPet object.
// controllers/pets.js

// CREATE - POST - /pets
router.post('/', async (req, res) => {
  try {
    // Create a new pet with the data from req.body
    const createdPet = await Pet.create(req.body);
    res.status(201).json(createdPet); // 201 Created
  } catch (err) {
    // Setup for error handling
  }
});
Be sure to include a status of 201 Created with your json response body.
Catch - errors
Errors can occur in several places when querying the database. We need to handle these errors and send a response to the client that is easy to read and understand. Luckily, we have already set up a catch block in the try...catch statement. We can use this to catch any errors that might happen:
// controllers/pets.js

// CREATE - POST - /pets
router.post('/', async (req, res) => {
  try {
    const createdPet = await Pet.create(req.body);
    res.status(201).json(createdPet);
  } catch (err) {
    res.status(500).json({ err: err.message });
  }
});
Inside the err object there is a property called message. This is a string that describes the error that has occurred. We can use this to send a meaningful response to the client. Include a 500 status to indicate that there was an internal error on the server side.
The
errobject is an instance of the built-in Error class in JavaScript. It has many valuable properties, one of them beingmessage. For a complete list of Error capabilities, check out the MDN Web Docs.
🎓 You Do: Test the create route with Postman
Now that we have finished the route let’s test it with Postman. We’ll do this by sending a POST request to http://localhost:3000/pets. Recall that our pet schema has the following specifications:
const petSchema = mongoose.Schema({
  name: {
    type: String,
    required: true,
  },
  age: {
    type: Number,
    min: 0,
  },
  breed: String,
});
Under the Body header, select raw and make sure the blue colored dropdown to the right is set to JSON.
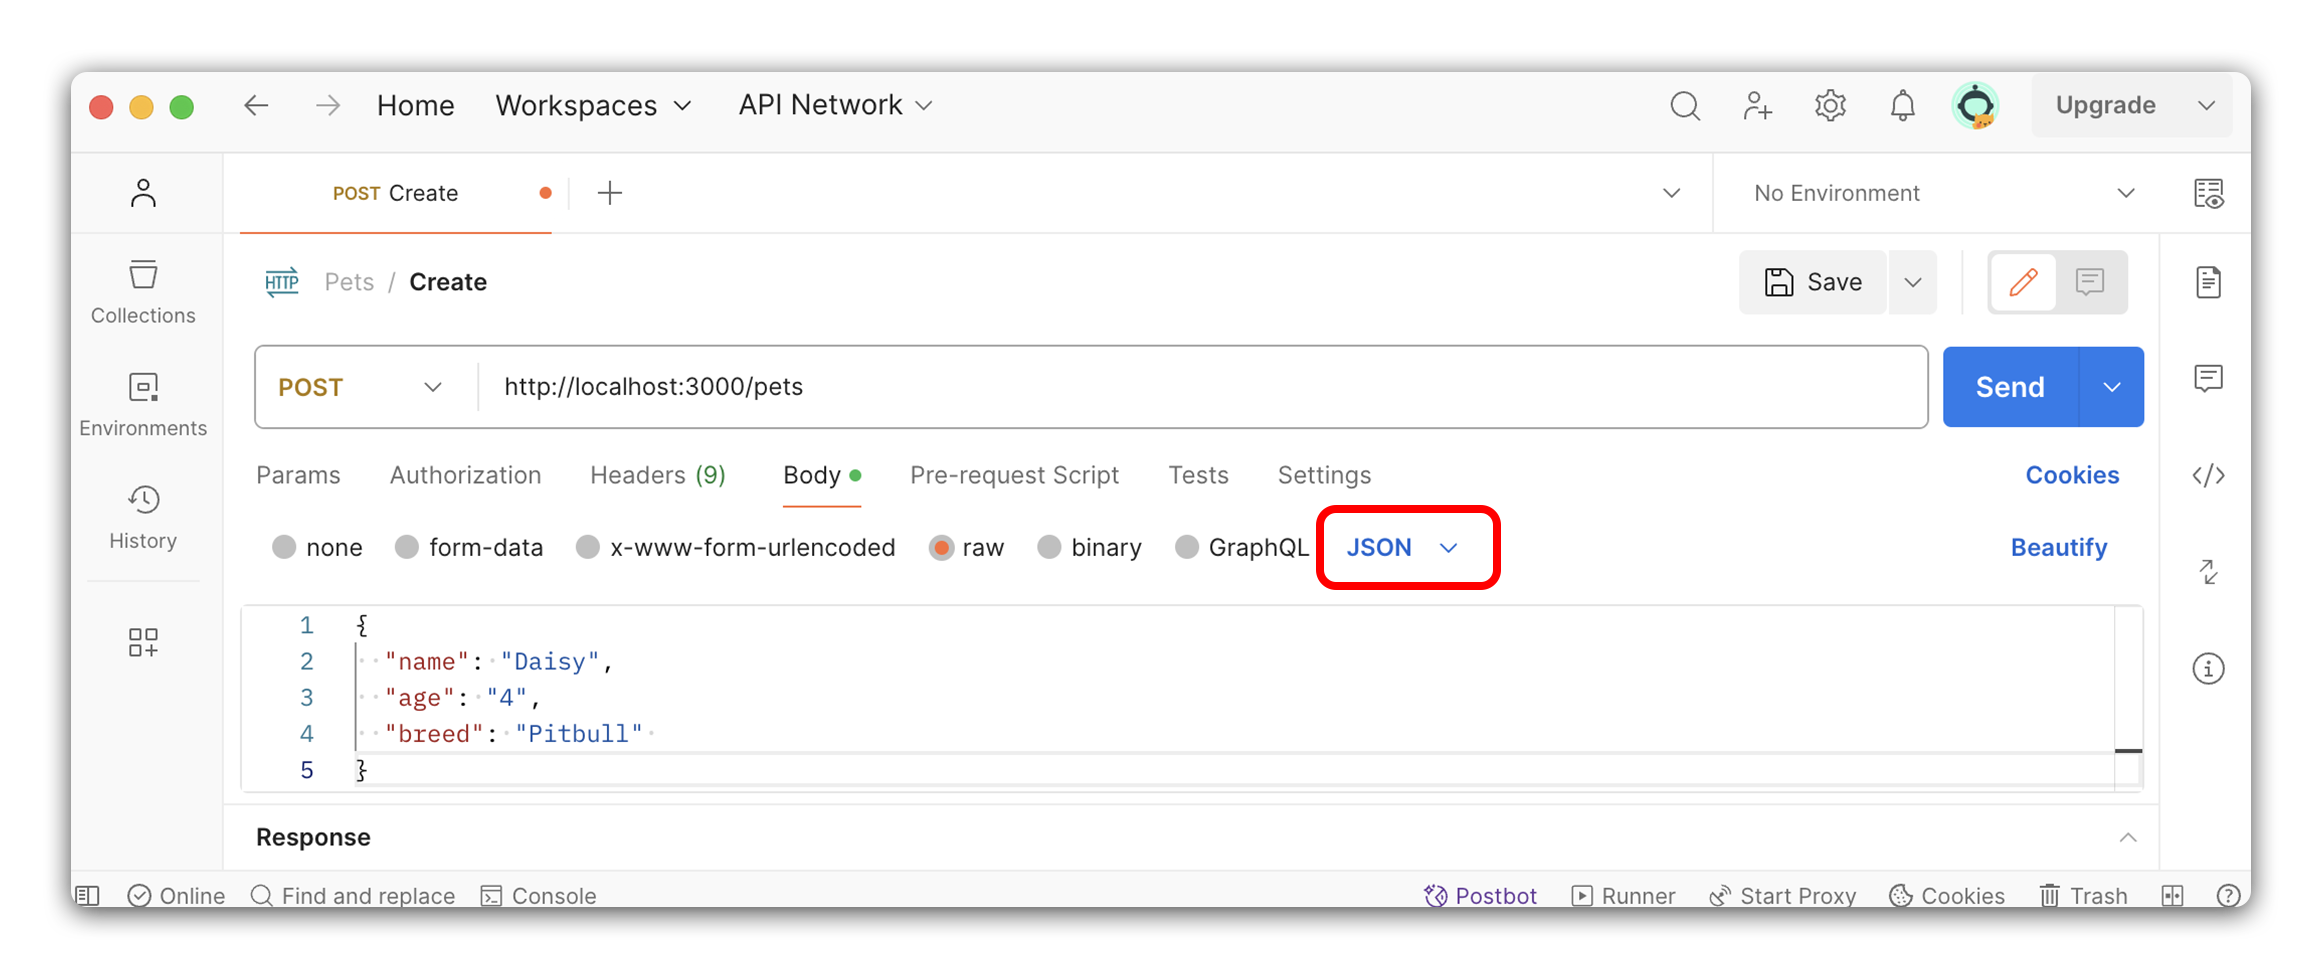
Your values will be different, but an example body would look something like this:
{
  "name": "Daisy",
  "age": "4",
  "breed": "Pitbull"
}
Once you have composed the body, send a POST request to http://localhost:3000/pets. Test both success and error messages.
- Success: You should receive a JSON response with the new pet object!
- Error: You should receive a JSON response with an error message - most likely, that the
create()failed due to bad form data. This message should describe the error that has occurred.