Lifting State in React Lifting State
Learning objective: By the end of this lesson, students will be able to transfer state from one component to its parent
Overview
Let’s practice the concept of lifting state with a real-world example. We’ll construct a to-do application in which data is passed from a child component to its parent.
Our to-do app will consist of the following:
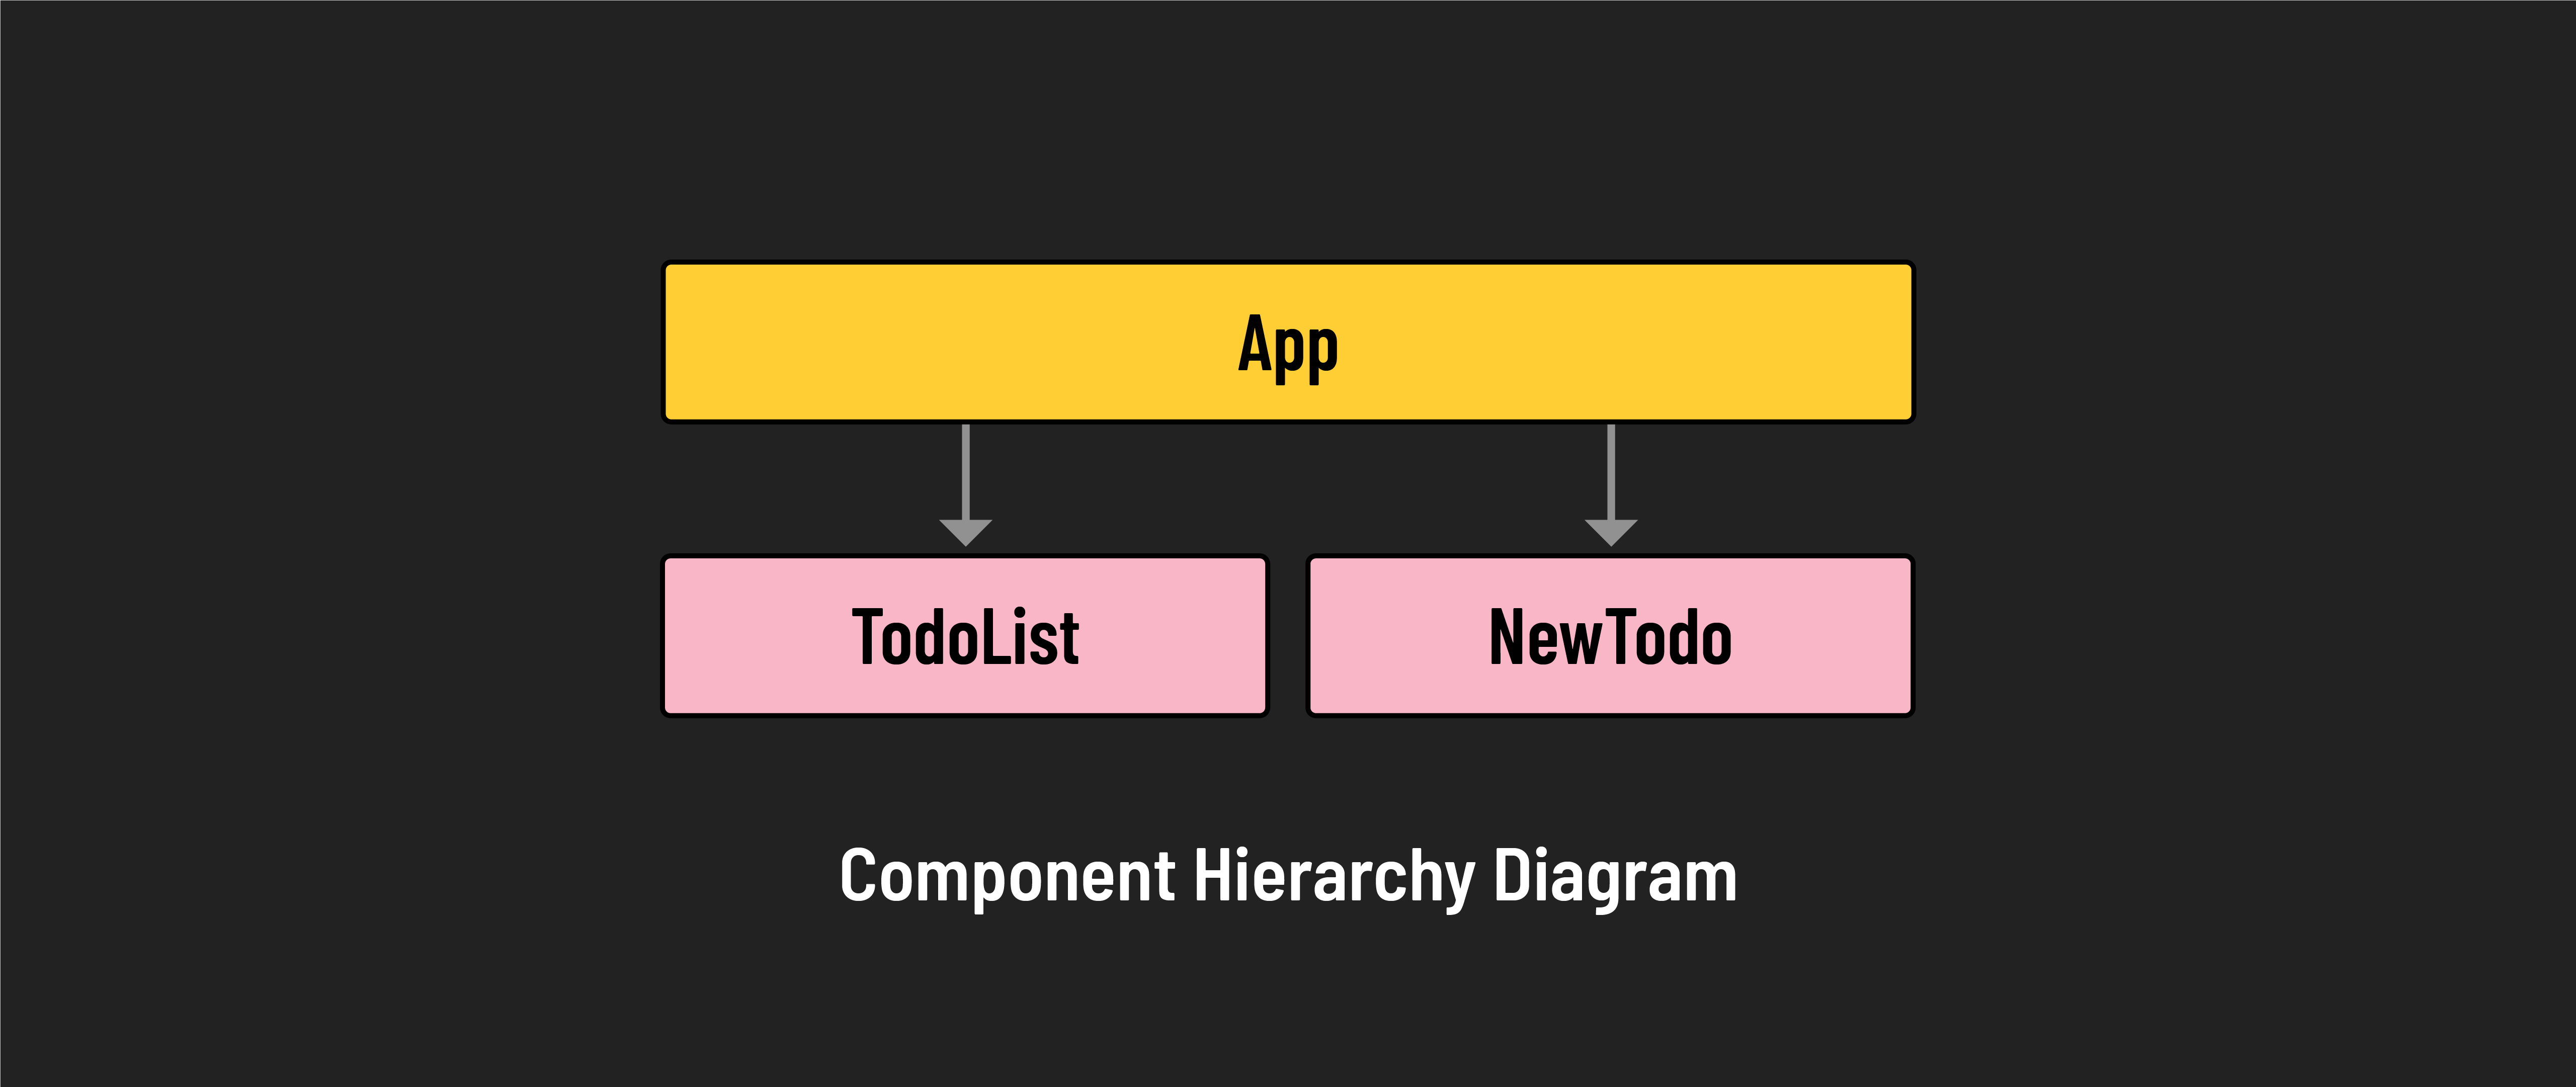
- App (parent component): The main component that holds state and the child subcomponents.
- NewTodo (child component): A form component for creating new to-do items.
- TodoList (child component): A list component responsible for rendering the to-dos held in state.
Setting up App.jsx
We can now remove the counter functionality from src/App.jsx.
Update App.jsx with the following:
// src/App.jsx

const App = () => {

  const addTodo = (newTodo) => {
    console.log(newTodo);
  };

  return (
    <>
      <h1>To-do App</h1>
    </>
  );
};

export default App;
Check your browser and confirm that the to-do App is being rendered.
Creating the NewTodo form
In your terminal, create a new component file:
touch src/components/NewTodo.jsx
In src/components/NewTodo.jsx, add the following:
// src/components/NewTodo.jsx

const NewTodo = (props) => {
  const handleSubmit = (event) => {
    event.preventDefault();
    console.log("Creating a new to-do...");
  };

  return (
    <form onSubmit={handleSubmit}>
      <label htmlFor="todoInput">Todo: </label>
      <input id="todoInput" type="text" name="todo" />
      <button type="submit">Create to-do</button>
    </form>
  );
};

export default NewTodo;
Now, let’s import it at the top of src/App.jsx:
// src/App.jsx

import NewTodo from './components/NewTodo.jsx';
Next, add the component within the return statement of App.jsx:
// src/App.jsx
  return (
    <>
      <h1>To-do App</h1>
      <NewTodo />
    </>
  );
Check your browser. You should now see that the form has been added to the page.
Click the Create to-do button on the page and check your browser’s dev tools console for the logged text “Creating a new to-do…”.
Passing addTodo to the NewTodo form
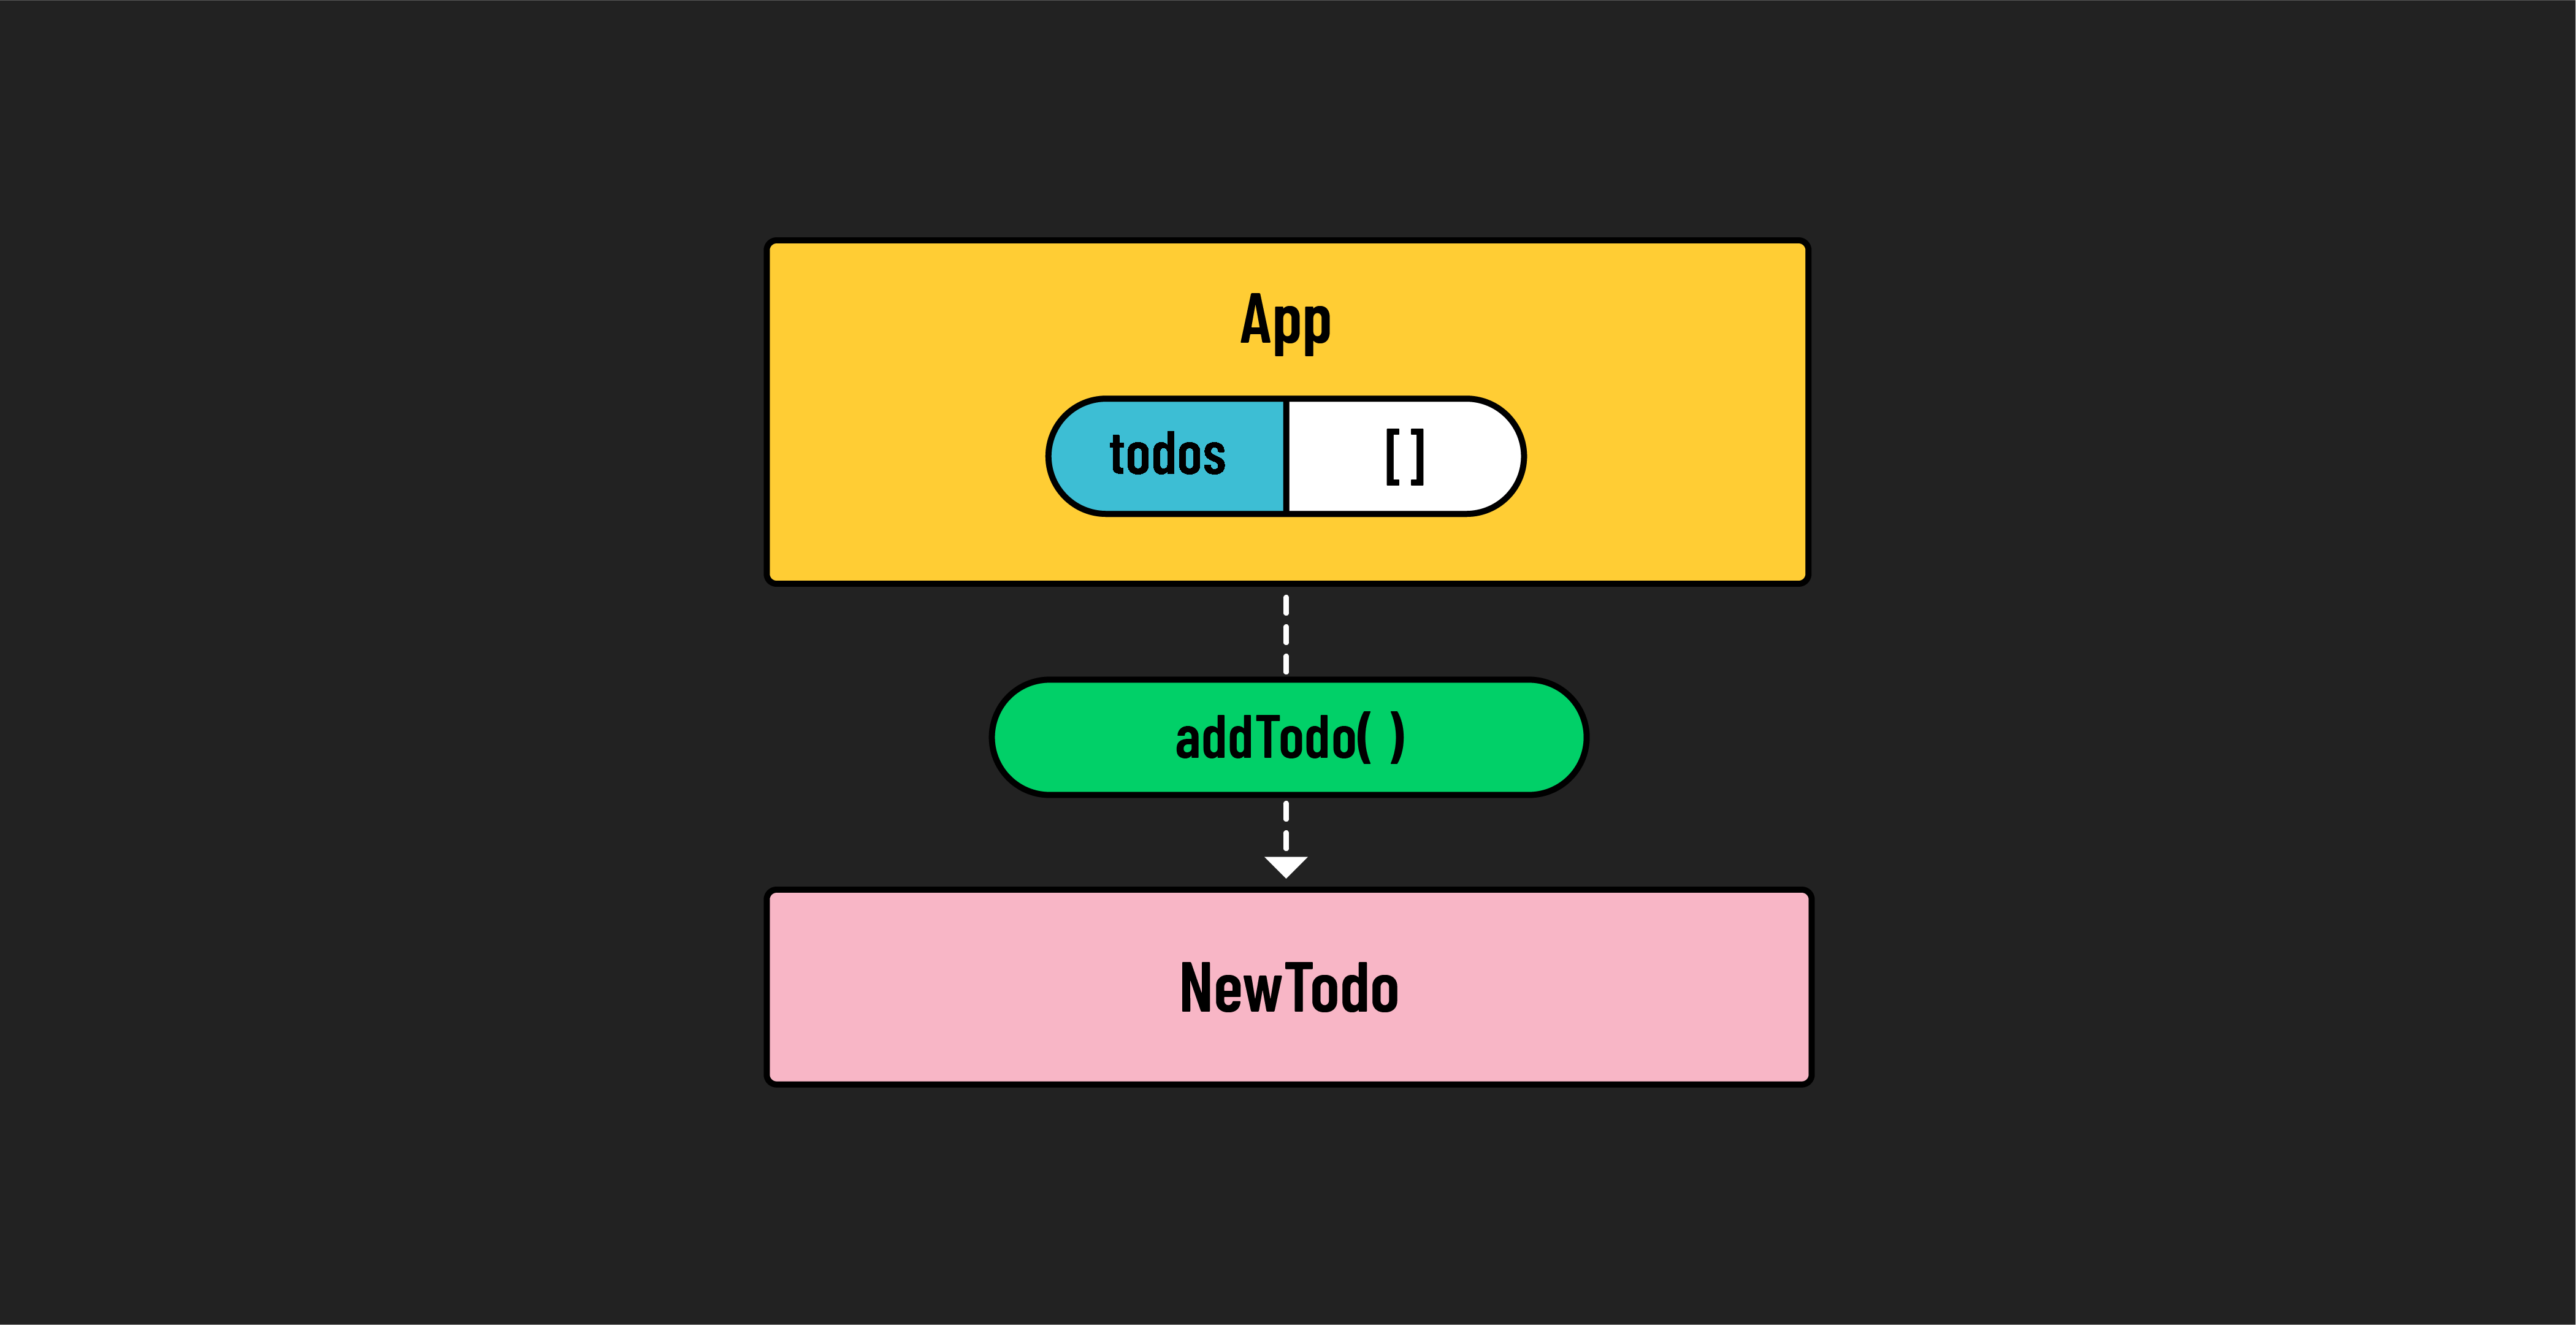
Now, we want to pass addTodo down from App.jsx to NewTodo.jsx in much the same way that we passed addOne down from App.jsx to IncrementButton.jsx previously.
Make the following adjustment to the return statement of src/App.jsx to accomplish this:
// src/App.jsx

  return (
    <>
      <h1>To-do App</h1>
      <NewTodo addTodo={addTodo} />
    </>
  );
Now, the addTodo function, defined in App.jsx, will be available within NewTodo.jsx as props.addTodo. Let’s use that within our handleSubmit function:
// src/components/NewTodo.jsx

  const handleSubmit = (event) => {
    event.preventDefault();
    props.addTodo('data created within NewTodo component');
  };
Back in the browser, click the Create to-do button and check the console to ensure the text “data created within NewTodo component” has been logged. The important thing here is that the text was logged by addTodo in App.jsx. This function was called by handleSubmit within NewTodo.jsx. There, we passed props.addTodo an argument of 'data created within NewTodo component'.
Setting up state for the NewTodo form
At this point, we can pass information to the parent via the addTodo function. However, we’re only passing the string “data created within NewTodo component”, which is not exciting or useful. Let’s create an input so the user can enter text, which will then be passed to props.addTodo instead of the static text.
At the top of NewTodo.jsx import useState, so that we can keep track of what the user has typed:
// src/components/NewTodo.jsx

import { useState } from 'react';
Now initialize the state and its setter function inside the NewTodo function:
// src/components/NewTodo.jsx

const [newTodo, setNewTodo] = useState('');
Update your form in NewTodo.jsx like so:
// src/components/NewTodo.jsx

    <form onSubmit={handleSubmit}>
      <label htmlFor="todoInput">Todo: </label>
      <input
        id="todoInput"
        type="text"
        name="todo"
        onChange={handleChange}
        value={newTodo}
      />
      <button type="submit">Create to-do</button>
    </form>
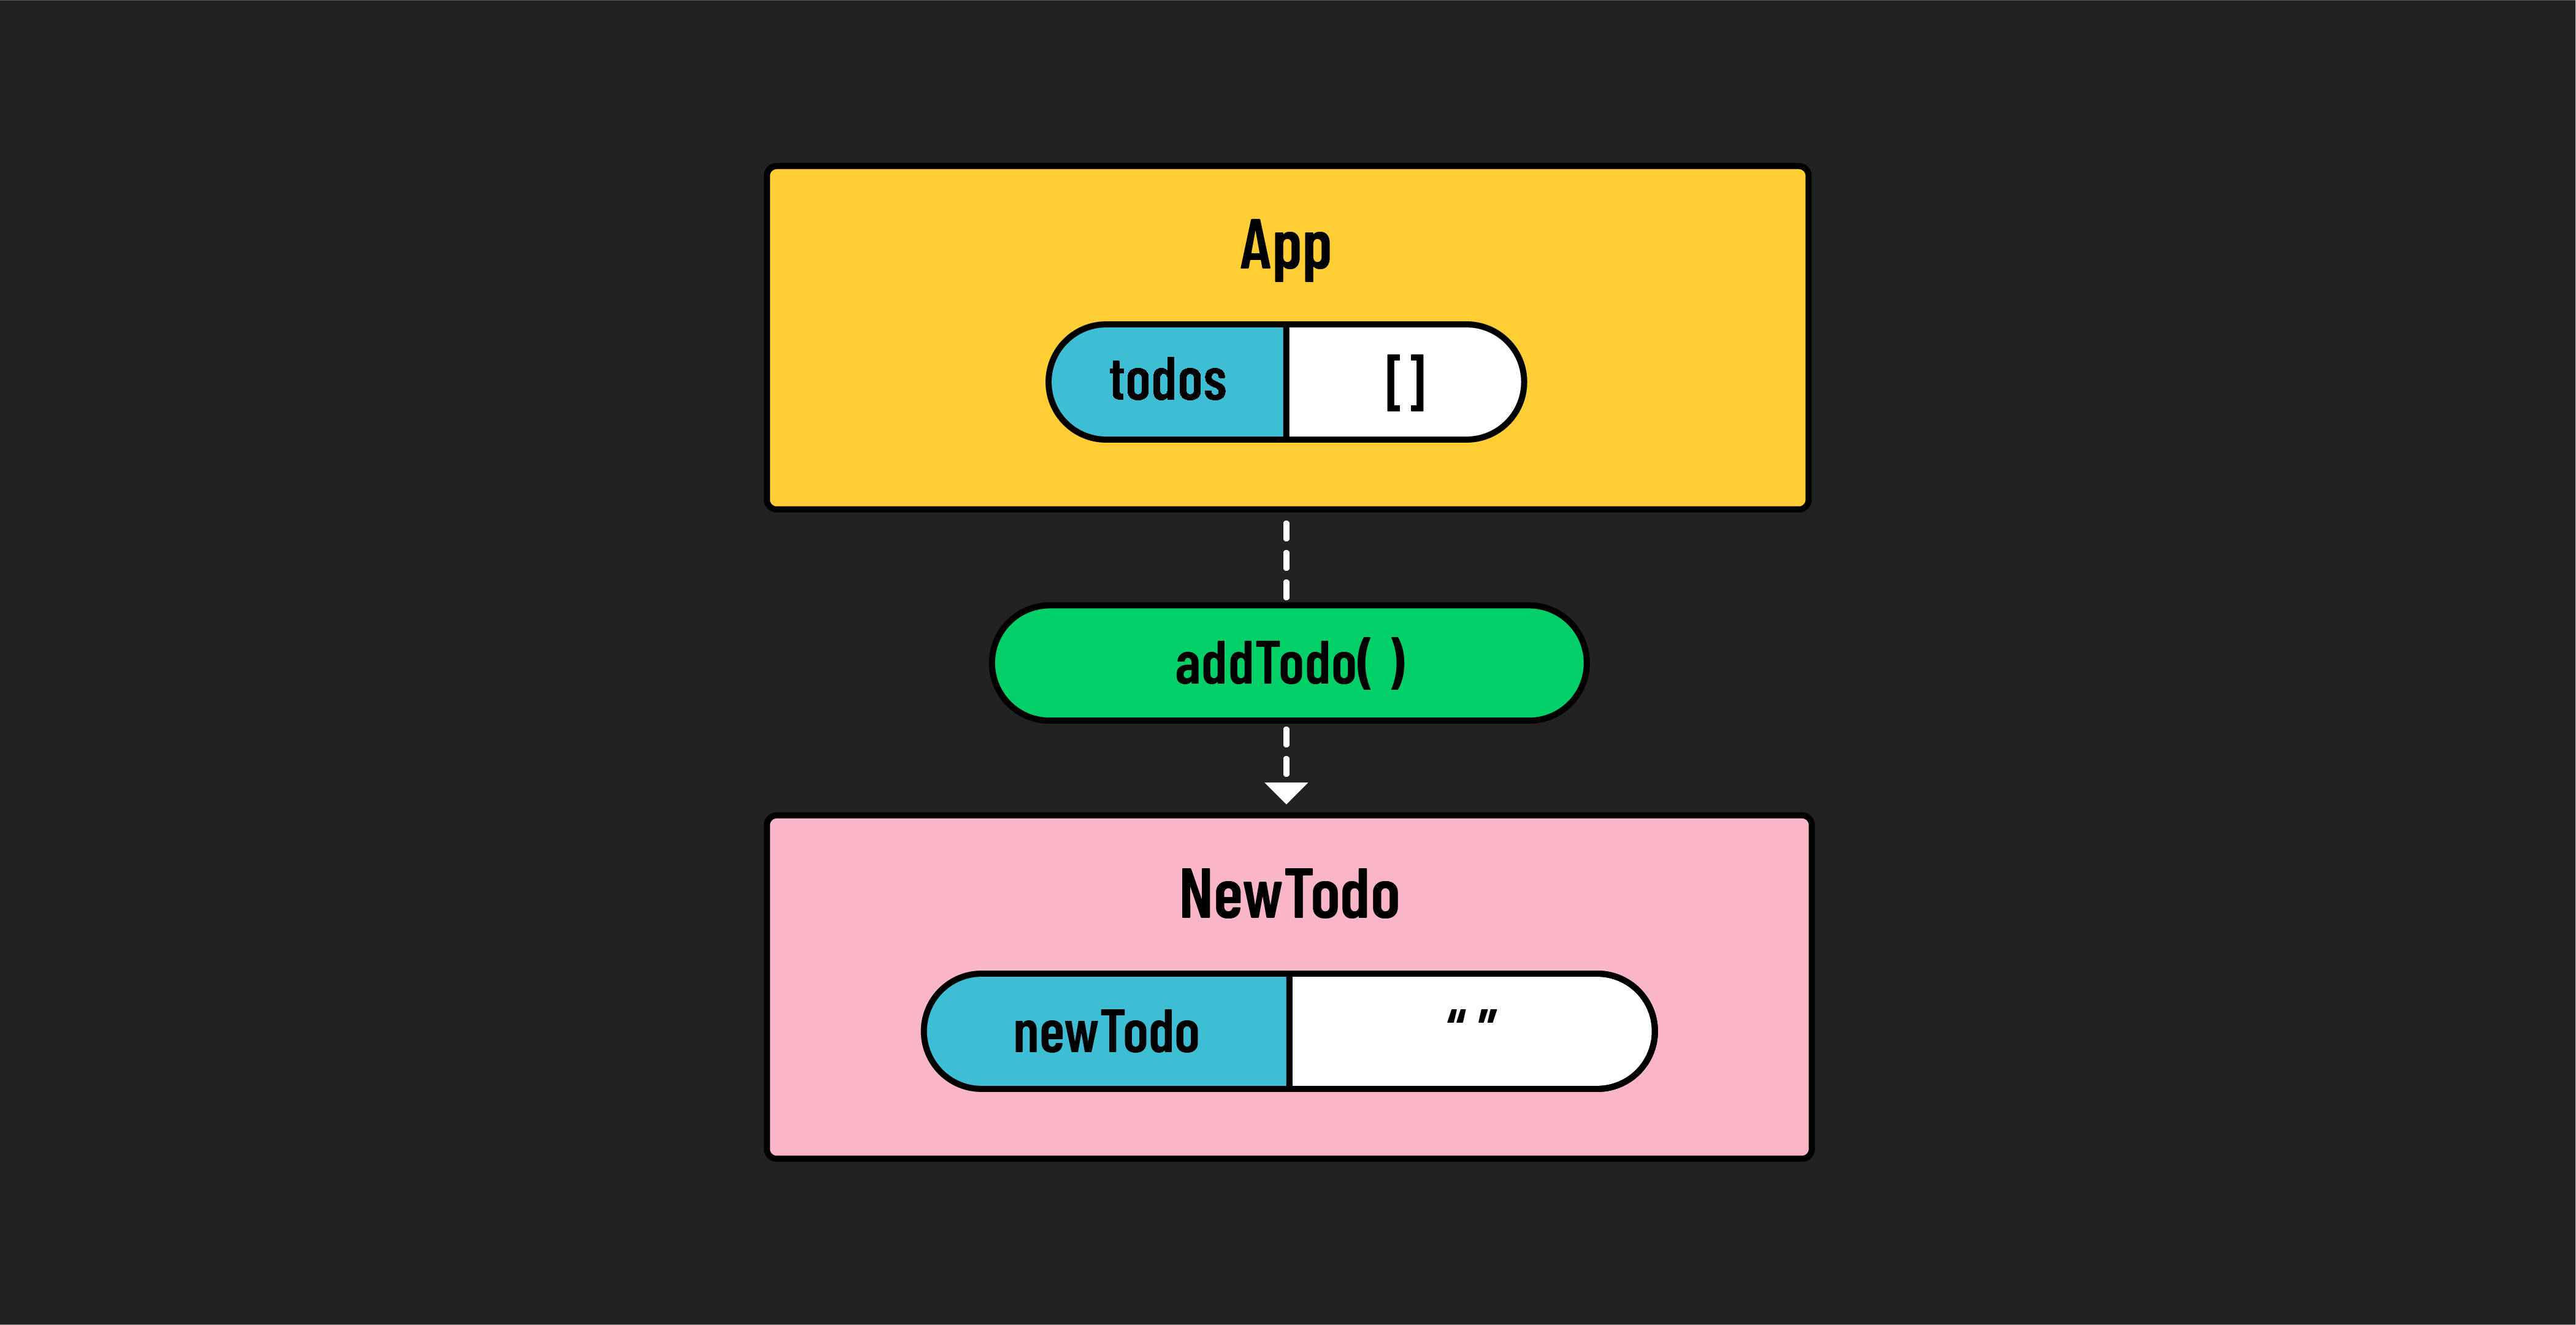
Finally, create the handleChange function, which will be called when the user types in the text input. It will invoke setNewTodo, passing in the value of the input that the user entered:
// src/components/NewTodo.jsx

  const handleChange = (event) => {
    setNewTodo(event.target.value);
  };
Notice that we set the value attribute of the <input> tag to {newTodo}, which is being updated in the handleChange function as the user types. By binding the value of the input to state, which is updated as the user types, we have created a controlled input.
Test this out in the browser by typing something into the text input.
Passing form state to addTodo
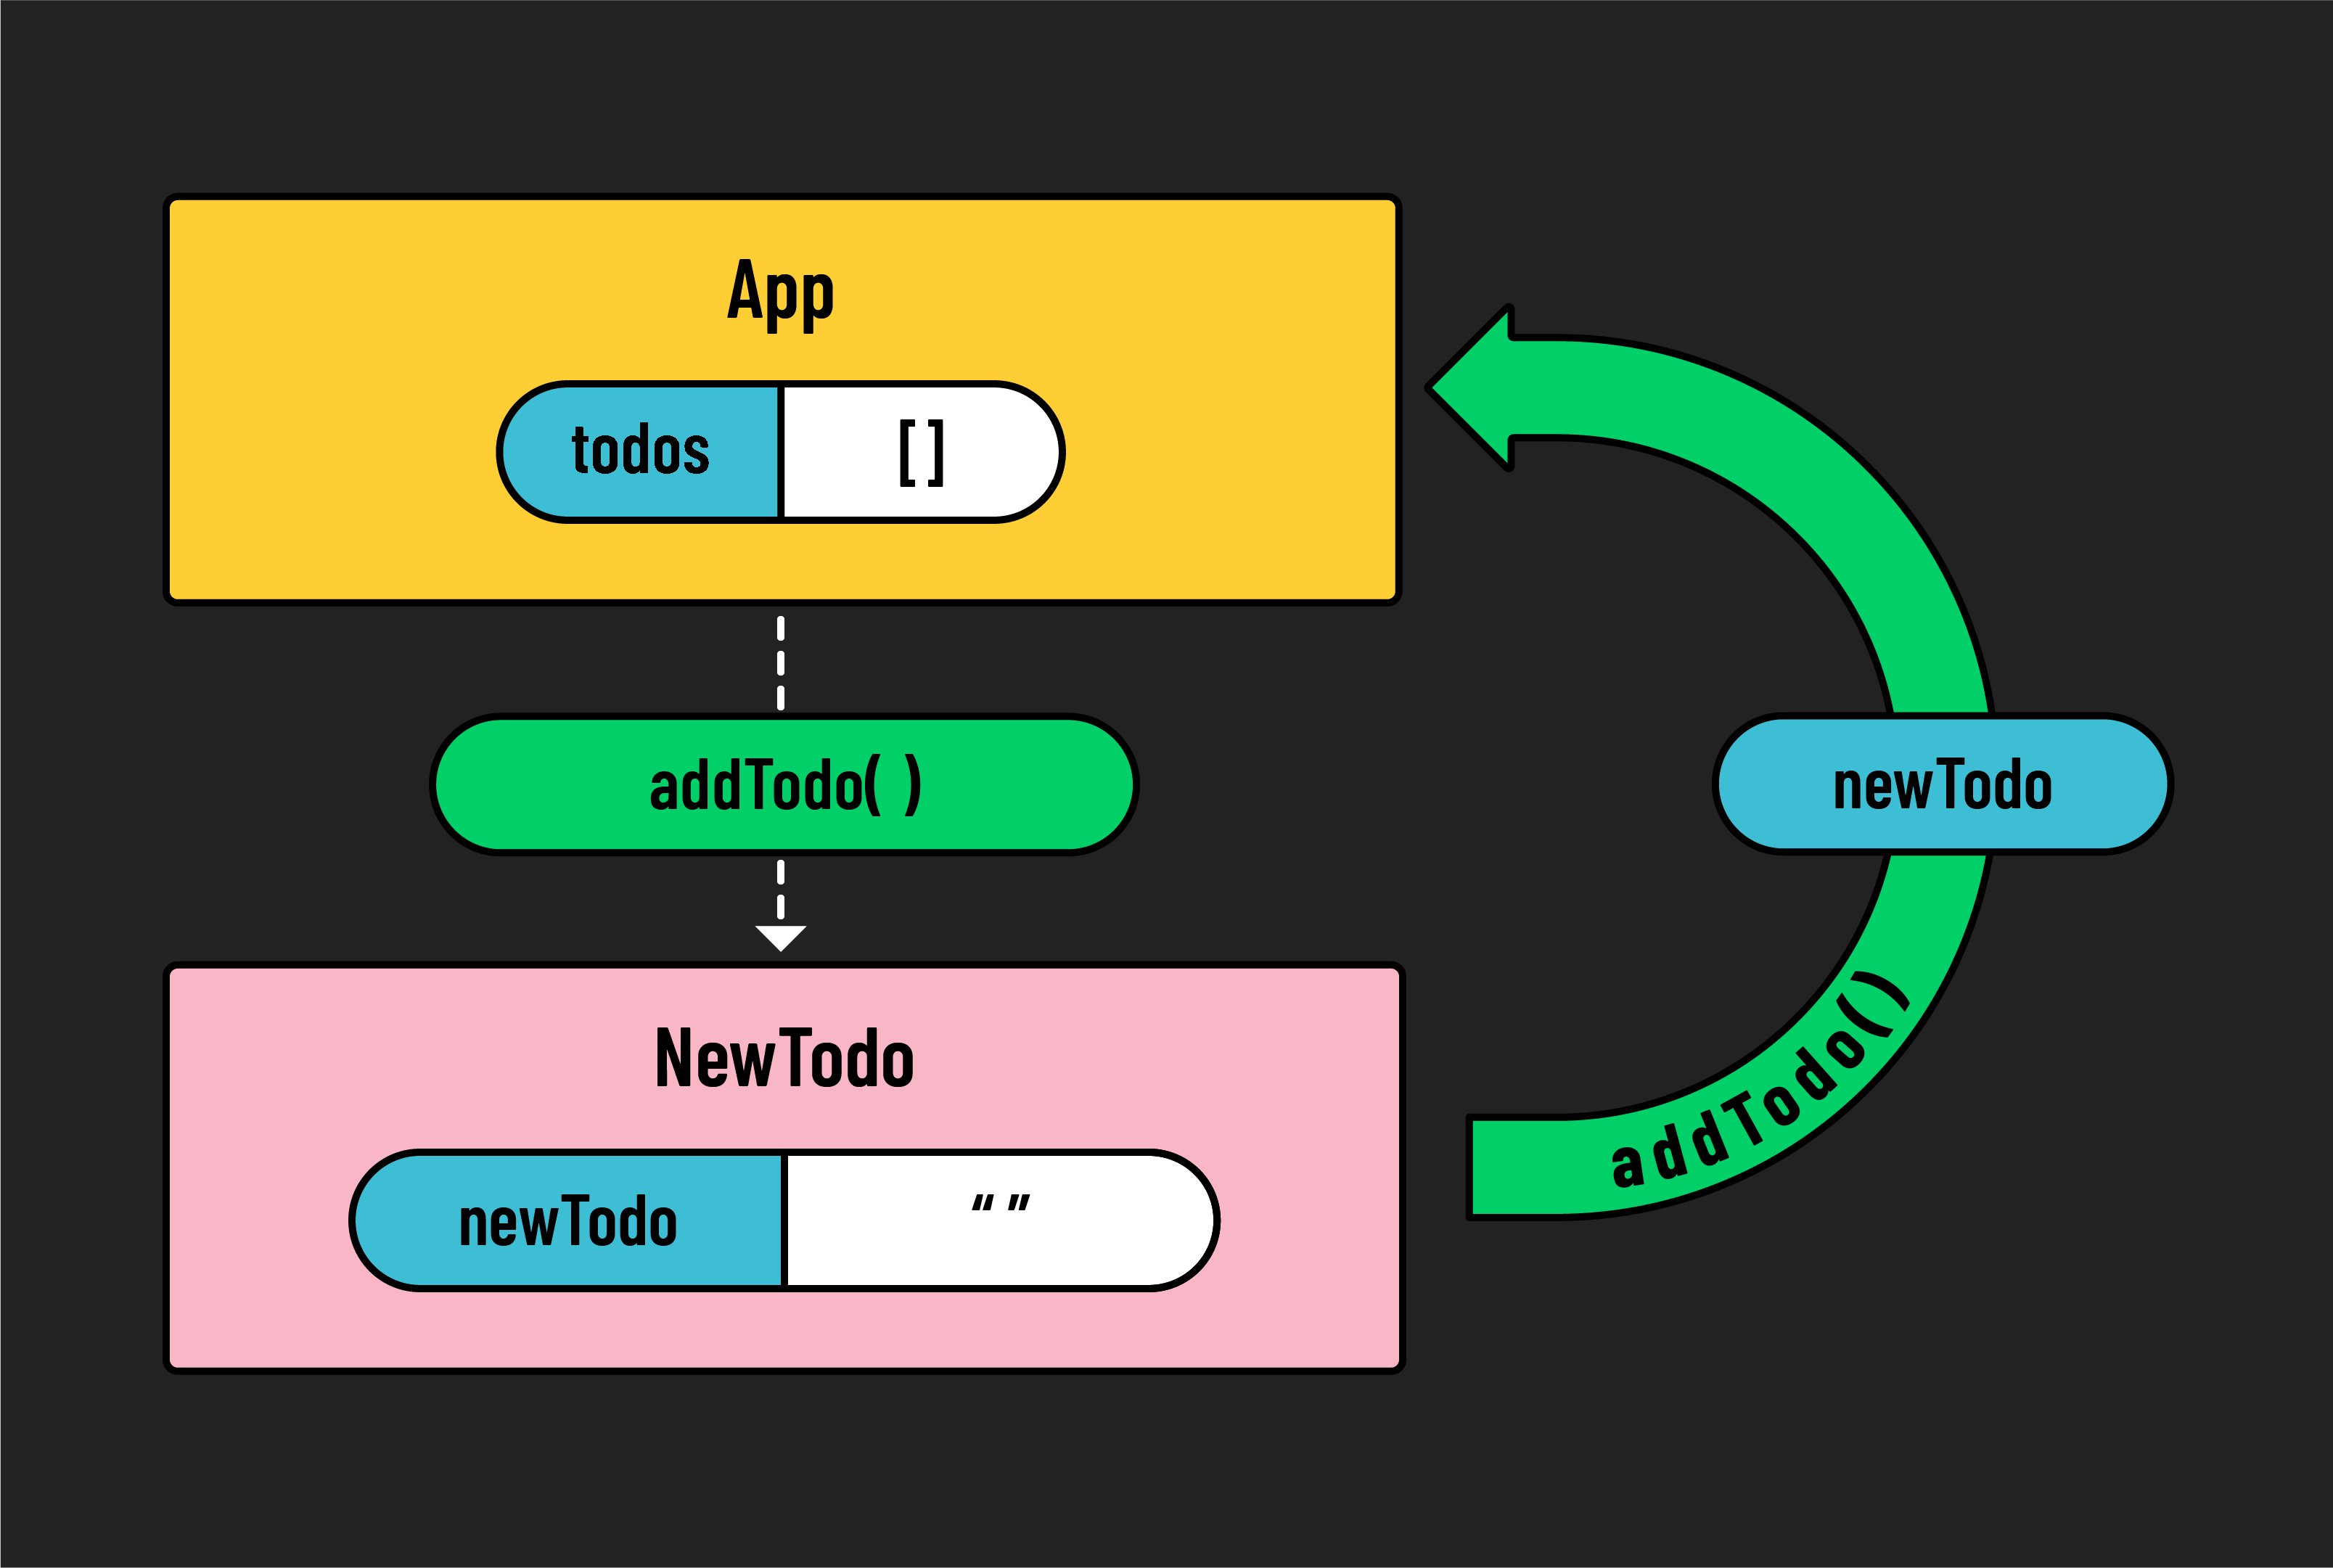
Great! Our form has its own internal state, but the text “data created within NewTodo component” is still being passed to props.addTodo. Let’s pass the newTodo state variable instead!
In NewTodo.jsx, update your handleSubmit function to accomplish this:
// src/components/NewTodo.jsx

  const handleSubmit = (event) => {
    event.preventDefault();
    props.addTodo(newTodo);
  };
Check back in the browser. Type something into the input and click the Create to-do button. You should now see that the browser console has logged your input text. Yay!
Let’s add a new feature to improve the user experience. When we click the Create to-do button, the text we entered in the <input> tag remains. It’d be nice if that value were cleared out so that it’s easier for the user to enter additional to-do items.
Because this is a controlled input, we can control the text in the input using the newTodo state variable. This means we can clear it when needed. Adjust the handleSubmit function like so:
// src/components/NewTodo.jsx
  const handleSubmit = (event) => {
    event.preventDefault();
    props.addTodo(newTodo);
    setNewTodo('');
  };
Now, when we click “Create to-do” the newTodo state variable is set to the empty string. This gets reflected in the <input> tag, removing any text the user had typed.
Try using the form in the browser, and check the DevTools console. Everything you type should show up there. Congratulations! The NewTodo form is complete, and we’ve successfully lifted the data from its newTodo state variable up to the App component!