Lifting State in React Sharing State Between Components
Learning objective: By the end of this lesson, students will be able to transfer state from one component to its sibling through their parent’s state.
Setting up state for App
This next section aims to set up a state for the App component and incorporate the newTodo data coming up from the <NewTodo> child component. Let’s start by initializing state in App.jsx. At the top of the file, import useState:
// src/App.jsx

import { useState } from 'react';
Inside the App function, initialize a state variable todo as an empty array and generate its setter function:
// src/App.jsx

  const [todos, setTodos] = useState([]);
Now comes the exciting part. We want addTodo to append its newTodo parameter onto the todos state array and then log todos. You might think you could do something like the following:
// src/App.jsx

  const addTodo = (newTodo) => {
    todos.push(newTodo);
    console.log(todos);
  };
BUT YOU CAN’T! One of the rules of React is that you can’t mutate a state variable outside of a setter function like setTodos. Instead, you have to create a new empty array, fill it up with the current values of todos, and then add newTodo to the end of it. This way, the original todos state variable remains untouched until setTodos changes it.
♻️ Repeatable pattern: To reiterate, you will never update state with the
push()method in React, ever.
Let’s implement the correct method of setting our todos state.
-
So, we start with a brand new empty array inside
addTodo:// src/App.jsx const addTodo = (newTodo) => { const updatedTodos = []; }; -
Now alter that statement to use the spread operator
..., which takes the values of an array and spreads or copies them into a new array:// src/App.jsx const addTodo = (newTodo) => { const updatedTodos = [...todos]; }; -
Now,
updatedTodosis just a duplicate oftodos. Let’s add thenewTodoas a new item at the end of the array:// src/App.jsx const addTodo = (newTodo) => { const updatedTodos = [...todos, newTodo]; }; -
We can now pass this new array into
setTodos(adding a console log for testing):// src/App.jsx const addTodo = (newTodo) => { const updatedTodos = [...todos, newTodo]; console.log(updatedTodos); setTodos(updatedTodos); }; -
Or, more concisely (this code results in the same functionality as above):
// src/App.jsx

  const addTodo = (newTodo) => {
    console.log([...todos, newTodo])
    setTodos([...todos, newTodo]);
  };
Nice! Check the browser. Type something into the text input and click the Create to-do button. Each time the button is clicked, the DevTools console should log the entire todos array with whatever was typed into the text input as its last element.
We’ve successfully moved data from a child component into the parent’s state.
Displaying the to-dos
Now that we’ve got the App component’s todos state variable updating properly, all we need to do now is display items on the page. Update the return statement in App.jsx like so:
// src/App.jsx

  return (
    <>
      <h1>To-do App</h1>
      <NewTodo addTodo={addTodo} />
      <ul>
        {todos.map((todo, index) => {
          return <li key={index}>{todo}</li>;
        })}
      </ul>
    </>
  );
Try it out the browser, and you should have a working to-do app! We have successfully lifted the state from the <NewTodo> form, used it to update the <App> component’s state, and displayed the values coming up from <NewTodo> in <App>.
Moving the list to its own component
Now that we’ve passed data from a child component to a parent component through lifting state, let’s see how to pass this same data back down to a sibling component. We’ll pass the todos state variable in <App> down into a new child, which we’ll call <TodoList>. In this way, the data comes up from <NewTodo> into <App> and then goes back down into <TodoList>.
First, let’s create a new component to hold our <TodoList>:
touch src/components/TodoList.jsx
Add the following to it:
// src/components/TodoList.jsx

const TodoList = (props) => {
  const tempTodos = ['first', 'second', 'third'];
  return (
    <ul>
      {tempTodos.map((todo, index) => {
        return <li key={index}>{todo}</li>;
      })}
    </ul>
  );
};

export default TodoList;
There’s nothing too exciting here. It’s currently a standalone component with a static array that gets mapped over to generate <li> elements. Import that component into App.jsx:
// src/App.jsx

import TodoList from './components/TodoList.jsx';
Add it to the return statement in App.jsx and replace the <ul> we created in the last section. The return statement in App.jsx should now look like this:
// src/App.jsx

  return (
    <>
      <h1>To-do App</h1>
      <NewTodo addTodo={addTodo} />
      <TodoList />
    </>
  );
If you check the browser, you should see that a static three-item list has replaced our previous dynamic list. That’s fine. We’ll make the <TodoList> dynamic next.
Pass the todos state variable in App.jsx into <TodoList/>:
// src/App.jsx

  return (
    <>
      <h1>To-do App</h1>
      <NewTodo addTodo={addTodo} />
      <TodoList todos={todos}/>
    </>
  );
Now, in TodoList.jsx, use props.todos instead of tempTodos (which you can remove now). Todos.jsx should now look like this:
// src/components/TodoList.jsx

const TodoList = (props) => {
  return (
    <ul>
      {props.todos.map((todo, index) => {
        return <li key={index}>{todo}</li>;
      })}
    </ul>
  );
};

export default TodoList;
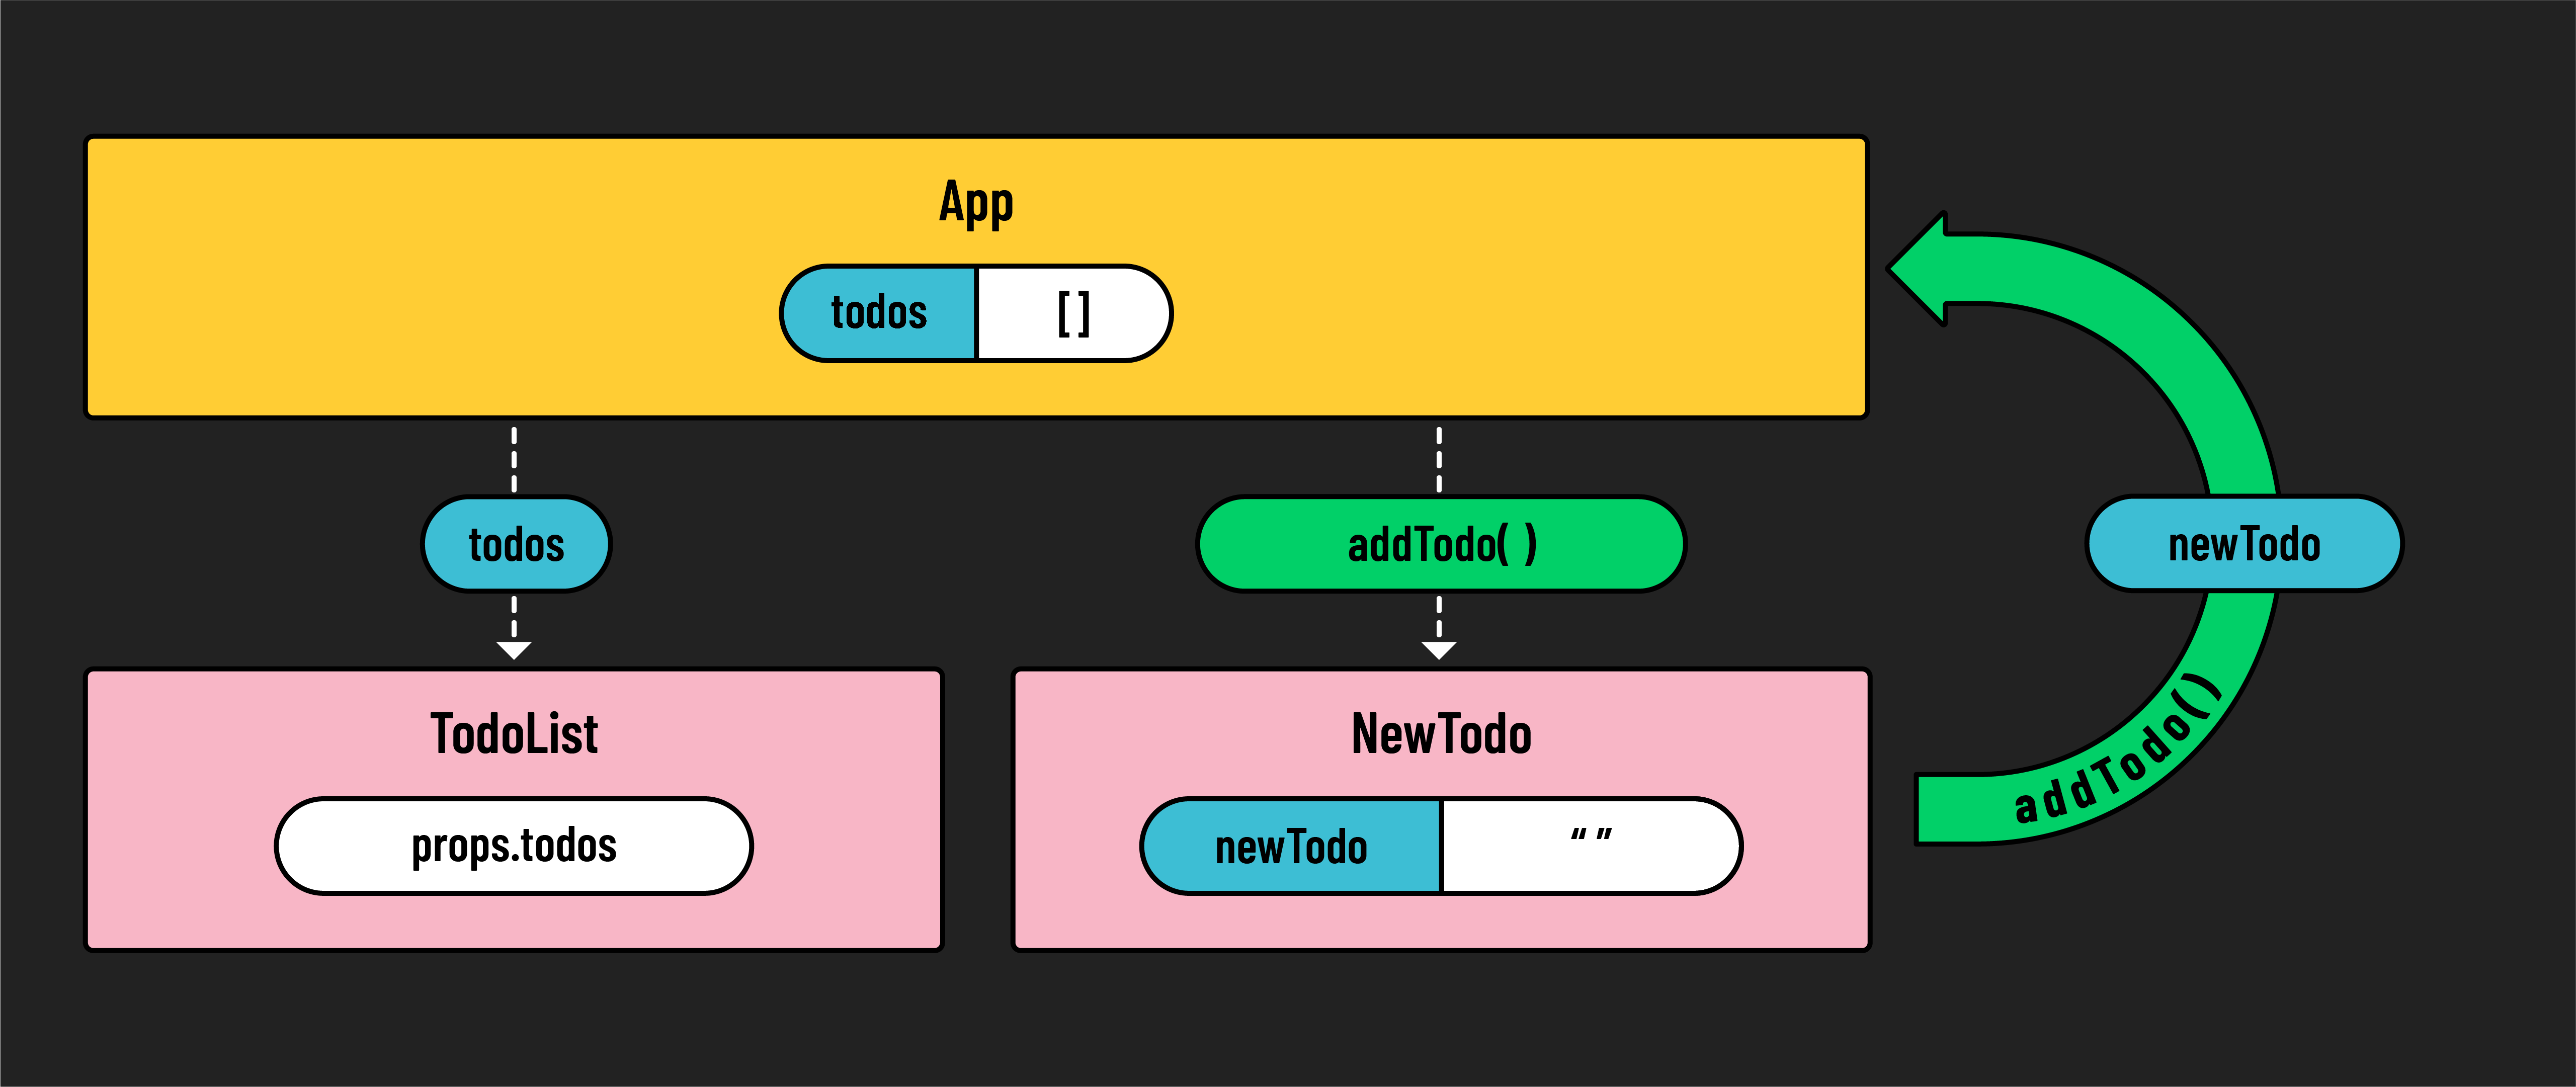
Congrats! You have now lifted state up from NewTodo.jsx into App.jsx and then passed it back down into TodoList.jsx, effectively moving state from NewTodo.jsx to its sibling component TodoList.jsx.