Python and PostgreSQL Installfest - Early 2024 Ubuntu and WSL
What you need to begin (you must read this, do not skip this, this is important)
- A device running Ubuntu 22.04 LTS (Jammy Jellyfish), either natively or with WSL in Windows 10 or Windows 11.
- A user account with administrative privilege to your local installation of your OS.
Python
Python is an extremely popular programming language with a simple syntax. It is a natural choice for developers to have in their toolbox. Python must be installed on your machine to execute programs written with it.
To install Python, run these commands in your terminal application:
sudo apt-get install software-properties-common
sudo add-apt-repository ppa:deadsnakes/ppa
sudo apt-get update
sudo apt-get install python3.11
Make Python 3.11 the default version used with:
sudo update-alternatives --install /usr/bin/python3 python3 /usr/bin/python3.11 10
You can test the installation by running python3 --version.
Install pip
pip is the package installer for Python. You’ll need it to use Python packages found on the Python Package Index (PyPI).
Install pip with this command:
sudo apt install python3-pip
PostgreSQL
PostgreSQL is a popular and robust Relational Database Management System (RDBMS).
PostgreSQL comes with Ubuntu, but we will want to ensure we have a specific version installed.
psql --version
If the output of this command starts with psql (PostgreSQL) 16 then you don’t need to install Postgres; you will need to configure it. Skip to the Configure PostgreSQL section below.
Otherwise, let’s install version 16 of PostgreSQL!
Install PostgreSQL
First, add the postgresql apt as a source for packages by running this command in your terminal:
sudo apt install -y postgresql-common
sudo /usr/share/postgresql-common/pgdg/apt.postgresql.org.sh
You’ll be asked to confirm this action. Do so.
Next, run the following command in your terminal to update your package lists and install PostgreSQL version 16:
sudo apt update
sudo apt install postgresql-16
You may be asked if you would like to continue. Type Y and hit the Enter key to continue installing.
Check that the correct version is installed with:
psql --version
The output of this command should start with psql (PostgreSQL) 16. If it does not, reach out to your instructor for troubleshooting steps
Starting the PostgreSQL service
🚨 Important!! You’ll have to run this command on each restart to start up the PostgreSQL service:
sudo service postgresql start
Configure PostgreSQL
You must assign the default admin user a password to connect to a database. Do so with this command:
sudo passwd postgres
Enter a password when prompted. It is EXTREMELY IMPORTANT that you do not forget the password. You can make it the same password as your user account password if you prefer. Keep it stored in your password manager. Note that as you type, no characters will appear.
If the new password you have chosen is valid, you will see this returned in the console:
passwd: password updated successfully
Upon seeing this, stop the PostgreSQL service with this command:
sudo service postgresql stop
Close all running terminal instances, including any instances of VS Code that are currently open.
Open a new terminal instance. Start the PostgreSQL service again with:
sudo service postgresql start
We now need to create a database role that matches the name of your operating system user. Use this command. Do not replace $USER - this will automatically create a user that matches your Ubuntu OS username:
sudo -u postgres createuser $USER
Follow that up by creating a database of the same name. Again, do not replace $USER. This will automatically create a user that matches your Ubuntu OS username:
sudo -u postgres createdb $USER
Now run this command to switch to the postgres user:
sudo su - postgres
Finally, enter:
psql
You have now successfully entered the PostgreSQL shell as the postgres user!
Assigning Roles
We want the user we just made to be able to create databases, so we need to assign it that role with this command in the postgres shell. YOU MUST replace <user> (including the < and the >) with your Ubuntu username:
ALTER ROLE <user> WITH CREATEDB;
Don’t forget the semicolon. It must be used at the end of the command.
You will also want to give this user superuser permissions. This will keep you from ever having to use the postgres user again. YOU MUST replace <user> (including the < and the >) with your Ubuntu username:
ALTER ROLE <user> WITH SUPERUSER;
Again, don’t forget the semicolon.
Close the terminal session and start a new one.
You should now be able to run this command and start the Postgres shell successfully:
psql
Let’s test your ability to create databases. Run the following command in the postgres shell:
CREATE DATABASE apples;
As always, don’t leave off the semicolon!
Next, enter the \l command to see a list of all databases. If you can see the apples database you just created, then success!
Let’s go ahead and delete that database with the following command:
DROP DATABASE apples;
Enter \l again to confirm the database was dropped.
Installing Pipenv to use virtual environments
What is a virtual environment?
A virtual environment is a self-contained directory that you create using a tool like Pipenv, which contains a Python interpreter and all the libraries and dependencies needed for a particular project.
It allows you to isolate your project’s dependencies from other projects on your system, preventing conflicts such as different versions of the same library used in different projects and ensuring that your project runs consistently across different environments.
Virtual environments provide a clean and isolated environment where you can install these dependencies without affecting other projects.
By creating a virtual environment for each project, you can:
- Install dependencies locally within the environment.
- Install additional packages required for your project, such as database drivers, middleware, or third-party packages.
- Ensure your project remains compatible with specific versions frameworks and other dependencies.
- Easily manage and update dependencies without worrying about conflicts with other projects.
Install Pipenv
Install Pipenv using pip:
pip install pipenv --user
If you encounter any errors, check out the Handling errors 💔 subsection below. Otherwise, continue to the Add Pipenv to your PATH section.
Handling errors 💔
You may encounter an error that starts with the following text:
error: externally-managed-environment
If this is the case, use this command to install Pipenv instead:
pip install pipenv --user --break-system-packages
If you still have an error or encounter any other error, reach out to your instructor for assistance.
Add Pipenv to your PATH
Run this command in your Terminal so that you can run pipenv:
cat << EOF >> ~/.zshrc

export PATH="$(python3 -m site --user-base)/bin:\$PATH"
EOF
There is no output from this command.
Close the Terminal application entirely after running this command.
Open the Terminal application.
Confirm that pipenv was installed correctly with this command in your Terminal:
pipenv --version
If this doesn’t return a version number, contact your instructor for assistance.
Creating a virtual environment (demo)
You don’t need to do this now, but below are details about how you create virtual environments that use Django. Feel free to skip this, just read through it, or run these commands!
🧠 This does not install Django globally on your machine - it is a demo of what you will do for each Django project you create. You do not need to do any of the following to complete the installfest. If you have gotten this far, you’ve installed everything you need to install, this is just a demo so you can get practice.
Navigate to the directory where you want to create your project - we’d recommend ~/code/ga/lectures.
Create a new directory for a test project:
mkdir my-environment-test
cd my-environment-test
Initialize a new virtual environment inside your project directory:
pipenv install django
This may take a moment and appear as if nothing is happening; give it some time.
This command will create a new Pipfile and Pipfile.lock in your project directory, specifying Django as a dependency.
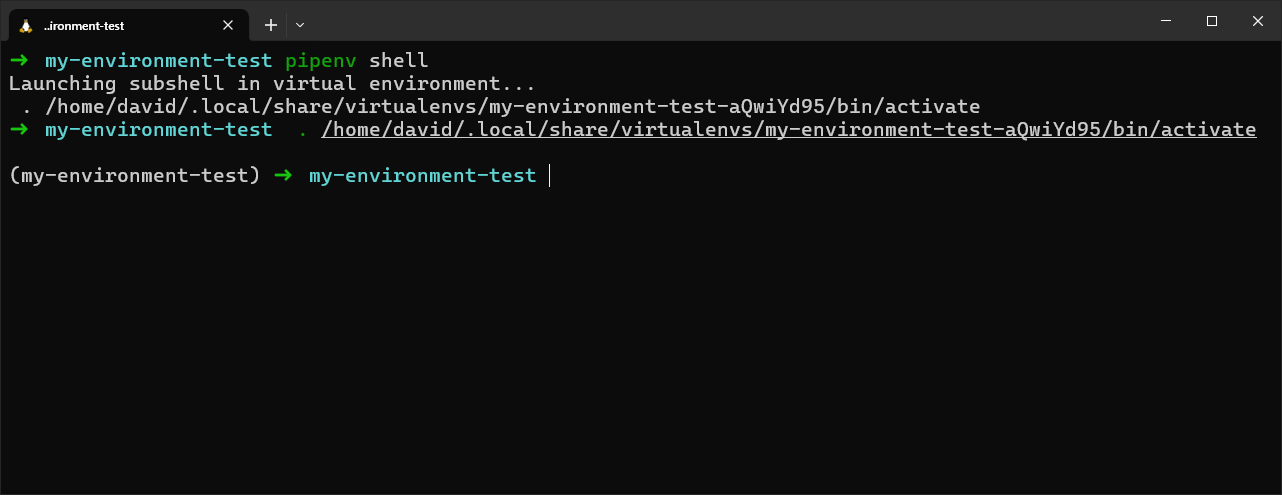
Activate the pipenv shell:
pipenv shell
This will activate the virtual environment and change your terminal prompt to indicate that you are now working within the pipenv shell.
Verify the installation:
django-admin --version
When you’re done working on your project, you can deactivate the pipenv shell by typing:
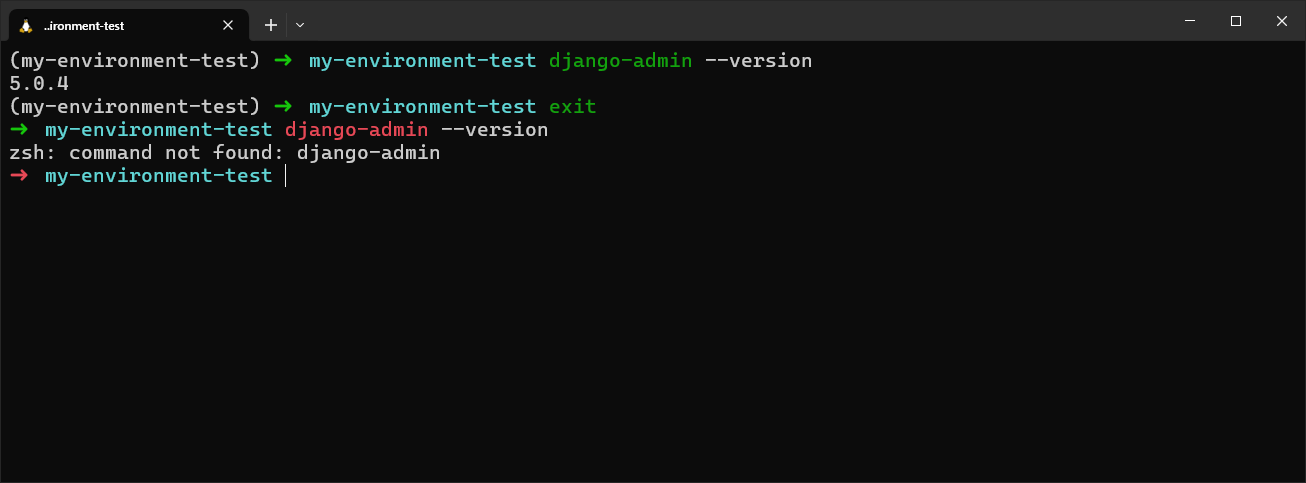
exit
Note if you run the django-admin --version command again, you’ll receive a message that it’s not installed. Packages only work within the environment they were installed in!