React State Management
The useState() Hook
Learning objective: By the end of this lesson, students will be able to use the useState() hook to create stateful components.
Creating state
State is created in a React component using the useState() hook. The useState() hook is a function that returns an array with two elements:
- A state variable to hold your state data at the
0index. - A state setter function that allows you to update that state value and trigger the re-render of a component at the
1index.
Let’s focus on the following for now:
- Creating a state variable.
- Assigning an initial state value.
- Visually displaying that state value.
Let’s get to work creating our first state variable.
First, import the useState() hook from React at the top of `App.jsx. Then, we’ll use a destructuring assignment to unpack the two values returned from our state hook: a state variable and a setter function.
// src/App.jsx

import { useState } from 'react';
Next, we’ll construct the state variable. We will name our state variable isDarkMode and our function to set state setIsDarkMode.
♻️ Repeatable pattern: While you can technically name these anything you want, convention dictates that you name your state variable
stateVariableand your state setter functionsetStateVariable. What we name the state variable is up to us, but it should reflect the data being stored and updated. In this case,isDarkModeis our state variable that holds the current state (like whether dark mode is on or off), andsetIsDarkModeis a function that lets us change or set this state.Using
setas a prefix is a widely adopted convention in programming. It indicates that this function sets or updates a variable.
This boolean state variable will manage the visibility of the dark mode. State variables that are intended to hold a boolean value, like a switch that can be either on or off, will typically begin with is, has, can, or other prefixes that imply a boolean value or state condition. This is a common naming convention that helps to clearly indicate the purpose and type of a variable, making your code more readable and understandable for other developers.
These variables often control elements that users interact with. We’ve followed that convention here with isDarkMode.
When planning your state, always consider the dynamic nature of your components. Here, we have a binary toggle - dark mode can be either on or off, so a boolean works well.
// src/App.jsx

import { useState } from 'react';
import './App.css';

const App = () => {
  const [isDarkMode, setIsDarkMode] = useState();

  return (
    <h1>Hello world!</h1>
  );
};

export default App;
🧠 Destructuring Syntax: This syntax might feel unfamiliar at first, but let’s take a closer look at what is happening here. Imagine what returns from
useState()as a box; when we open the box, we are given two items: a variable to store data and a function to update that variable. We’ll dive intosetIsDarkMode()and how to use it to update the state value.
Let’s add a console.log() to take a look at our new state value isDarkMode:
// src/App.jsx

import { useState } from 'react';
import './App.css';

const App = () => {
  const [isDarkMode, setIsDarkMode] = useState();

  // Add a console.log
  console.log('Our isDarkMode state value is:', isDarkMode);

  return (
    <h1>Hello world!</h1>
  );
};

export default App;
⚠️ Make sure your
console.log()is outside of the return statement.
Initial state value
In your terminal, run:
npm run dev
Then navigate to http://localhost:5173/ and open the console pane in your DevTools. You should see a message reading: Our isDarkMode state value is: undefined.
This is because we have not assigned an initial state value!
We’ll begin with the state set to false for our dark mode toggle. This means that the app will start in light mode by default.
To give our state an initial value, we need to provide that value as an argument when calling the useState() hook.
// src/App.jsx

import { useState } from 'react';
import 'App.css'

const App = () => {
  // Update the initial state value to `false`
  const [isDarkMode, setIsDarkMode] = useState(false);

  console.log('Our isDarkMode state value is:', isDarkMode);

  return (
    <h1>Hello world!</h1>
  );
};

export default App;
If we recheck our console, we can see that the state value is false. This is the initial state value assigned to isDarkMode. If you change the initial state value to true and recheck the console, you will see that the state value is now true.
useState() syntax
We can now see the complete syntax for using the useState() hook:
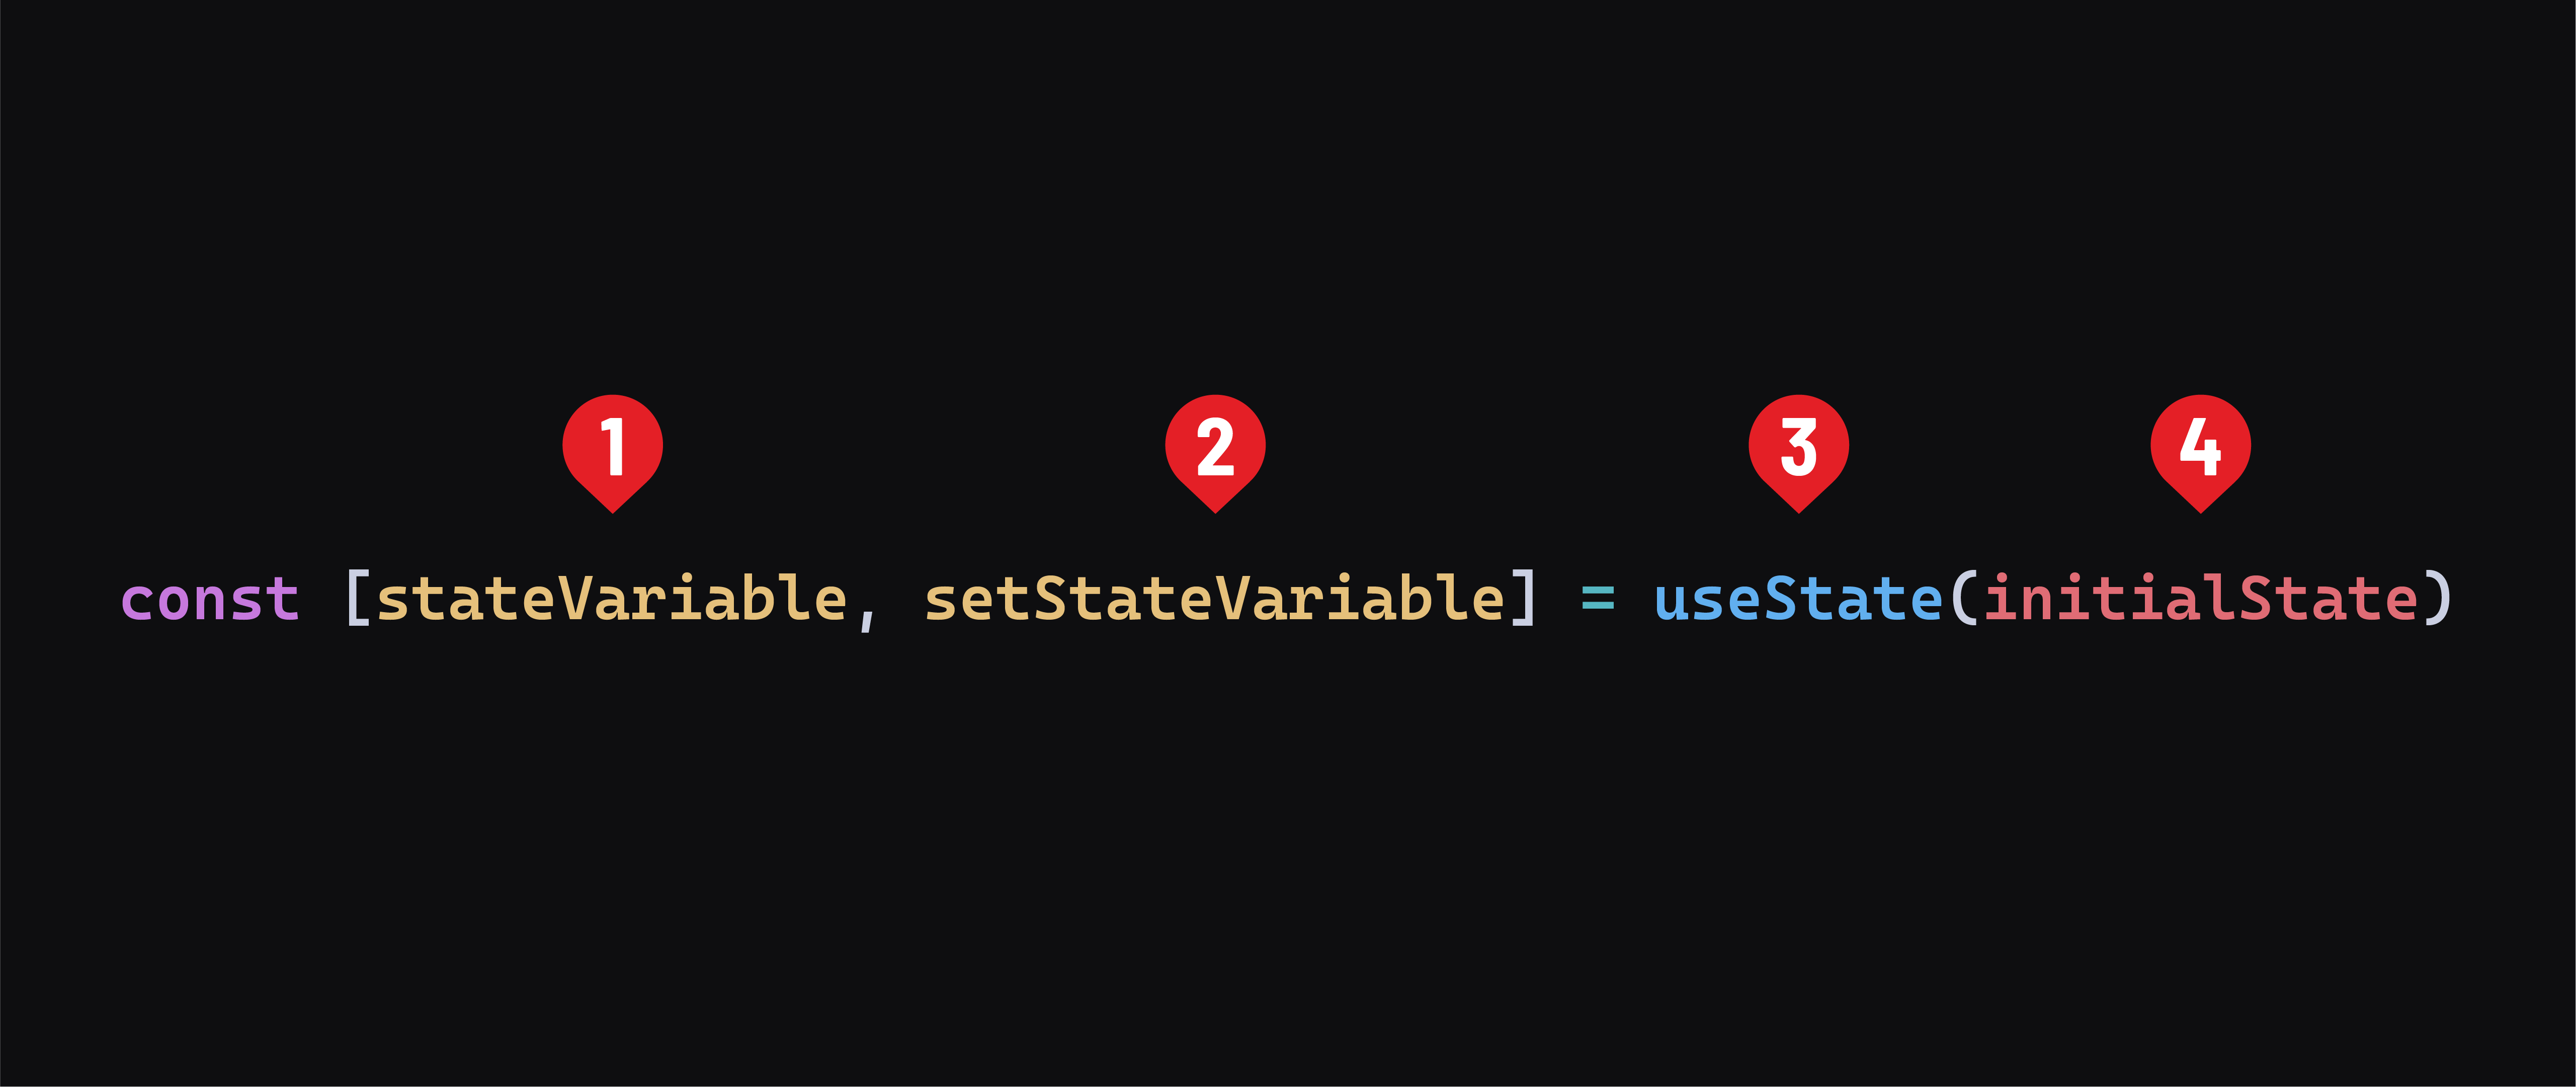
- The current state.
- The setter function is called to manipulate the state variable.
- The
useState()hook is used to declare a state variable. - The initial state of the state variable.
Displaying state value

Now that we can successfully log the value of our state let’s use this value to alter the UI of our component. We will use the isDarkMode state value to conditionally render dark or light modes. We can accomplish this in many ways, but for simplicity, we’ll use a ternary operator to conditionally apply a CSS class to an element in our component.
Let’s look at an example of this ternary operator:
isDarkMode ? 'dark' : 'light'
The result of this operation will either be the string value dark or light. We can use this result as a class name to render a dark or light mode conditionally.
💡 In React, we’ll frequently use ternary operators. They are a great way to conditionally render content in JSX where we need to use expressions. As a bonus, they are easy to read and don’t take up much space in the markup.
Now, we’ll create a couple of simple CSS classes to define our two modes. If isDarkMode is true, we will want to change the background color of our app to dark and the text color to light. If isDarkMode is false, we will want to change the background color of our app to light and the text color to dark. Replace the current contents of App.css with the following rules:
/* src/App.css */

.light {
  background-color: #ffffff; /* white background */
  color: #333333; /* darker text for contrast */
  border-color: #dddddd; /* light grey borders */
  font-family: 'Arial', sans-serif;
}

.dark {
  background-color: #2c3e50; /* dark background */
  color: #ecf0f1; /* light text for contrast */
  border-color: #34495e; /* slightly darker border for depth */
  font-family: 'Arial', sans-serif;
}
⚠️ If the
App.jsxfile doesn’t contain animportstatement for the CSS file, this CSS won’t be applied. Ensure you haven’t removed it!
We are ready to bring these elements together and conditionally apply our CSS classes depending on our state.
// src/App.jsx

import { useState } from 'react';
import './App.css';

const App = () => {
  const [isDarkMode, setIsDarkMode] = useState(false);

  console.log('Our isDarkMode state value is:', isDarkMode);

  // use `className` instead of `class` to apply styles in react
  return (
    <div className={isDarkMode ? 'dark' : 'light'}>
      <h1>Hello world!</h1>
    </div>
  );
};

export default App;
If you change the initial state to true and check the browser, you will see that our component has taken on some dark mode styling. If you change the initial state to false, you will see that our component has taken on our light mode styling.
Building state in React applications
In React, deciding what to keep in state is important for your application’s functionality. Here are some key questions to help you figure out what should go into the state of a component:
- Data for rendering: What information does the component need to show? For instance, if you’re making a to-do list app, the state might need to include the list of tasks.
- Data to monitor: What information does the component need to track? This could be anything that changes over time or in response to user interactions, like whether a task is marked as done.
- Data to update: What information will change within the component? Consider what needs to be dynamic, like adding a new task to your to-do list.
There are also some quick rules about what not to put in state:
- Contradictory state: Avoid storing pieces of state that could disagree with one another, as this can lead to errors.
- Derived state: If you’re making calculations or decisions based on state, you likely don’t also need to hold the result in state.
- Duplicated state: It’s important to maintain a single source of truth for the state of your application.
Types of data to store in state
The useState() hook in React is flexible and can accommodate any JavaScript data type. This allows us to manage and render dynamic content in many forms. Here are some examples:
Primitives
For straightforward data like a user’s name or a counter, state can be simple like a string, number, or boolean.
const [count, setCount] = useState(0);
const [name, setName] = useState('John Doe');
Objects
When you have more complex related information, such as user details or a form, an object might be the most efficient way to store it.
const [user, setUser] = useState({
  name: 'John Doe',
  age: 25,
  email: 'johnDoe@mail.com'
});
Arrays
An array is ideal if you’re dealing with a list of items, like books in a library app. This is especially handy when working with data from APIs or in CRUD applications.
const [books, setBooks] = useState([
  {
    title: 'The Great Gatsby',
    author: 'F. Scott Fitzgerald'
  },
  {
    title: 'To Kill a Mockingbird',
    author: 'Harper Lee'
  }
]);
💡 Notice that all of these data types could be passed in as the initial value of
useState().
🎓 You Do
Now it’s your turn to practice. Create a new state in your React component. This state will be an object with four properties:
firstName: Set this to a string with your first name.lastName: Set this to a string with your last name.hasPets: Set this to a boolean (true or false) indicating if you have pets.age: Set this to a number representing your age.
Once you have set up your state, do two things:
- Log it: Use a
console.logto see your state in the browser console. - Display in App: Render your state in your app. Display it as a sentence, like: “Hello, my name is Jane Doe, I am 25 years old, and I have pets.”