Setup Your Own VM Lab Create an Ubuntu VM
Learning objective: By the end of this lesson, students will be able to create a new VM and install the Ubuntu operating system on it.
Creating a virtual machine (VM) running Ubuntu
Most of the images in this guide demonstrate this process utilizing Windows, but the steps should generally be the same regardless of your OS. When there are differences, these are called out or demonstrated below.
🧠 As part of this exercise, you may need to do some troubleshooting and research to complete some of the steps. This is a valuable skill to develop now, as you’ll need it throughout your career. If something is not working, try to deduce what the problem is and use your problem-solving skills and the internet to find a solution.
Download the Ubuntu 24.04 ISO
You’ll need a copy of the Ubuntu 24.04 ISO file to install Ubuntu on your VM. An ISO file is a disk image containing all the files that would be on a physical disk. It’s the most common format used to install operating systems.
🧠 ISO files were far more prevalent when software was distributed primarily using physical media such as CDs or DVDs. You won’t encounter them as often when installing regular applications anymore, but they used to be one of the primary distribution formats for all software.
This process is slightly different depending on your OS and hardware. Follow the instructions for your OS below.
Non-Apple Silicon Macs, Windows, and Ubuntu
Use this link to download the Ubuntu 24.04 ISO file.
Apple Silicon Macs
Use this link to download the Ubuntu 24.04 ISO file for ARM computers.
Create a new VM in VirtualBox
-
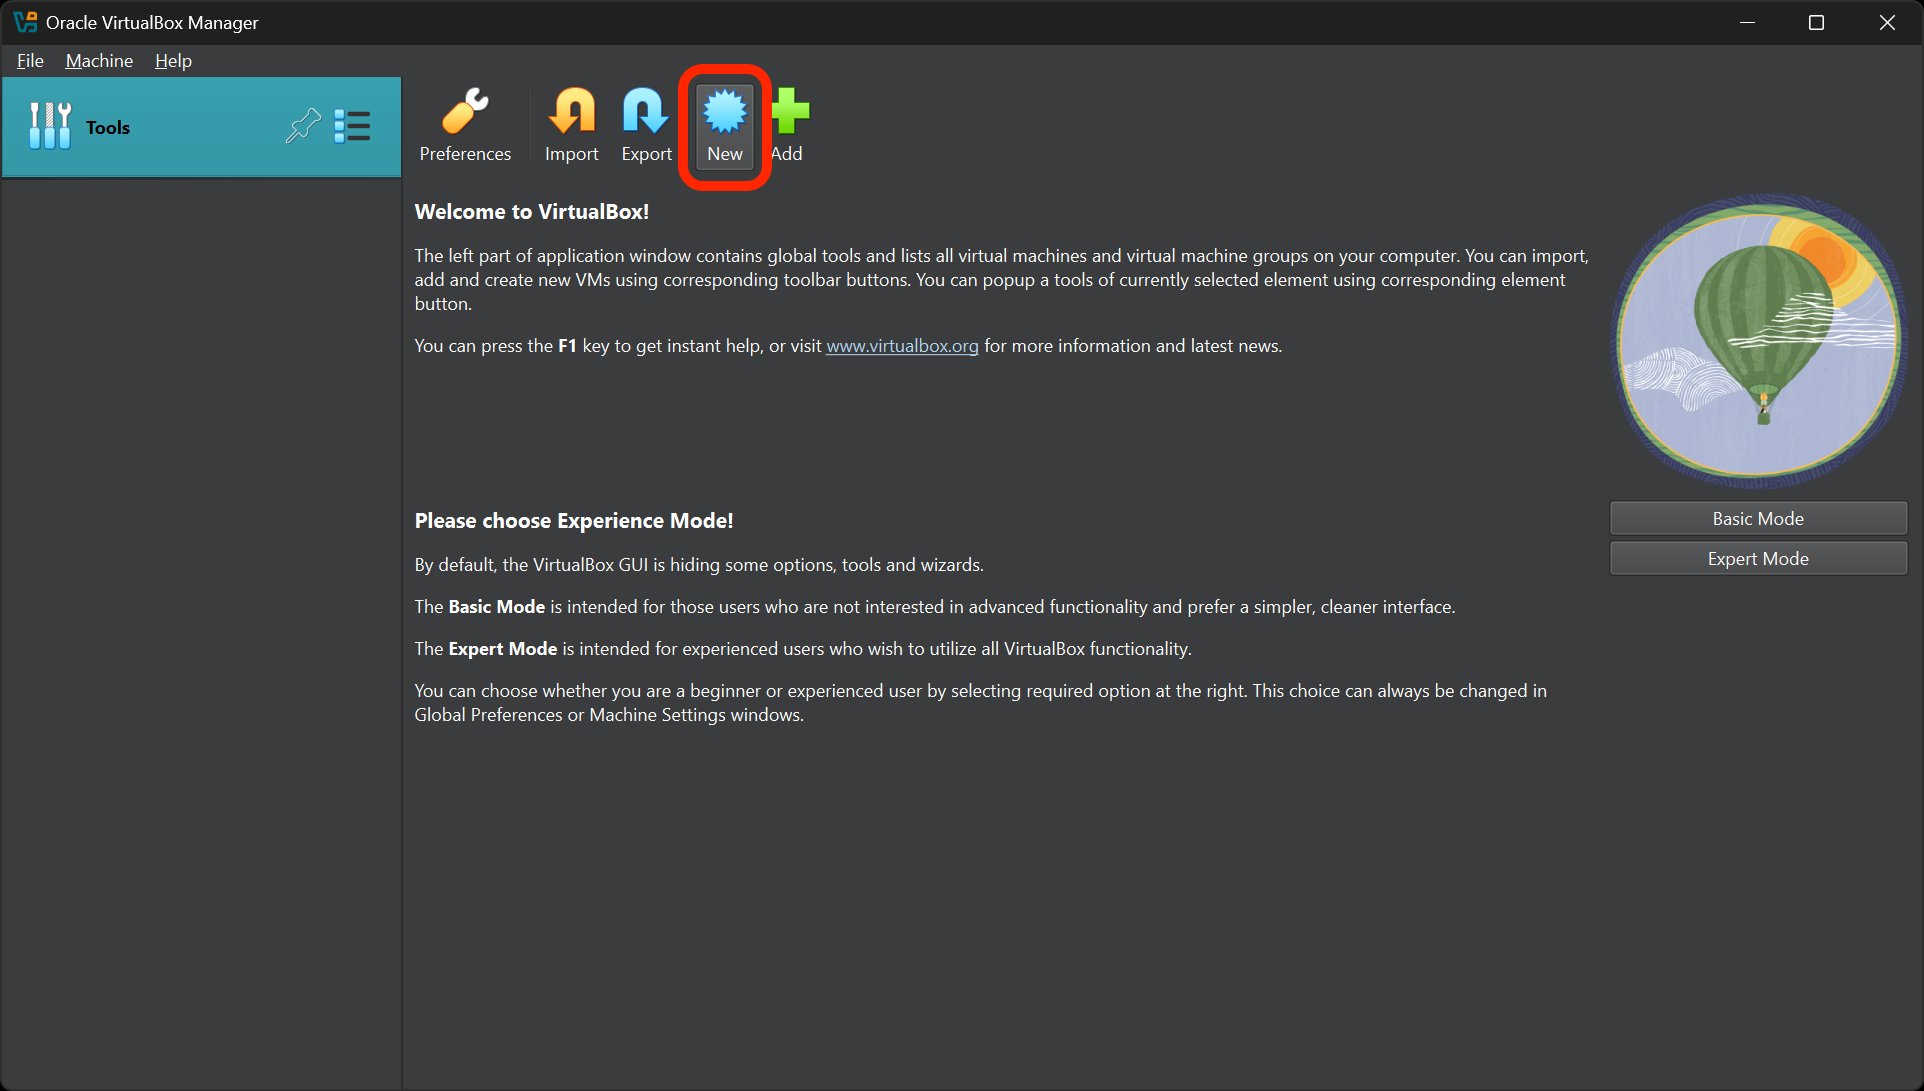
Open VirtualBox and select the New button to create a new VM.
-
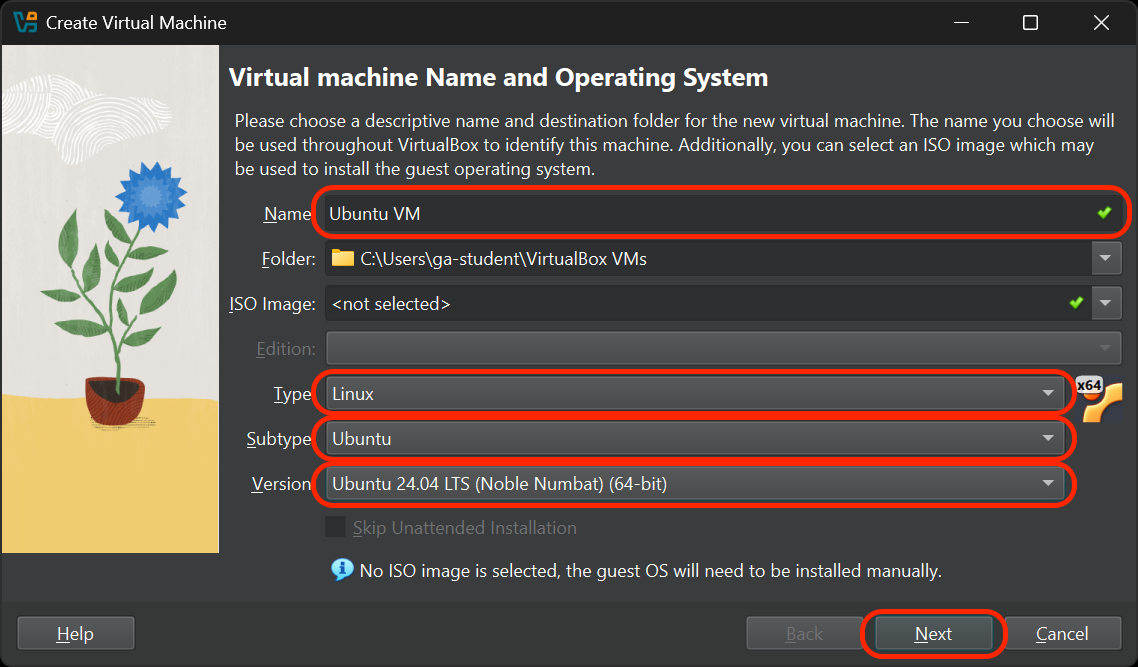
You’ll be taken to the Virtual machine Name and Operating System screen.
- Give it an appropriate name, such as Ubuntu VM.
- Choose Linux as the type.
- Choose Ubuntu as the subtype.
- Select the Ubuntu 24.04 LTS (Noble Numbat) 64-bit version unless you’re using an Apple Silicon Mac - then choose the Ubuntu 24.04 LTS (Noble Numbat) (ARM 64-bit) version.
- Confirm your selections, then select Next.
-
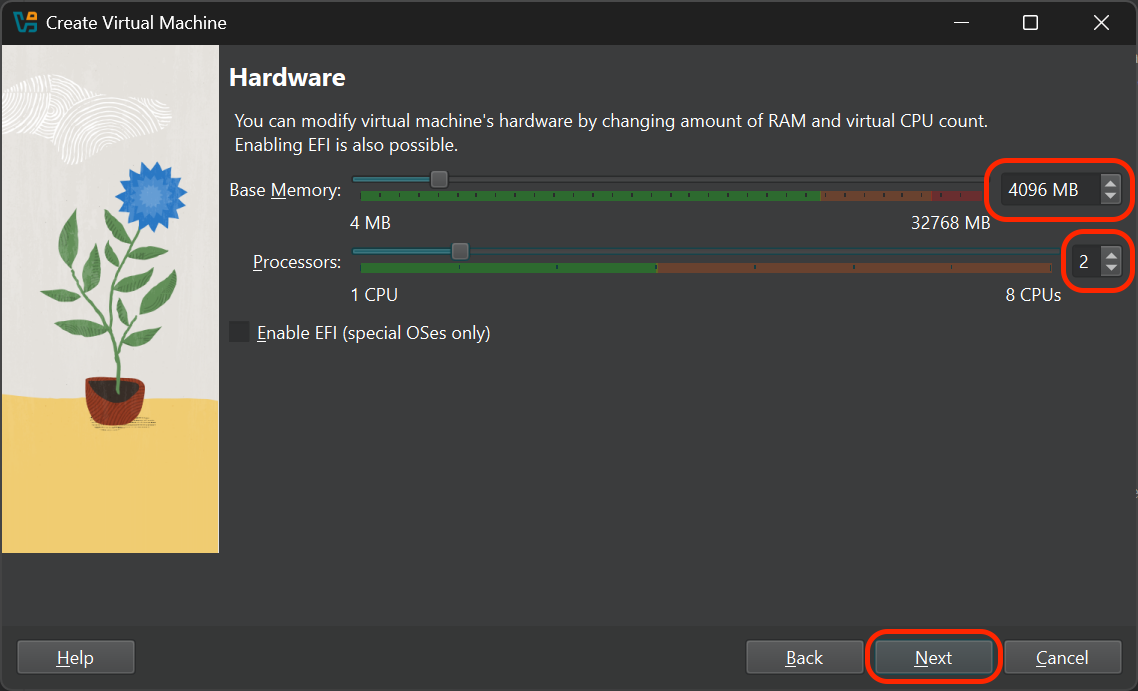
You’ll arrive at the Hardware screen.
- Allocate at least 2048 MB (2 GB) of RAM to your VM. 4096 MB (4 GB) of RAM or more is recommended for better performance.
- Allocate at least 1 CPU. 2 or more CPUs are recommended for better performance.
- Select Next.
-
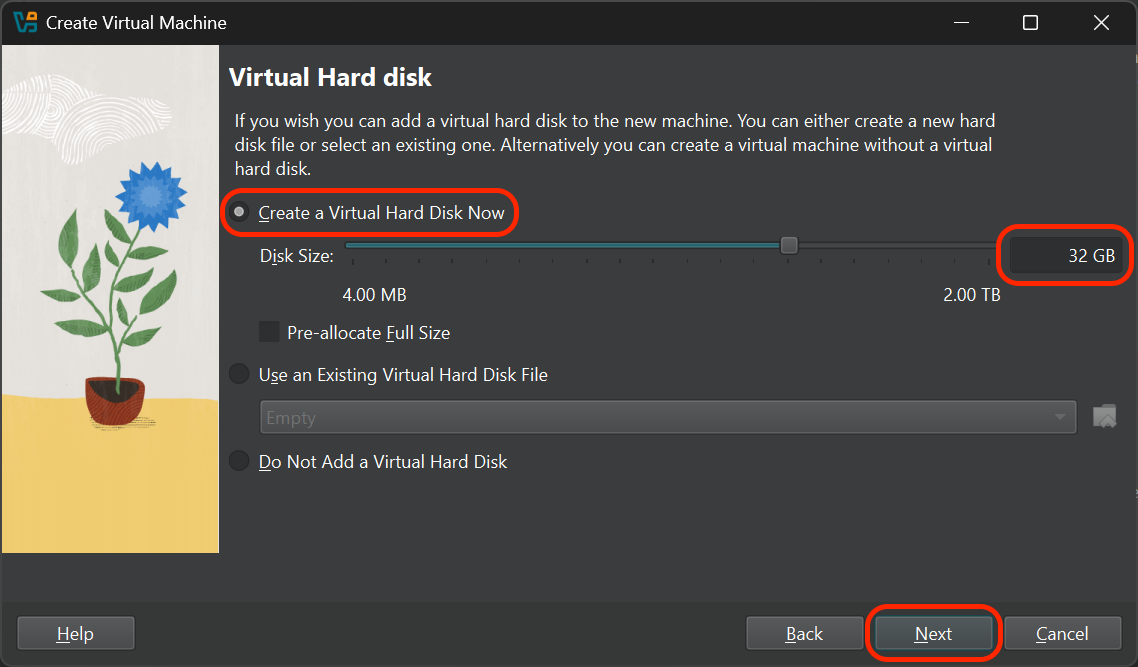
On the Virtual Hard disk screen:
- Choose the Create a Virtual Hard Disk now option.
- Specify the size of your virtual hard disk. For an Ubuntu VM, it’s typically recommended to allocate at least 32 GB, but you can complete this exercise by reserving as little as 12 GB.
- Select Next.
-
You’ll be taken to a Summary screen. Select the Finish button.
-
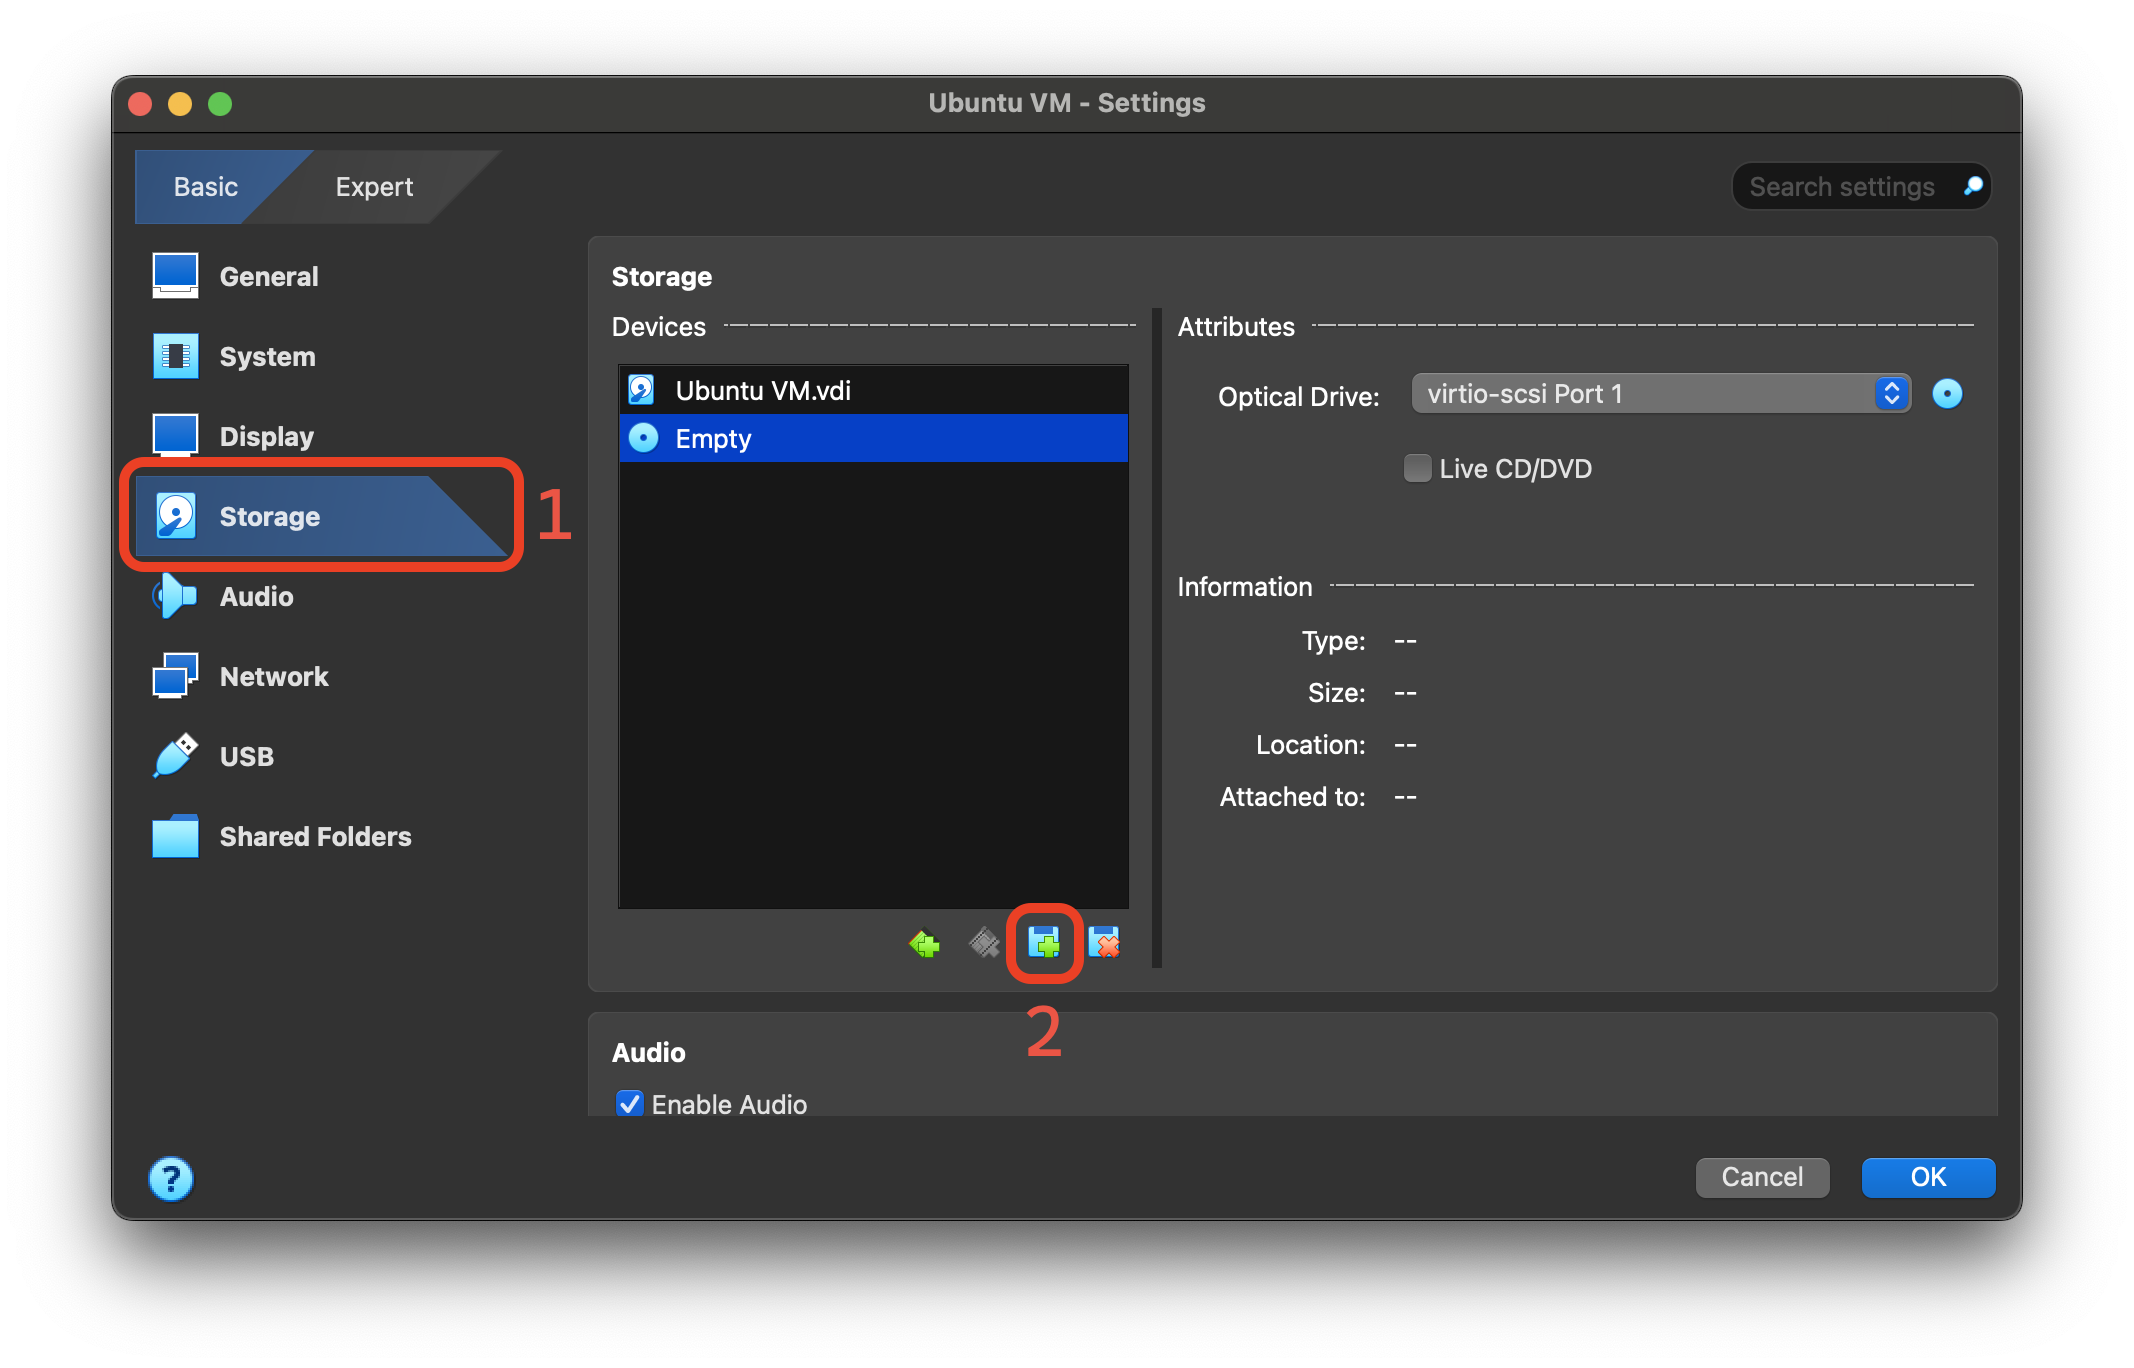
On macOS only: This is where we’ll use the ISO file you downloaded earlier (if it’s not done downloading yet, let it finish first). Select your VM in the VirtualBox Manager, and navigate to the VM’s Settings.
On the Storage tab, select the Add Attachment button and then select the Optical Disk option. In the new window, select the Add icon at the top of the window and choose the Ubuntu ISO you downloaded earlier. Finally, select the Choose button.
-
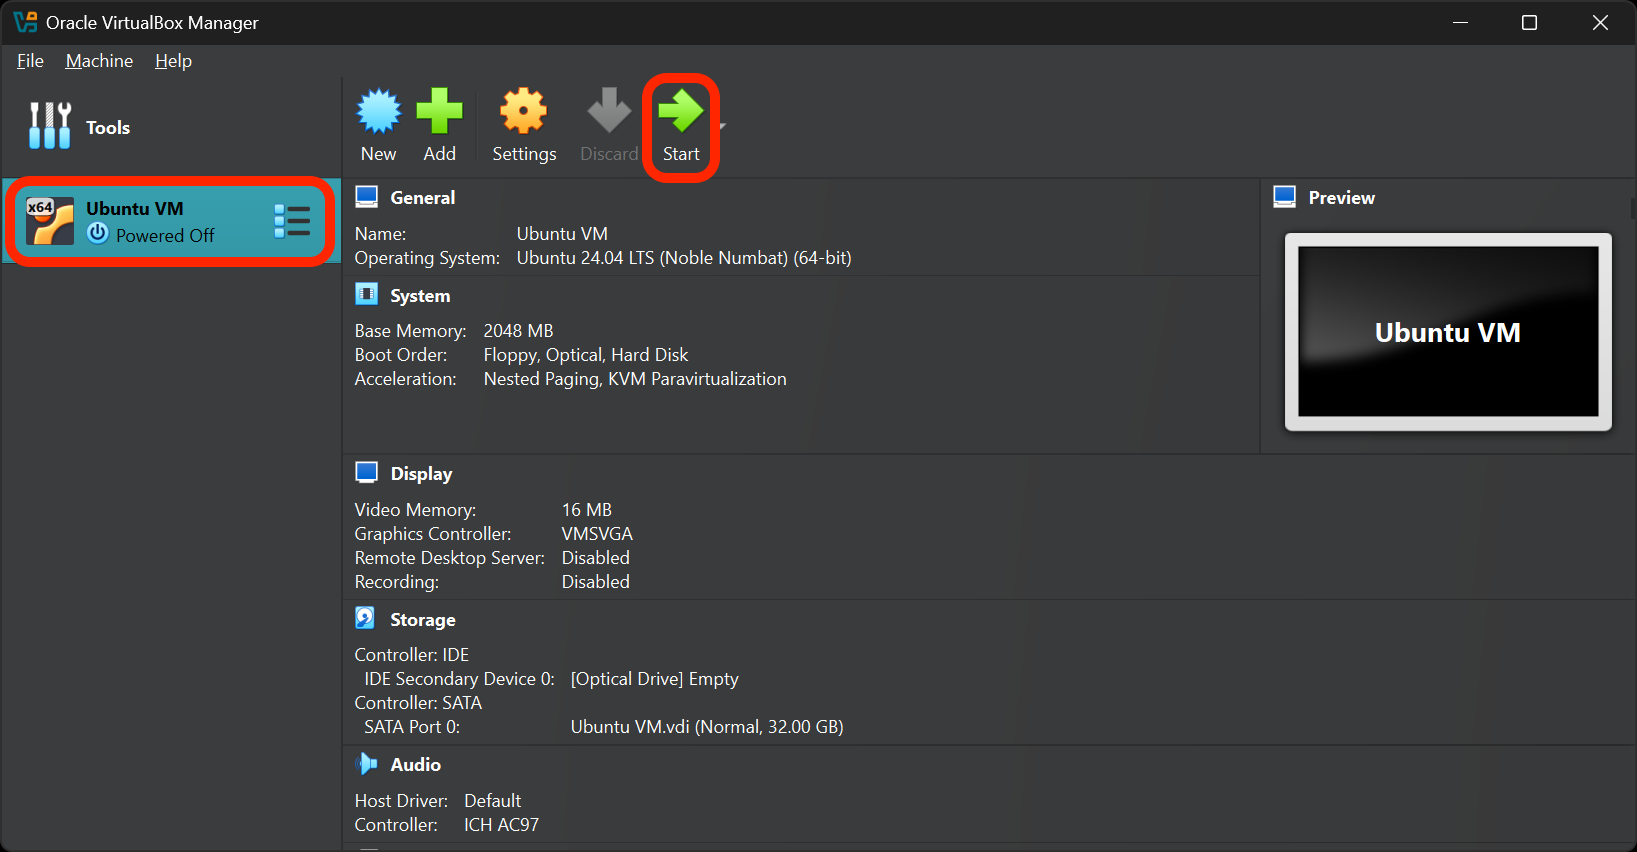
Your new VM should now appear in the VirtualBox Manager. Select it, and then select the Start button.
⚠️ On macOS, you may be prompted to allow VirtualBox to access your keystrokes. You’ll need to allow this and then restart VirtualBox for the changes to take effect. You’ll then be prompted to allow VirtualBox to control your computer. Allow this as well, and then restart VirtualBox again.
-
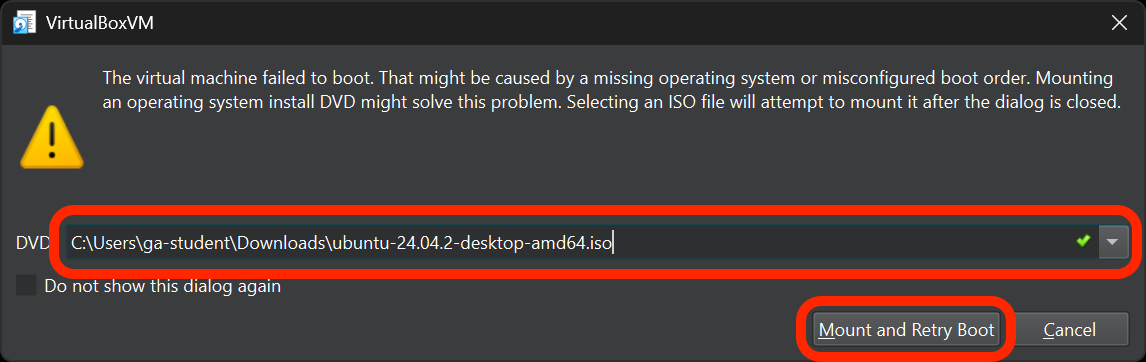
Windows and Linux only: VirtualBox will inform you that the VM failed to boot and ask you to mount an operating system install DVD. This is where we’ll use the ISO file you downloaded earlier (if it’s not done downloading yet, let it finish first). Choose the file path for the ISO file, then select the Mount and Retry Boot button.
-
VirtualBox will restart your VM. The Ubuntu installer should start automatically after you select the Try or Install Ubuntu option. Follow the on-screen instructions to complete the installation.
Reflection - VM installation
Answer these questions in your create-a-vm.md file in VS Code:
- What OS is your VM running?
- What challenges did you face while creating your VM? What troubleshooting steps did you take to resolve those challenges and what did you research?
- How much RAM and hard disk space did you allocate to your VM? Why did you choose these amounts?
- What do you think would happen if you allocated too much RAM to your VM?
Configuring your Ubuntu VM
-
Start your Ubuntu VM and wait for it to boot up.
We’re going to install the VirtualBox Guest Additions, which are tools that improve the performance and usability of your VM. To do that, we need to install a few packages from the Ubuntu repositories first.
-
Once you’re at the Ubuntu desktop, open Ubuntu’s Terminal application.
-
Run this command in the terminal to update your package list:
sudo apt update⚠️ This command will prompt you for your password. Type it in and press Enter. You won’t see any characters appear as you type your password, but it’s still being entered.
-
Run the following command in the terminal to install the required packages. You may be asked to provide your password again. Do so.
sudo apt install bzip2 build-essential gcc make perl dkms -
That installation will take a moment. Once it’s complete, reboot the virtual machine. You can use the handy
rebootcommand to do this if you’d like:reboot -
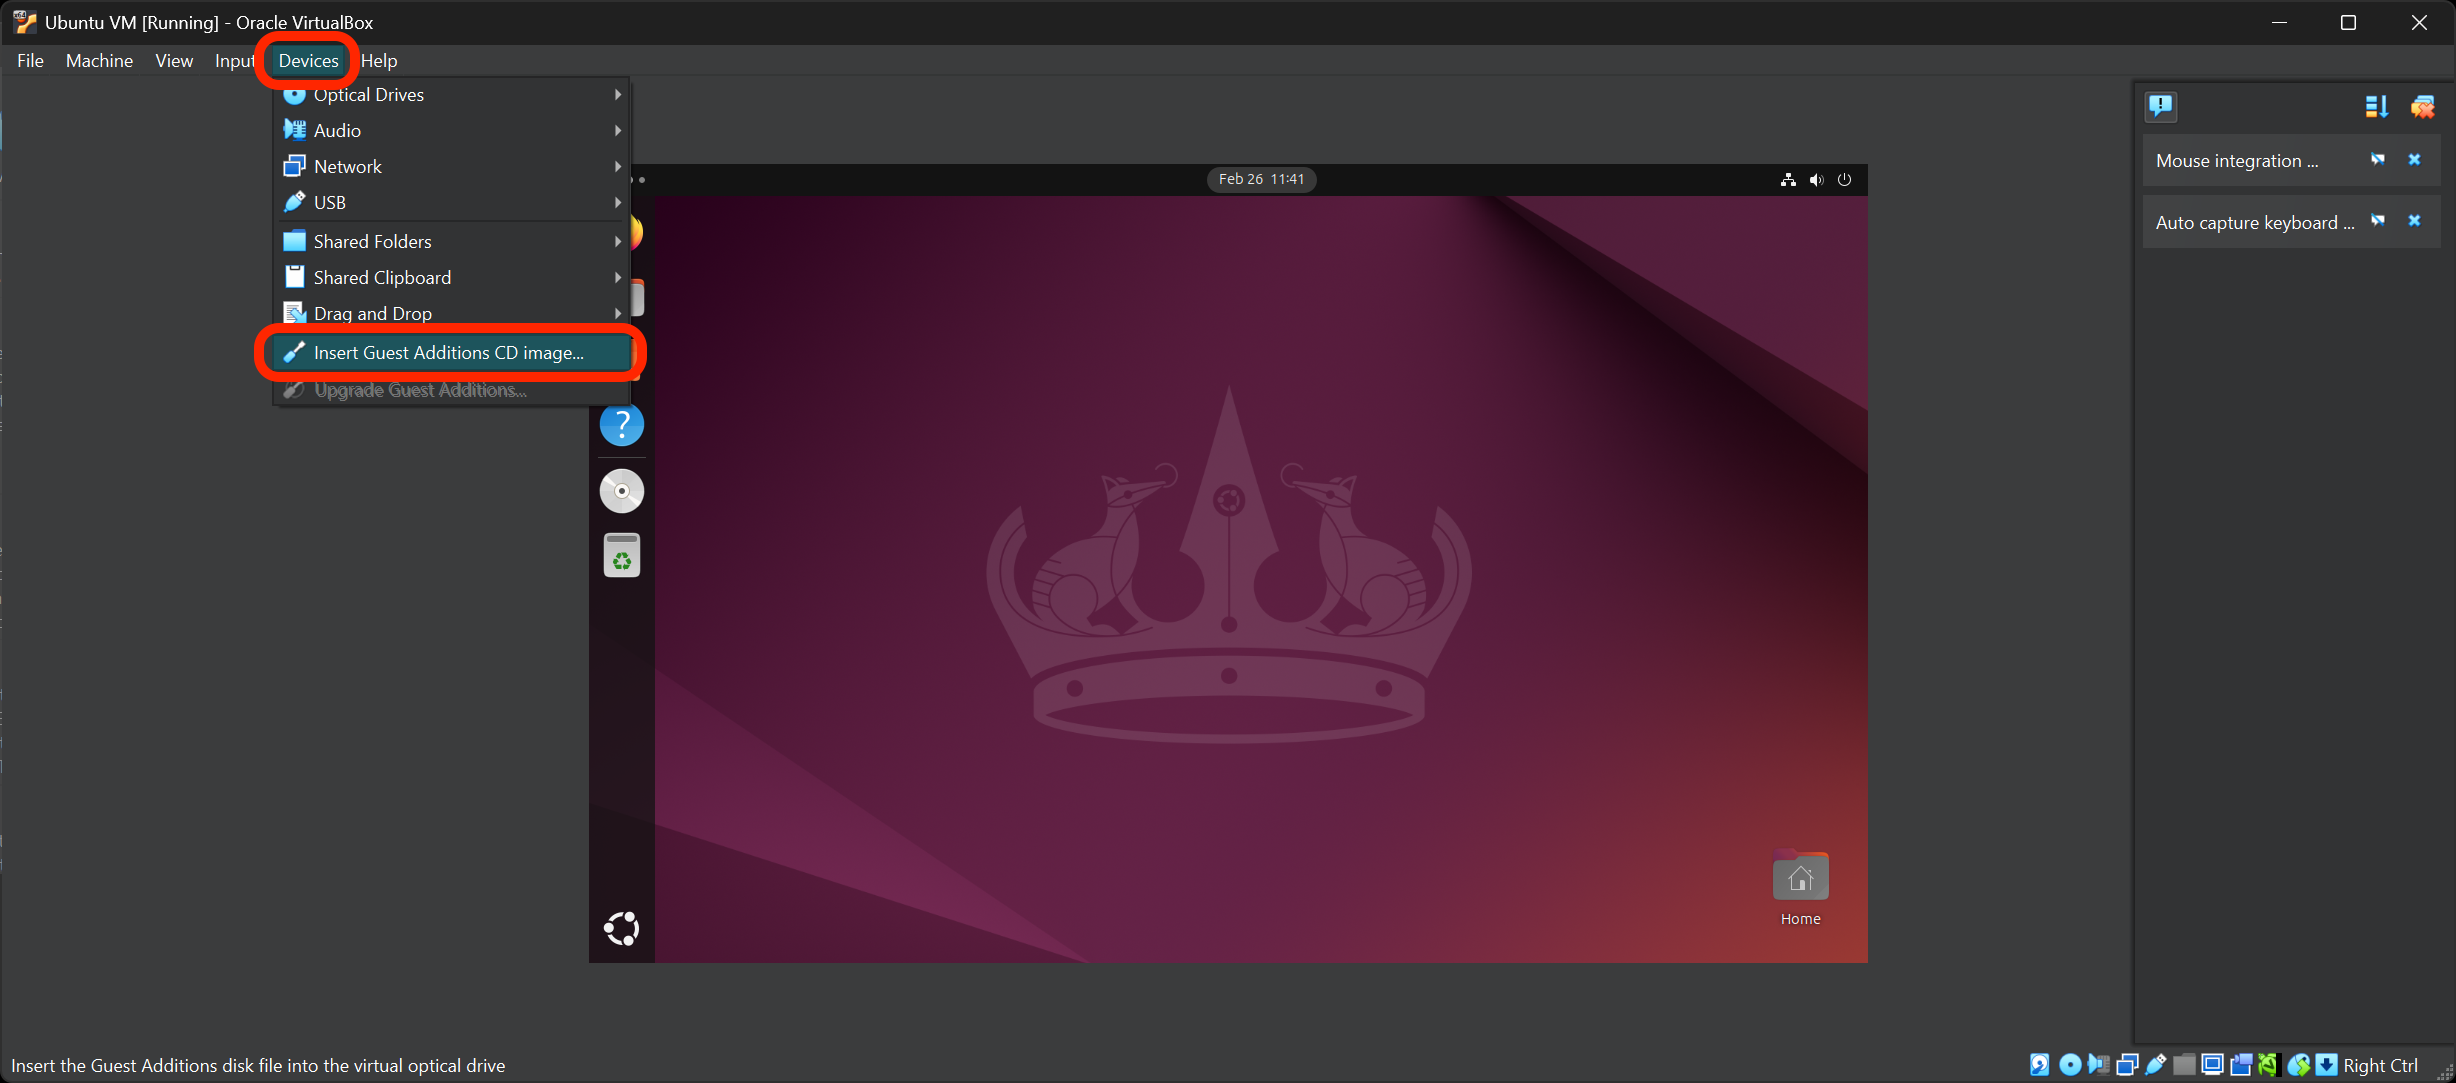
Once you’re at the Ubuntu desktop again, open the Devices option in the VirtualBox menu bar. Next, select the then Insert Guest Additions CD image option. This will mount a virtual CD containing the VirtualBox Guest Additions, which are tools that improve the performance and usability of your VM.
-
Open the Files app in your VM and navigate to the CD drive. Select the Run Software button towards the top of the window to run the software.
-
Follow the prompts to install the Guest Additions. The installation will take a moment and produce an output that looks similar to the following:
Verifying archive integrity...  100%   MD5 checksums are OK. All good.
Uncompressing VirtualBox 7.1.6 Guest Additions for Linux  100%
VirtualBox Guest Additions installer
Removing installed version 7.1.6 of VirtualBox Guest Additions...
update-initramfs: Generating /boot/initrd.img-6.11.0-17-generic
VirtualBox Guest Additions: Starting.
VirtualBox Guest Additions: Setting up modules
VirtualBox Guest Additions: Building the VirtualBox Guest Additions kernel
modules.  This may take a while.
VirtualBox Guest Additions: To build modules for other installed kernels, run
VirtualBox Guest Additions:   /sbin/rcvboxadd quicksetup <version>
VirtualBox Guest Additions: or
VirtualBox Guest Additions:   /sbin/rcvboxadd quicksetup all
VirtualBox Guest Additions: Building the modules for kernel 6.11.0-17-generic.
update-initramfs: Generating /boot/initrd.img-6.11.0-17-generic
Press Return to close this window...
Shut down your VM.
-
After you’ve shut down your VM, select your VM in the VirtualBox Manager, and navigate to the VM’s Settings.
-
Once in the Settings menu, you will need to enable 3D acceleration and allocate the maximum amount of video memory. You may need to do some research on the internet to discover how to do this.
-
Start your VM again. You should notice improved graphics performance.
-
After restarting, open the Devices option in the VirtualBox menu bar again. Then select Shared Clipboard and choose the Bidirectional option. This will allow you to copy and paste between your host and your VM.
Reflection - Configuring your Ubuntu VM
Answer these questions in your create-a-vm.md file in VS Code:
- What settings did you change and why?
- How did your VM perform before and after changing the settings?
- What other settings do you think could be important for optimizing a VM’s performance?